Monday, January 30, 2012

Right Leg: Too Straight in the Backswing?

A swing mistake that has caused me grief (left over from my S&T days) is straightening my right leg too much on the backswing. I had an outing once in Panama City, FL where I focused on keeping the right knee bend established at address into the backswing, and I had very good results throughout the round--fewer mishits and even more distance. As with anything in golf, inattention to one part of the swing can allow old habits to return.

Arnold Palmer
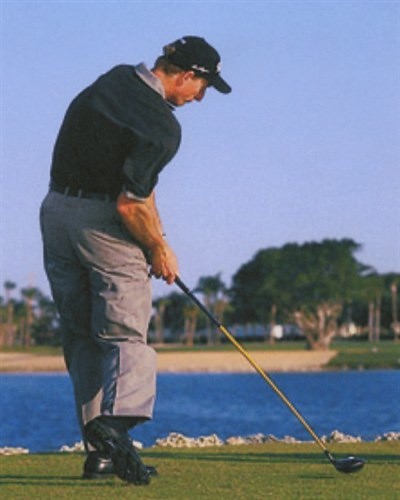
Note Palmer's Right Knee and Level Hips


I never completely straighten it now, but I occasionally (unconsciously) do it enough that it is changing the angle of my pelvis, which tilts the body left and causes a slight, unintentional reverse weight shift to the left. This requires a compensation on the way down which can lead to toe shots and other mishits. Obviously, straightening the right leg is desirable in S&T but not in a conventional swing.

To fight this, I like to feel like I'm sitting down (into my right hip) when I turn (see Paul Wilson's video below); in a way, it feels like I'm bending the knee more, when I'm actually just maintaining very close to the same bend I had at address (because I've been used to straightening it excessively). When performed correctly, the right hip moves straight back (not up or to the right) and feels very loaded and the pelvis feels very level--just turning, not tilting. The lower body feels very coiled, ready to unwind in its own flat plane, and capable of producing tremendous torque once you let it go. You will find no end of material on the internet that addresses this subject: keeping the bend in that right knee all the way through is important.

Properly executed, you can feel an unmanufactured, correct weight shift forward into the ball, where the weight goes from inside the right foot, first into the left big toe, and then around the outside of the left foot and into the left heel, just as many great golf instructors (like Hank Haney and David Leadbetter) teach.

This is one of those areas of golf instruction where there is debate among reputable teachers and professionals; new, popular swing methods require a straight or straighter right leg on the backswing. Examples of old golfing experts like Bobby Jones completely straightening the right leg on the backswing are used as proof for the validity of straightening the right leg. However, watching the video of Jones from behind, you'll notice that he regains the original address flex of his right leg during the downswing, well before impact. Many amateurs like me fail to execute this compensation, and instead, we straighten the left leg too much coming down to level the pelvis and end up catching the ball fat and thin; in essence, we're unitentionally "standing up" at impact. One avoids having to regain the right knee flex of the address position if one simply keeps the original bend--or close to it--in the right knee into the backswing; it is eliminating the need for a compensation.

There are, of course, a few words of caution. First, be wary of swaying. The right hip can feel loaded but still exhibit a sway, where the right hip moves rightward (away from the target) of its address position; if the right hip sways, the left shoulder will often tip towards the target. The right hip should move backwards while staying close to the same level during the backswing, never towards, over, or outside the right foot. The correct address position should form a "reverse K," meaning the right leg should be slanted away from the target at an angle that makes the entire address position of the body look like an inverse K.

A simple check: After address, place the club down the middle of your chest mimicking the spine without moving. If you are in the proper Reverse K position, the handle of the club will touch the inside of your left thigh. The position of the sternum should be behind the pelvis at address and all points during a standard full swing.

The right leg should really never move from this angle from the front-on view during the backswing; the right hip moves back ONLY (not up, down, or sideways). From the golfer's perspective, just focus on keeping the right hip inside the instep of the right foot at all times. The right leg braces against a firm left side, as Shawn Clement teaches. Your right leg, from your perspective looking down, should be angled outward to the right or away from the target--it shouldn't lose that angle while the right knee stays bent in the backswing.

Next, watch out for the tendency of the head to drop too much. The head SHOULD drop some on the backswing when correctly loading into the right leg; according to Jim McClean (video below), 70% of tour players drop their heads in the backswing some. Some professionals have so much lag that they drop even more on the downswing. Too much of a drop can happen if you're overzealous with focusing on keeping the bend of the right knee. You may unintentionally bend it more and drop the upper body too much into the right hip. This squat feeling definitely loads for power and torque but increases the chances of hitting fat behind the ball without enough compensatory action in the downswing. Be especially careful when hitting the driver; it's better to keep a very steady and somewhat level head when using longer clubs. Will the head move? Yes. But steady is better with the driver for most amateurs. Just be wary of going to far; anything in golf can be taken too far.

If you rotate properly into your right hip, your hips should remain level, allowing you to make a downswing that is on plane, and compresses the golf ball.If you’re like me, you may slide off the ball during the takeaway, then your right hip gets higher than your left at the top of your swing, causing you to come up, and back out of the shot to even make contact with the ball. If you hit thin shots, off the toe, you may be making this mistake.
[From Correct Hip Movement In The Golf Swing]
Although a full shoulder turn is vital to a powerful golf swing, be sure not to compromise one key fundamental: right knee flex (for right-handed golfers).The role of the right knee in the backswing is very simple, but incredibly important. The importance of the flex in the right knee is undeniable. The flex in the right knee helps keep the hips more level in the backswing. If the right knee straightens, it pushes the right hip up and consequently the left hip down resulting in too much left-hip tilt in the backswing.***Another key reason to keep the right knee flexed is how it is used in your transition into your downswing. Your right knee is a key source of driving power of your lower body in the downswing. It's very difficult to drive off a straightened right leg in the transition. Therefore, the upper body tends to dominate the downswing resulting in poor swing plane and loss of power.
[From Looking for a way to make your golf swing more repeatable? Remember knee flex]
There are many important facets to a good golf swing, but maintaining the bend in the right knee is one that simply can’t be overlooked. When a student comes to me with a common complaint (slicing, poor ballstriking or a general lack of consistency), I always take a close look at his or her body angles, and make certain that their posture and knee position are constant throughout the swing.
[From Golf Tips - Maintain The Bend]
Here is another great swing thought - and one that is inter-related with that idea of turning the Right Pocket Back. Maintaining a level belt line as you turn your shoulders and upper body allows your weight to go fully on o the right heel, which gives you more time to fully wind and unwind your swing for maximum clubhead speed.There's nothing worse than seeing a golfer with a short, quick swing which chops down on the ball. And the last thing you want is a tilted belt line, like this above, where the right hip/right pocket is very high and the weight hangs on the left side.
[From What the pros do - Robert Baker]
Other tips to increase power in your golf swing: Flex the back knee during the backswing: Keeping your back knee flexed during the backswing does two things. First, it restricts your hip turn so you can coil your upper body (the upper body continues to turn against your hips), this builds energy in the backswing. Next, it allows you to drive your weight off your back foot during the down swing so you can release the club head through the impact area.
[From Golf tip: Remember, in your backswing, width equals power - GolfInstruction.com]
If you’ve been struggling with consistency, and you find yourself hitting thin, fat, and even topped golf shots, I want you to pay attention to what your right knee is doing in your backswing.Many times a golfer will either straighten the right knee in the backswing, or let it move to the side (away from the target), which results in a sway off the ball. This may seem like a minor issued in your swing, but let me tell you from firsthand experience, it WILL cause many faults in your swing unless you fix it right now!
The Role Of The Right Knee In Your Backswing
If and when the right knee flex is lost, as is the case with so many amateur swings, weight is thrown from the right side back to the left (reverse pivot). That’s a big no-no. Second, straightening the knee moves the backswing plane to the inside, which can lead to all kinds of downswing misery. Third, losing the right knee flex gives your lower body too much room to turn, in addition to allowing it to sway away from the ball on the backswing. As a result, you lose all of your coil. Potential energy is nil, and all you’re left with power-wise is what you can generate by moving your arms as fast as you can back down to the ball. It’s an unleveraged motion that’s both weak and inconsistent and certainly no part of a successful swing.As far as maintaining flex, I advise my students to preset a solid, bent right knee. This preset goes beyond simply flexing the knee and holding it there. At address, and without lifting your right foot, bend in your right knee slightly, like you’re trying to point your kneecap at the golf ball. It’s just a slight kick in to the right.
The Key Ingredient | GolfTipsMag.com
All-time golf great Jack Nicklaus believes a player’s knee action is important to a proper backswing. As you take the club back the front knee should move forward and to the right (for a right-handed player) to allow your hips to rotate properly. At the same time, the back knee should remain stiff to brace the right leg and prevent your body from sliding to the right. When your back leg remains firm during the backswing, "the body is coiling like a spring around the knee," Nicklaus says.Tiger Woods says if you slide your right hip outside of your right foot "you’ve cut your power by about 50 percent." Woods focuses on keeping his weight over the inside of his right foot during his backswing while keeping the angle of his right leg steady.
Coiling In the Backswing | Golfsmith
The key to achieving this effortless backswing is keeping the spine angle you establish at address a constant. The spine angle and right-knee bend are closely related, and it’s necessary to maintain both angles for a solid golf swing.
Maintain The Bend | GolfTipsMag.com
The way you will know that you start the backswing properly in the lower body is that there will be tension in between your right thigh and right hip flexor.
Golf Lessons 101: Knee Action Basics | Golf Lessons 101
Recently, I was working with a student (we will call him Allen) on this very move and I noticed that his rear leg was straightening in his backswing. I have seen this before in golfers and this error can cause a number of swing errors like reverse pivoting, or can cause you to top the ball or hit it thin. Often I will try to create a swing error with my own body to help me to feel what the student is feeling which allows me to explain why a particular problem is occurring. As I made a backswing and straightened my right leg, as my student did, I noticed that I had no way of pushing off my back side to move my hips through. Allen had no way of rotating his left hip backwards because he couldn’t push-off his right side.
The Right Knee and my Upcoming Article | Guru's Golf Blog
Most players never load their butt muscles during the swing properly. In fact, many golfers straighten or lock the right knee completely before they even finish their backswing. If you straighten up during this phase, it causes an "over the top" move so common to amateurs and saps all the power from the trunk or core muscles. Ideally, you should maintain a slight knee flex at the top of your golf swing or think of maintaining the same knee flex that you started with at the address posture. This should feel like a semi squat.
Unlock Your Power


Use Chalk During Practice

If you're like me and have a net in your garage for practice when the mood strikes you (or when it's freezing outside), here's a little trick that will determine your likely club face direction and even clue you to the path upon which you're swinging and thus determine whether the ball likely would have faded or drew (not all of us can afford one of those fancy-shmanzy OptiShot style simulators).

Take some chalk (I recommend colored chalk designed for kids to use outdoors) and rub it all over the face of your club (you can also use masking tape or other materials designed for this purpose). Now hit a ball into your net. You should see a nice impact spot somewhere on the club face. If it's in the middle…you've just pulled of a great shot (if the path of the club head was correct - see D-Plane). Pay attention to the blur of the arc down at the bottom of your swing for the other piece of information; if you're swinging inside-out (like you should be most of the time) then you needn't worry over this variable. However, the position of impact on the club face can clue you to the path you're swinging on as well.

More likely, you'll see an impact spot near the toe. Slicers (most golfers who swing outside-in for various reasons--i.e., chicken winging, coming out of posture, etc.) will tend to hit towards the toe, because that's a typical condition of an open club face and outside-in motion. Toe impacts tend to worsen a slice, because the club head will open slightly at impact. Hookers (golfers, not streetwalkers) will tend to hit towards the heel, due to the club face closing through impact and the inside-out motion. Heel impacts serve to close the face even more. Sometimes, the club face is so closed that a shank occurs, and the ball will shoot low and right or run along the ground straight (making you think you topped the ball)!

Where you address the ball on the club face can also affect the mark. It's technically correct to address the ball more towards the toe if you prefer to rest the club on the ground behind the ball (i.e., instead of hovering it), as centrifugal force will pull the club slightly away from your body on the downswing. If you suddenly see your practice shots go low and dramatically right, you're probably shanking off the heel. Use chalk to verify this and then adjust your address position accordingly: Address the ball towards the toe and see what happens to the mark. Note: This assumes you address the ball with the arms naturally hanging; if you vary the extension of your arms towards the ball then this is a variable that will negate learning where you typically impact the club face; work to ensure you address the ball with the same posture and arm position each time!

You may discover that the difference in the club and stroke imparts varying impact points on the club face, depending on the manner in which you stroke the ball. For example, I need to address irons more off the toe to get closer to the center, while woods require me to address closer to the heel (even hovering the club). The reason, I believe, is that irons (shorter clubs) require more of a downward blow, while woods and drivers utilize more of a sweeping action.

However, if you start seeing your ball marks move from the toe towards the heel, it's a GOOD THING. It means that you're learning to keep your extension, swing inside-out, and close the club face…ingredients needed for the draw. As a matter of fact, making changes to achieve an opposite result in golf is usually a good drill (e.g., if you sliced during a round, stop at the range and hit balls until you're hooking it).

Since the club is pulling in towards you, the ball is struck with a glancing blow and on the toe of the club resulting in a slice that doesn't go very far. Does this sound familiar? It is a very common fault, so here is a three-part drill to get you on your way to correcting the problem.

[From Get hip to drive the ball farther - Tips at GolfInstruction.com]

Most golfers think the shank and its violent, clanky offline flight are caused by an open clubface. However that is almost NEVER the case. In fact for most golfers the face is actually closed when the ball makes contact with the neck or hosel. The ball first contacts the rounded, angled portion of the inside of the neck and starts flying offline before any true contact with the flat clubface can be made.

[From Stop Shanking the Golf Ball – Herman Williams Golf Instruction]

Third, check your clubface. If the golf ball leaves an imprint on the inside part of your clubface (near the hosel), then you have most likely hit the ball from inside-out. If the imprint is on the outside of the clubface (near the toe), then you have most likely hit the ball from outside-in.

[From Golf Tips – How to Swing That Golf Ball From Inside Out! | ProgolferDigest]


Sunday, January 29, 2012

Let the Hips Drive the Swing

Going "hand-in-hand" with the idea of finding the "slot" by making a "reverse loop" downswing, the golfer should fire the hips forward to get the required power. The feeling I have is that my right hip leads my arms into impact, while the arms make ZERO muscle movements once set at the top of the backswing (they simply fall and rotate out due to momentum of the lower body). Both butt cheeks should be visible from DTL at impact due to this hip rotation (most beginning golfers commit the error of returning the hips to the address position).

Another thought is to use is to think of the knees, which may cause less problems than concentrating on the hips. If the swing is driven from the ground up (as we've heard countless times), the knees should turn and drive towards the target first while the upper body stays back. The hips and everything else will follow in sequence. Consider the footage below of Rory McIlroy. Pay attention to his knees at the top of the backswing and then as he transitions into the downswing; the knees move around and towards the target first and everything else follows. This also helps keep his head behind the ball and prevents too early a weight shift.

All of the golfers that can hit the ball a long way have one thing in common. They are firing their hips around on the downswing. Another common fault I see in teaching is the student's hips not being open enough at impact. GolfTEC's motion analysis computer measures how many degrees the hips have turned open (towards the target) at the impact position.

[From Get hip to drive the ball farther - Tips at GolfInstruction.com]

Here are some swing thoughts that a handful of my students think of when trying to turn the hips more through impact.

"Fire the right hip around."
"Fire the right knee towards the left knee."
"Get my left leg straight and left hip turned behind me"
"Get my right pocket turned to the ball as soon as possible."
"Turn my belt buckle towards the target"
"Hit the ball with my right hip."

[From Get hip to drive the ball farther - Tips at GolfInstruction.com]

Exaggerate the hip rotation for a fade and hold off the forearm rotation by tightening the grip.

I call it "holding off the shot." I'm keeping my arms quiet with far less forearm rotation and delaying the closing of the clubface. I think of it as squaring the face with my body rotation. You can see here my hips have turned significantly toward the target before the club has reached the ball. That's a good fade feel for me.

[From Adam Scott: Steal My Feel: Golf Digest]

Consider the images below of Mattero Mannasero and Jim Furyk. Both use a reversed loop downswing to hit from the inside, and look at how open their hips are at impact. The right hip clearly leads them into the ball, much like Ben Hogan's timeless swing.

Jim Furyk Downswing Matteo Mannasero Downswing

Friday, January 27, 2012

Pitching a Fit

Anthony Kim Pitch

The short game has been the bane of my existence (as it is for most amateur golfers). I've struggled with the long game too, but I can at least ADVANCE the ball to within pitching distance. But nothing is more humiliating than to be 50 yards from the green and take a big divot BEHIND the ball and have it go nowhere. Blading or pulling the pitch are just as bad.

I've made some short game strides recently with putting, chipping, and pitching. My pitching and greenside bunker goals are basic: clean contact and hit the green.

A pitch is like a shorter full swing or a longer chip (with a little wrist action); the backswing of a pitch should be like the full swing (vary the length of backswing and followthrough for the length of shot being attempted). A pitch shot is also somewhat like a greenside bunker shot, except the pitch swing might be less vigorous for the same required distance (many of the tips below apply to greenside bunkers). The arms still must stay in front of the body, but they don't travel as high (if they go higher than 9-o'clock you're really probably hitting a full wedge shot).

  • Posture is EXTREMELY important; don't setup with an arched upper back and drooping shoulders. Keep a good spine angle with the shoulders back as you would for a full shot. Either bend the knees more or use a more narrow stance to maintain the correct posture
  • Open the club face (a little for lower trajectory more for higher trajectory) BEFORE taking your grip; use the bounce…not the leading edge (consider the photo of Anthony Kim's club face--the club has not turned over as in a draw shot); increases margin for error and adds loft to the club
  • Go with a neutral to weak grip (grip more in the palm of the left hand with the back of the left hand facing the target, and maybe turn the right hand over the top of the club a bit more); you want to prevent opening and closing the club face and digging at impact--now you're using the BOUNCE of the wedge to glide along the grass and that provides some margin for error--don't use the leading edge (same for bunker shots) unless you have a buried lie
  • Grip down on the club ONLY for added control and feel (I use the middle of the grip); gripping down reduces the length of the shot, but use shot length to do this instead
  • Use a tension-free swing and feel the weight of the club; think of swinging a weighted rope
  • Always consider the lie--if it's tight then consider a chip if there are no obstacles
  • Open the stance a little as you open the club face; the weight can be a little more to the left instep; don't shift much going back; turn the left foot out more and make the right foot more perpendicular
  • At address, ground the club behind the ball ensuring the arms are straight and elbows close together; then and only then should you raise the upper body slightly to HOVER the club just above the ground and behind the ball; this helps ensure a downward blow and helps avoid fat shots
  • Ball positioned well forward (really exaggerate this--especially in a greenside bunker); position the ball off your big toe but set up as if the the ball is in the middle of your stance; you'll think there's no way you'll hit a good shot but WRONG; play ball back a little more for increased spin and lower flight (ball will run more)
  • Favor the left leg by pressing into it at address; on the backswing, avoid any great shift into the right leg
  • Use a shallow, U-shaped swing (unless the lie is buried--then use V-shape)
  • Think of using a longer takeaway; try to keep the butt end of the club pointing at the belt buckle on the backswing
  • Set and hold the wrists on the backswing and into impact; use body rotation (think of turning the belt buckle towards the target and letting the arms chase)
  • USE THE RIGHT HAND TO PITCH: Think of it as an underhanded throwing motion; the key is to set the wrists and leave them that way through impact--this means the left wrist will be flat but facing the sky during the follow-through, and the right wrist will remain slightly bent back through impact; the more the right palm faces the sky on the followthrough, the more loft that was added--back off from this to flight the ball down (Lanny Watkins); this is especially important for flop shots
  • Follow through more around the body instead of down the line, swinging more to the inside after impact; the arm motion should circle around to your left hip on the followthrough
  • Make certain to come through with the right shoulder!
  • The club will often finish in a verticle position with a slight left arm chickenwing
  • Brush the grass in your practice swings; feel relaxed during the motion; the club head should not dig
  • Accelerate -- don't start fast and finish slow (do the opposite)
  • Turn through and complete the finish (let the right foot come up)
  • Watch the ball disappear before looking up! ALWAYS, ALWAYS avoid looking up too early (on all short game shots). This is the first thing to verify if chipping, pitching, and putting go awry. Keep looking down until the club makes ball contact!
  • Let the finish mirror the backswing (higher for higher trajectory; lower for lower trajectory)
  • For higher shots (lobs) and bunker shots with a high lip, take a wider stance and bend the knees more

When you swing the golf club back the most important aspect of pitching a golf ball, besides for using a sand wedge, is that you open the clubface and you do it with your right wrist more in the open position as opposed to bent back. You don’t need a lot of wrist cock, but you do need to feel that the right wrist is more in an open position, one that will give you loft when you come into the shot. So if you have trouble pitching the golf ball chances are that you bend your right wrist back and take the club to far back into the inside. Open the right wrist as you go back, not a lot of wrist cock, but keeping the club out in front of you with your right wrist more in an open position will make it so much easier for you to pitch the golf ball up in the air and onto the green. Open that right wrist and just let the club slide underneath the ball.

[From Video Golf Tip | Getting a Pitch Airborne]

You don’t have to have a wrist cock in your pitch shot. Watch Steve Stricker hit his pitch shots the next time he is on TV in a PGA tournament. He sets up with an open stance and open clubface but does not have a wrist cock. His club opens and closes to the target line as his arms swing on plane around his body but he avoids wrist action. This method requires a larger swing but I believe it is the easiest method for most golfers to perfect.

[From Golf Instruction by Scott Erwin » The Basic Pitch Shot]

You should feel like your hands are in almost the same relationship to your sternum as they were at address; in other words, a “one-piece” takeaway. The wrists set slightly, but do not make a significant change in angle from where they were at address.

[From Mastering The Basic Pitch Shot]

The big thing for me on pitch shots is getting the clubhead swinging and letting that move my body, not the other way around. I start with the ball slightly forward and my hands centered in front of me. I also play the face a little open for all my pitch shots. Then I hinge the club upward going back, not around my body, with the toe pointing to the sky. Coming down, the club should unhinge the same way it went back (left). I want to feel it swinging down and through. The momentum of the club pulls my body to the finish.

[From Luke Donald: Do's & Don'ts of the Short Game: Golf Digest]

A feeling to key in on is the sense of swinging to the inside after impact (as pictured below). Be sure to keep the face open or looking up while the club tracks to the inside as this will prevent the leading edge from digging.

[From Open Face | Andrew Rice Golf]

One of the ways that the professional golfers add speed to the pitch shot is that they weaken their grip. Their right hand comes to a weaker position on the golf club. This means that the ‘V’ shape that your index finger and thumb make will be pointed towards your left shoulder. This will feel very strange at first. This will allow you to accelerate through the shot and will stop you from closing the club face through the shot. Having the weak grip will help you to open the blade in the back swing (remember, this is only for the pitch shot) and will also allow your to release the club at speed without closing the face of the club at impact.

[From Golf Pitch Shot, Golf Pitching, Golf Swing Basics, Tips]

This is the "brushing of the grass." Take a few practice swings and brush the grass each time. Notice how easy it is if you are relaxed and not "gripping the devil" out of the club. Go back and forth and back and forth like a metronome.

[From GOLF TIP - The 20 to 40 Yard Pitch Shot]

As in chipping, a lot of amateurs play pitches with the ball too far back, causing the leading edge to dig at impact. The pitch is like the sand shot, except you don't swing as hard. Play the ball about middle, and keep your weight slightly forward. The club's bounce should graze the grass the way it slides under the ball in the sand. This is more forgiving than playing the ball back, because the club can actually hit the ground behind the ball and still slide through

[From Zander Golf - Breaking 100 - Don't lean too far left on chip shots]

Try to get the ball up in the air, with a slight cut action and have it land softly. This will give you the sense of keeping the face open and using the bounce of the club correctly. It will also prevent the wrists from being overly active. A feeling to key in on is the sense of swinging to the inside after impact

[From Leading Edge Digs | Andrew Rice Golf]


Tuesday, January 24, 2012

Reverse the Loop

I recently took a few online video lessons with Hank Haney's cadre of instructors and learned some really good information. First (probably left over from my S&T days), I tended to be a little upright in my swing plane and I took the club inside, which caused a slight over-the-top move with an opening club face through impact and a nasty push-slice. Yes, I managed to get some in-to-out motion occasionally with that steeper inside swing and occasionally drew the ball as I intended, but I also hit more than my share of straight-slices, pushes, push-slices, and even pull hooks. Why the hooks? Because in addition to trying to force in-to-out motion using a steep approach, I was having to make manipulations with my hands and forearms to try to square the club face (or use a stronger grip which doesn't feel natural to me). When I didn't hit the ball fat, my divots on the target side of the ball were always DEEP…too deep, starting shallow but ending an inch or two down into the turf.

I knew about all of the positions I was told I should be in, and I would always get confused by the instructors who would contradict each other--some saying those positions happened naturally and some saying they had to be conscious thoughts. You've heard about these positions and characteristics of a good swing before (i.e., flat left wrist at impact, rolling forearms, retained lag, foreword leaning shaft, retracing the backswing plane with the downswing plane, etc.).

So, during a recent 9-hole practice round, I decided to copy some advice I heard Hank Haney give several of his famous pupils on The Haney Project who suffered from some of my identical mistakes: Learn to reverse the OTT loop--take the club back slightly OUTSIDE the line and then come UNDER the plane with the club head on the downswing. This move gets the golfer approaching more naturally from the inside on a shallower downswing plane. The feeling that I had was that my hands and right elbow were dropping towards my right hip with the hips leading (the club dropping slightly behind me and flattening); the club made a shallow arc when in the vicinity of the ball. I could feel slight tension in my grip and left forearm, as it rotated and squared the club into impact; the feeling I could best associate with this is like closing a gate with the back of my left arm. The club stayed in the middle of my body, even into the followthrough. My divots shallowed out and my contact was better. I was drawing my 3-hybrid and 4-iron and the ball was launched on line!!! And the real test? I left with the same two balls with which I started! I usually push-sliced the devil out of that 4-iron, sometimes ending up 30 yards right of my target or out of bounds. Let's not even discuss the driver, which I would usually push, push-slice, or hook into trouble. Occasionally, I would get a low draw that would put me in the fairway, but with no real distance.

In reality, what's causing the hands and elbow to drop towards the right hip is FEELING THE WEIGHT OF THE CLUB HEAD FALLING BEHIND ME, making a loop (see Jim McClean's video below on the slot swing). And all of this means that the RIGHT SHOULDER IS ACTUALLY DIPPING DOWN while the back is still turned to the ball. All of this creates a Figure-8 oval shape with the club head. Keeping a loose grip at this stage of the swing really helps to feel the weight of the club head, and this also means that the transition from backswing to downswing feels more continuous (i.e., no real pause in the motion).

I also should add another important point I got from my online lesson; the instructor noticed that I set my wrists late and suggested that I set them earlier to increase my lag. So I work to set my wrists once the club passes above my waist, and this seems to work really great along with dropping the club head and reversing the loop. Also important: 90-deg shoulder turn. Getting a full 90-deg really helps with getting an inside swing path (in a sense, it helps automate the loop).

I have focused on this halfway-back position via what's become known as an 'early wrist set'. It's quite simple: I look for my wrists to be fully hinged and the club 'set' up on a good plane by the time my left arm is at horizontal.

[From How to plug in a repeating swing - Nick Faldo]

Bobby Jones in his book Bobby Jones on Golf had similar advice on bringing the right elbow in close and keeping the wrists set:

BJonGolf

If you look around on the internet long enough, you'll see this theme repeat over and over:

Start the downswing by stepping down on your left heel and letting your left hip move slightly toward the target. As your lower body starts to move, pull your hands down, keeping your right elbow close to your right hip as long as possible.

[From Take our advice: Put your golf slice in the past]

Jim McClean calls this the Slot Swing:

Here's a drill from Jeff Ritter that uses the waggle to prep the body to hit a looping swing ("…your slice will be gone forever.")

So, after that wonderful practice round, I decided to do some research on the subject and found Bradley Hughes--a retired golf professional from Australia who now teaches in South Carolina. Hank Haney's teaching differs from Hughes in so many areas, but in this one area--the reversed loop 2-plane swing--they seem to agree. And the common thread seems to be a universally admired golfing hero--Ben Hogan. Both Haney and Hughes admire Hogan and incorporate his teachings to various degrees (Hughes more so). Whereas Haney seems to gravitate towards this approach as a last ditch effort, Hughes seems to embrace it as the only way to swing.

Hogan (and many of the professional golfers preceding him and following him up until the 1990s or so) swung the golf club this old way. Even Tiger swung this way in the beginning, using the older wooden clubs with flatter lie angles. Hogan was so flat coming down that many 'experts' criticized him as being laid off. Jim Furyk receive the same criticism. But Hogan's results are undeniable, and many of the professionals who swung like him coming down were also consistent greats, including Jack Nicklaus--the greatest of all time based on results. I'm not talking about their backswings, which are irrelevant according to Hughes. Nicklaus was fairly upright on the backswing. Consider Jim Furyk's backswing--it's nearly vertical, but he loops, drops his hands and right elbow to his waist coming down, and hits a nice, shallow, powerful ball, and then ends with a high finish (no pushing the upper left into the chest on the followthrough--the so called "connected" finish). He and Sergio Garcia are two examples of the few modern professionals who still swing the old way but get criticized for it, unfortunately. If Garcia could putt better (and he's working on that), he would be one of the best EVER! In some cases (like with Garcia) it's hard to notice by looking only at the hands and right elbow (pay attention to the club head).

And low and behold, several other positive benefits happen, according to Hughes. The flat left wrist, bent right wrist, lag, forward shaft lean, head behind ball, bent knees, and so on all happen naturally when using this downswing. No artificial rolling of the arms or flipping the wrists is necessary to square the face. Hughes says to forget the backswing and grip--so many differences in those fundamentals among players that they should not be considered fundamentals. The impact area is the only true fundamental.

The cherished ball strikers of days gone by (see below) all had the common theme of retaining their knee flex....and swinging on a shallower plane into impact....which allowed the right arm to stay quieter UNTIL well after impact.

This bred the consistency of their ball striking and allowed them to play much more flawless, easier hassle free golf without having to conjure up miracle shots and have to hole 25 foot putts on every green to salvage a score.

[From BradleyHughesGolf.com | Page 8]

Still not convinced? Look at these videos and articles (there are MANY others):
Brad Redding: Reverse Your Loop
Fire Your Lower Body
Haney to Romano: Reverse the Loop!
If You Slice, Read This
How to Fix an Outside Swing in Golf
Over the Top Golf Swing
How to Fix Your Golf Slice
Learn From Sean O'Hair's Downswing Loop
10-Yard Guarantee: Right Elbow, Right Hip
Drop the Hands to Hit Inside-Out (my previous blog post on the subject)

Monday, January 23, 2012

Lag Putting? Don't Look at the Ball

Here's something that has helped me enormously on lag putts: Don't look at the ball during your practice strokes! Don't look at the putter head! Look at the intended target.

As a drill, I set up for the putt, get my line, and before I roll the ball, I focus on a spot on the line or focus on the hole (depending on the situation) and then just rock my shoulders WITHOUT looking at the ball. This helps me roll it close (usually) or even occasionally in the hole! Very good for distance control and not bad at directional control.

I don't recommend doing this during the stroke, however, because you will occasionally mishit a putt off the heel. But it's great to do as a practice stroke or even a pre-round drill.

Try this as a drill when you're practicing to see if it helps you; I like it so much as a drill that I started using during play.

Sunday, January 22, 2012

Chip - Don't Chili Dip

Standard "fundamental" setup pointers:

  1. Feet close together (use putting stance width)
  2. Ball off the back foot (further back = lower shot with more run on landing)
  3. Lean slightly to the left (don't over do it or the leading edge might dig)
  4. Grip down on the club (the further down, the shorter the shot)
  5. Use a weak or putting grip with left hand and weak grip with right (rotate the right hand over the top of the shaft); keep a flat left wrist back and through
  6. Address the ball with the club head grounded at first and with both arms straight and elbows close together; afterwards, slightly hover the club head
  7. Hands ahead of ball/shaft leaning forward; form a "lowercase Y" with the arms and club; the club shaft and left arm should form a straight line and it should remain that way
  8. Hover the club slightly above the ball (encourages downward strike) by lifting the upper body slightly
  9. Keep arms/hands firm (like in a putt)
  10. Simply rock the shoulders like a putt
  11. Allow the body to turn through after impact
  12. Pitch-like chip: release the club for more loft (normally keep left wrist flat) - tip from Hank Haney
  13. Pitch-like chip: open the club face more and then do everything else the same
  14. Pitch-like chip: slightly rotate the left forearm going back and square coming through
  15. Watch the ball disappear before looking up!

The number one cause of my chili dipped chips is my right elbow. It's absolutely crucial to address the ball with the elbow straight and to avoid bending it going back and through, as straightening right elbow usually causes contact behind the ball.

Raymond Floyd said to think of your chips as "putting with loft." This got me to thinking that I should just rock my shoulders with a forward leaning shaft and keep the lower body still until the turn through. This helped but I was still making silly chipping errors, especially when I committed my primary short game sin: Looking up before the ball disappeared to see where it was going.

Select clubs based on the situation. The goal is to get the ball rolling on the ground sooner. Chipping 30 yards from the green to a back pin position might require a 7 or 8-iron, while a close chip calls for a sand or lob wedge. Use the same chipping motion for all chips and adjust for distance using club selection. You may also open wedges as you would on a pitch shot to add loft to chips.

A weak or putting grip in the left hand with a flat left wrist really sets you up for success (it's easy to control direction if the back of the left hand leads). Hover the club slight above the ball to encourage hitting down through it and bottoming out in front. Keep the hands and wrists out of it--THEY SHOULDN'T MOVE (just like in putting).

But here's something that has really helped me, and it strongly relates to chipping with a putting motion. Forget using any wrist hinge whatsoever; as a matte of fact, you should keep the wrists and hands completely relaxed and loose. In other words, you should really feel the weight of the club head slightly waggling in your hands. Next, you'll notice that both FOREARMS form a small triangle; simply think of moving that small triangle back and forth, with no thought to the hands at all. Forget the larger triangle made by the full length of the arms and club. Makes it very easy to chip. The longer the stroke, the more the wrists will naturally hinge and unhinge from the weight of the club, creating very large chips or small pitch shots.


Drop the Hands to Hit Inside-Out

My main ball flight mistake is a push-slice. Video analysis shows that I pull the club too much inside and then swing just slightly over the top on the downswing and with the club face open slightly (or even maybe opening because of the motion). It's easy to see when the blur of the club is cutting across the ball. Try it as a drill or notice your practice swing.

The easiest way to swing the club without effort is to simply let gravity do it for you with maybe a little assistance to get some "oomph!" How? From the top of the backswing, simply drop the club and arms while the back is still turned, while simultaneously rotating the left hip backwards. This will stop the over the top move and result in a nice, relaxed, languid swing. The body will naturally react to this falling motion to prevent the arms from crashing into the body; Shawn Clement is a big proponent of this, as are many other teaching professionals.

The feeling I have is that I lift my arms straight up in front of my chest while turning fully (back facing the target), get to the top, and then drop my arms and hands while my back is still turned while also immediately rotating the left hip targetwards and backwards (again, the back is still turned); from there everything just happens automatically. This creates a tremendous "X factor," where the hips are open while the shoulders are still mostly closed (an X shape is formed due to the difference between the hips and shoulders). There's no flipping of the wrists; the left forearm turns so that the back of the left hand is flat and "slapping a wall" or "closing a gate." The pivot is driving the motion as the club "falls"--closing the club face while also approaching the ball from the inside. The blur of the club face feels flatter to the ground and appears more circular (less linear), such that the blur approaches the ball from the left-rear (the inside).

Two additional important points: The grip should be slightly loose but firm enough to rotate the club. AND turning the shoulders a full 90 degrees (back to target) will allow for an easier inside move.

This move gets the right elbow in front of the right hip coming down, a key position seen in almost every professional.

Another way this feel has been described is "swinging to right field." This is a baseball analogy (that isn't exactly true) but it ingrains the feel of a proper inside-out downswing.

This reverse looping action--often called "dropping the hands into the slot"--is taught by Hank Haney and many other professionals, including Bradley Hughes. But in reality, it's a classic way of swinging that has fallen out of favor with todays upright swingers. Ben Hogan made this two-plane approach famous.

Here's Bradley Hughes on Hogan's swing:

It's easy to see from Hughes' analysis of Hogan's swing that Hogan did a lot of great things, including keeping the club and arms in front of his body all the way through. He also used his pivot to square the club face rather than relying on an artificial rolling of the forearms. Keep in mind that Hogan fought a hook, whereas most of us fight slices; therefore, an overly active lower body is a great way for hookers to straighten out their shots and even start hitting fades, which is what Hogan did using the torque of his lower body. Slicers (like me), however, need more active arms and less body (hence…drop the arms while turning the left hip back). Too much lower body motion for a slicer will only make a slice worse (Haney).

Most amateurs try to help the club toward the ball by pulling on it from the top of the swing. They are, in effect, trying to help gravity—one of the greatest forces in the world. Mother Nature doesn’t need your help. She’ll get it done—if you don’t pull on the club.

When you’re at the top of the backswing in good balance, you literally let (key word even if it’s small) your arms drop through space as you turn your hips left and get your weight onto your left heel at the completion of what’s a lateral turn.

[From Golf Tips - The Fire Drill]

Wherever your eyes are looking, your hands and the clubhead will want to go. If your eyes are looking at the back of the ball at address, then you are probably trying to square the clubface to the back of the ball at impact. Address and impact are two very different alignments in golf. Focus your eyes on the inside quadrant of the ball at address and your hands will strive to reach your new focal point. By making this small change, you will be well on your way to improving your downswing and obtaining much more manageable misses.

[From Classic Swing Golf School]

Upon reaching the top of the backswing, simply allow the arms to fall vertically. The shoulders must be relaxed and the arms must feel light. This motion is dependent upon gravity, as well as, the golfer permitting the arms to drop from the top. This will allow the club to fall in the slot. With this technique, the golfer must resist the urge to work the club out to the ball. The outward action of the clubhead results from body rotation, therefore, the arms must fall from the top of the backswing before any rotation of the body begins.

[From Classic Swing Golf School]

Butch and I [Tiger Woods] worked hard on my first move down--letting my arms fall as my weight transfers to the left, and keeping the club more in front of my chest instead of behind me. When you see me make that little drop move with an air club, it's a reminder of that first move down. The lesson for you: Start the downswing by letting your arms drop as your weight shifts targetward.

[From The lessons I've learned: And what you can learn from them - golf swing techniques; managing a career in golf | Golf Digest | Find Articles]

From the top of the swing, the arms and hands are passive, essentially in free fall. As the club lowers to waist height, the feeling is that the right elbow drops in and the left arm is extended.

[From Breaking 100-90-80: A monthly guide to the scoring basics - golf tips | Golf Digest | Find Articles]

"The farther you line up left of your target, the farther you'll hit it to the right. With that being said, you've almost got to feel like you're swinging toward right field and putting some hook spin on your ball." ~Zach Johnson, PGA Touring Pro

[From Never Slice Again - Golf.com | GOLF.com]

How to Close the Club Face

So, you're aimed slightly right, hitting from the inside (trying for a draw), and the ball is pushing well right (or even push-slicing). The ONLY problem here, then, is that the club face is too open for the path. As Hank Haney so correctly puts it, all slices (whether classic, straight, or push) are ultimately caused by an open club face, though other factors may be associated with or contribute to that open club face. To close or square the club face, the toe needs to be overtaking the heel through impact, while a fade has the toe and heel coming through together. The only question is: What's the best way that each one of us can achieve this goal?

The grip, hips, shoulders, and forearms must work together to square and then close the club face coming through. This becomes easier when you think of the arms crossing over ("let the wrists kiss") when the club shaft is "center mast" to the body (the belt buckle or belly button).

Here are some ways to close the club face. Be careful trying more than one of these at at time, because you might start hitting really low pull-hooks:

  1. Use less grip tension (waggle the club and relax the arms at address).
  2. Square the back of the left hand by the time you reach impact! Golfers who roll the forearms open in the backswing may leave the club face too open through impact and block, push, and slice the ball; they must learn to square the back of the left hand BY THE TIME impact occurs. If they overdo it they can start pulling the ball or hooking it. You may need to consciously think of hitting the ball with the back of your left hand--sort of like a tennis backhand. To do this requires EARLIER left forearm rotation than you might believe (missing right means you need to exaggerate rotating the forearm earlier). It's too easy to mistakenly roll the forearm late--once the hands reach the ball, which will usually just result in a flip with added loft. Begin rolling the left forearm once your hands reach the vicinity of your right thigh or right hip. This gives you time to square up the club face. The back of the left hand and the right palm will rotate down to point roughly 45 degrees towards the ground when the hands are in the vicinity of the right thigh; as a consequence, the club face will also point ~45 degrees down towards the ground when the club is parallel to the ground on the downswing. This should feel really closed to you if you've been leaving the face open. Now all that's required is a turn through. The continued roll or "crossing over" appearance after impact is just a product of the squaring action you started earlier!! Focus on leading the club into the ball with the left wrist coming through first--even slightly ahead of the left hand; this will prevent the left wrist from bending backward or cupping (called dorsiflexion) through impact. The left wrist should either be flat or it should slightly bow while the left forearm rotates! (This continued rotation post-impact is also called "the release"). This seems to be the best for getting a slight draw shape without a lot of manipulation. Hank Haney calls this squaring the back of the left hand, and some instructors have referred to this as making your watch face the target. Another added benefit is that this delofts the club slightly, lowering the ball flight and adding distance. If you begin to pull or pull-hook shots, you will either need to back off slightly on how early you rotate the left forearm, use a slightly weaker grip, and/or swing more out to the right. The disadvantage here is that it requires a bit of timing to ensure a square position at impact; too much rotation and you can pull-hook, too little, a block or push-slice. If you do this correctly, you'll say farewell to the balls that keep heading right; but you might say 'hello' to a pull or pull-hook. Then you'll have to think more about the way to get the ball started more to the right so that it can spin back to the left! This is a welcome dilemma if you've been a chronic slicer.
  3. Takeaway: Ensure the club face matches your spine angle! This is really just another way of accomplishing #2 above without having to reverse-roll your left forearm clockwise in the downswing. To do this, have the feeling that the back of your left hand faces the ball for as long as possible in the backswing (there should be no sensation of rolling the forearm counter-clockwise); this should make it easy to return the club face to square at impact. Another way to put this is to keep the club head outside your hands in the takeaway. Also, be careful to avoid the urge to lean left on the backswing when using no forearm rotation; make sure you still lean right and shift into the right leg.
  4. "Shake hands" with the target using the right hand. This doesn't mean letting the right hand take over, which can cause the left wrist to cup or flip as above; in a sense, the right wrist straightens and the right hand rotates slightly over the top of the left, with the watch facing the ground just after impact. This is the one that I can use to hit a big hook, because it's very hard to time properly (i.e., tough to know how much rotation is too much rotation and when). This one is often called letting the wrists kiss or cross over each other.
  5. Grip the club more in the fingers and away from the palm (automatically applies less tension).
  6. Use a stronger grip (rotate both hands to the right with "V's" towards right shoulder).
  7. Physically hood the club face at address (close it a few degrees then take your usual grip). This one doesn't work for me.
  8. Consciously turn the left hand knuckles down at impact. This another way to think of #2 above; but I think it's better to think of leading with the left wrist, as there's less manipulation involved than when using this swing thought. This is often taught as turning the door knob with the left hand or revving the motorcycle throttle.

It's important to keep in mind that the club path works in concert with the face to produce the desired ball flight. That is, the club face can be closed but still open to the path, causing some form of slice (push, straight, or pull--depending on the direction the face was aiming at impact). The club face must be closed to the path to produce a hook (hitting inside-out with a face that's closing is critical).

You'll know you've gone to far when you start duck hooking the ball or getting a really low ball flight. Tom Watson wrote in his book, The Timeless Swing , that you should use as strong a grip as you can without hooking the ball.

Don't be afraid to try the "left wrist leading" even with your fades. The kicker is to hold off the release (i.e., slap the ball with the back of the left hand and then let the back of the left hand--or the right palm--continue chasing after the ball instead of rotating over). With an open set-up, the ball flight should be a slight fade as opposed to a large one.

In addition, the left wrist should be flat or bowed through impact. In the April 1956 issue of Golf Digest, Hogan wrote, "I've noticed one thing that all good golfers do and all bad golfers do not. The good ones have their left wrist leading at impact. It seems a small thing, but I've found it to be universally true. At impact the left wrist of a good player is slightly convex, while that of a poor player is generally concave."

[From Grouchy Golf Blog]

The more you grip the golf club in the fingers (#1), the faster you can swing the golf club and the quicker the clubface will close (causing a hook or draw ball flight). If you grip the golf club further up in the palm (#2), the slower the golf club will travel and the longer it takes for the clubface to close (causing a slice or a fade). If you are slicing the golf ball, you will want to move the grip more into the fingers (the base of the fingers), if you are hooking the golf ball, you will want to move the grip more into the palm area (higher up in the left hand).

[From Golf Swing Instruction Articles and Lessons to Shave 7 Strokes Off Your Game]

While the left hand swings back horizontally so that the back of the left hand is always perpendicular to the ground (vertically-oriented like a door opening) it "feels" slightly supinated relative to the inclined plane on which the clubshaft is traveling, and a golfer "feels" as if the left hand is rolling slightly over (supinating) during the followthrough. Tiger Woods states that he he tries to get a "feeling" that the knuckles of his left hand start to rotate groundwards (supinate) immediately after impact, and what he is describing in simple "feel" terms is the "roll-feel" movement of the left hand during the horizontal hinging action. The back of the left hand should never face groundwards during a horizontal hinging action (even though there is a "roll-feel" during a HH action), and it should actually remain vertical to the ground.

Impact

There are only two options for the club to be released through impact. You can either keep turning the body through at a high rate of speed, or you can keep your hands soft and rotate the left wrist counterclockwise. Which one sounds more efficient?

Golf Left Hand Release Drill - RotarySwing.com

If the player is not aware of or not expecting that change, it can be frustrating to watch every shot go right after supposedly getting on the ideal swing plane. The secret is to make the necessary adjustment in wrist and clubface action to deal with the new flatter plane.

A key checkpoint is the half-way position in the downswing once the hands are about waist high. It is imperative that the right palm is beginning to face down as the back of the left hand is also facing down toward the ground. This is part of the infamous pronation and supination referred to in descriptions of Ben Hogan’s downswing and impact positions.

Picture turning your watch face down toward the ground during the downswing, assuming you are a right handed golfer wearing a watch on the left arm. Another way to see it and feel it is to turn the knuckles of the left hand downward so they face the ground and are essentially out of view at the waist-high position coming down.

Stop Slicing Pushing Blocking Golf Shots – Herman Williams Golf

Flick suggests a drill to eliminate flipping that works best initially with shorter irons. Practice hitting balls while letting your right hand come off the grip just after impact. This removal of the right hand emphasizes the need for the left hand and arm to lead the swing, bowing the wrist with the hinge, rotating through impact with the ball and finishing the follow-through by folding up at the elbow.

Drills For People Who Flip In Golf | LIVESTRONG.COM

Contrary to conventional wisdom, Tiger does not delay the unhinging of his wrists for as long as possible. As soon as he initiates his downswing, he starts rotating his left forearm. That action starts to square the face and begins the gradual release of the clubhead. Halfway down, his wrists are already uncocking.

Golf Swing Tips to Boost Power | GOLF.com

"At impact the back of the left hand faces toward your target. The wrist bone is definitely raised. It points to the target and, at the moment the ball is contacted, it is out in front, nearer to the target than any part of the hand.

"When the left wrist is in this position, the left hand will not check or interrupt the speed with which your clubhead is traveling. There's no danger either that the right hand will overpower the left and twist the club over. It can't. As far as applying power goes, I wish that I had three right hands!

Saturday Morning Tip: Supinate your wrists like Hogan : The Instruction Blog: Golf Digest

The back of your left hand, assuming you've got a decent grip, will show you where the clubface is through impact. The common mistake a high-handicapper makes is swinging through the shot with the back of the left hand -- and the clubface -- pointed up. When the side of the hand leads the way like that, you'll hit weak slices.

To hit straighter, more powerful shots, you need to release your hands through impact. As you swing into the ball, turn your hands so the back of your left hand -- the logo on your glove -- points down the target line. That corresponds to a square clubface.

Get back to square: Golf Digest

To create more speed, here's a great swing thought: Rotate your forearms counter-clockwise as you start down, turning the face of your driver to the ground. Another good feel is to get the back of your glove pointing down, as if you were going to drag your knuckles along the turf. This move will help you maintain your wrist hinge longer coming down. Remember, power comes from clubhead lag, where the clubhead lags behind your hands until your wrists release at the bottom of the swing.

One word of caution here: Because you're closing the clubface earlier than you're probably used to, you might start hitting hooks, until you adjust your path into the ball. Feel as if you're swinging out to the right of the target. Do that, and you'll turn those left misses into power draws.

Rick Smith: Turn The Face Down For Bigger Drives: Golf Digest

Saturday, January 21, 2012

Setup for a Draw or Fade

Considering the D-Plane and "new" ball flight laws, try this method to set up for your draw or fade. It's very similar to the way Nicklaus and Watson (see Lesson 1 Lesson 2 on youtube) set up to shape their shots.

GC: What about the pre-shot routine; is that something you think is important?

TW: I talked about the target line and aiming. That’s your pre-shot routine; if you can do that, that’s fine. Getting behind the ball and hitting that ball over a point like Nicklaus does, that’s all the pre-shot routine you need.

You’ve got to aim it with the club face. You’ve got to learn how to do that; a beginner has no clue. “Where do I aim it? Is the club face square?” How do you determine whether the club face is square? You see people play with a closed club face and an open club face. But then they make an adjustment in their swing to try to get their club face back to square.

[From Tom Watson | Golfconversations.com]

I call it "holding off the shot." I'm keeping my arms quiet with far less forearm rotation and delaying the closing of the clubface. I think of it as squaring the face with my body rotation. You can see here my hips have turned significantly toward the target before the club has reached the ball. That's a good fade feel for me.

[From Adam Scott: Steal My Feel: Golf Digest]

So you can see (in harmony with the "new" ball flight laws), Tom Watson understands that the club face should aim where you want the ball to start…not where you want the ball to end up! If he has a natural hook in his swing, he needs to aim right to bring the ball back to target. This is why most pro golfers you watch on television appear to be hitting the ball off to the right; they're drawing the ball back to the target.

Stand behind the ball and imagine the TARGET LINE--a straight line from the ball to where you want the ball to carry. Don't worry if some obstacle falls on this line (e.g., a tree, trap, or dogleg); your intention may be to use the curve to go around that obstacle! At the same time, imagine an AIM LINE--a straight line where you want the ball's flight to begin. I recommend starting with smaller curves, so the aim line should be relatively close to the target line. These two lines (if imagined to be infinite) will intersect at some point behind you, forming a small angle.

The best way to create these lines at setup is to pick two points on the ground a few feet away from the ball; use blades of grass, broken tees, and so on as the points on the line. You'll need these frames of reference for alignment. I never pick points on these lines that are more than 5 or 6 inches aways from each other.

Set the club down with the face pointing down the aim line (not the target line); in other words, point the face at that spot chosen on the ground. If you find yourself hitting pushes or pulls instead of draws or fades, try closing or opening the club face slightly, but NOT at the target line. Now, align the body slightly open to the left or closed to the right of the aim line, depending on which curve you're attempting to produce. Putting the ball back in the stance slightly will also encourage a draw or hook, and vice-versa for a fade, slice, or cut; I advise, when using the ball position in this way, to simply align parallel to the aim line the way Watson recommends.

If you don't use the aim line and close the club face coming through, you may hook the ball off the course (same with a fade--ball slicing off the course--if you don't adjust your alignment to the left).

In essence, the infinite, imaginary aim and target lines along with the line created by the setup (i.e., TOE LINE - imagine a straight line running from the toes of each foot) will intersect at some point behind you and the distances between those lines will increase gradually as they proceed toward the target. Once you've addressed the ball, forget the target line…concentrate on the aim line (where the club face is aiming) and swing either left of it for a fade or right of it for a draw. These are feels but in reality you can use an inside-out swing for BOTH (remember…it's the club face relative to the path that imparts spin).

As alluded to earlier, Watson teaches that the toe line should be parallel with the aim line; but we want to avoid hitting a straight push or pull, so I advise SLIGHTLY closing or opening the toe line to the aim line, depending on the shot shape desired (unless you use some other method for encouraging the correct swing path). Once again, these lines are only FRACTIONALLY offset from parallel, especially the toe line. If you're already adept at controlling the path of your swing, the toe line idea may not be useful to you. Also, don't forget the ball position: Forward encourages a fade and backward encourages a draw, so this alone may be enough for you to consider leaving the toe line parallel to the aim line. Also, don't forget the D-Plane: the club face must still be offset from the swing path to produce the desired shot shape.