Saturday, February 25, 2012

Golf's Triangles

Another way to consider the motion of the arms in the golf swing is to think of the triangle formed by your arms at address. This swing thought can be used to help prevent getting laid off or across the line at the top, preserving the correct swing plane, and it can also aid extension back and through. Finally, it's absolutely critical for a proper takeaway.Takeaway Triangle

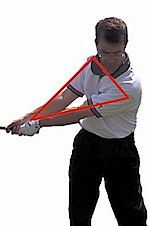
It's important to note that the triangle stays in front of the body or chest all the way through the swing, and it can even be used for short game shots. The sides of the triangle near the base (your upper arms) should stay connected to the sides of your chest.

Using this triangle swing thought keeps the elbows related to the hips, especially the right elbow to the right hip, and helps maintain the swing radius. It's important on the backswing to remember that the right leg stays bent to get the full benefit from the triangle.

Simply form the triangle at address, lift the triangle vertically on the backswing (as if it swings around your neck) by rotating the shoulders (the right elbow naturally folds as it rises); allow the triangle to lower on the downswing using hip rotation, and allow it to lift vertically on the through swing. The triangle stays in front of the body the entire time; the triangle does not become "horizontal" or more parallel to the ground until you reach the top (going back in the takeaway, it should feel vertical, with right arm above the left). A full 90-degree shoulder turn is essential to using the triangle correctly, with the right shoulder pulling the triangle into position at the top.

During the takeaway, the right arm should remain straight for as long as possible, and it will initially stay above the left arm, as mentioned above. This will help keep the club head outside the hands during the takeaway, which is key to avoiding an OTT downswing. When the right arm finally does fold up, the right elbow should be pointing down at the ground--not behind the golfer (both elbows should stay relatively close together--as close as possible to the distance they were at address). Separating the elbows at the top is a major flaw that can lead to the arms collapsing, and it's a sign that the arms are doing more than merely moving vertically.

The movement of the shoulders is key; the triangle in the takeaway moves in response to the right shoulder pulling back and up behind the golfer, while the left shoulder tilts down. The right palm faces down toward the target line during the takeaway, such that the club face angle matches the spine angle. The arms, wrists, and elbows do very little to get the club back, but the arms rise vertically to get the club up.

The raising and lowering of this triangle (along with wrist action) constitutes the upward and downward motion of the golf swing, while hip rotation (and associated shoulder rotation) constitutes the horizontal, circular motion of the swing. At no time should the arms pull the club back behind the body; the correct feeling is a lifting up-and-down in front of the body without much independent arm movement.

Martin Hall has criticized this "triangle thought" because the arms don't actually maintain perfect triangles throughout. Instead, he argues for keeping your arm extension. Don't let this deter you. As with anything in golf: If it helps you then USE IT! Yes, we're not talking perfect triangles (the elbows do bend) but you get the point.

The triangle concept perfectly illustrates the takeaway. The butt end of the club should point roughly at the belt buckle during the takeaway (before the arms begin rising). If you're used to quickly pulling the club inside with your hands then this will feel really weird and wrong--as if you're outside the target line. But you're not! You're keeping the club head OUTSIDE your hands until the correct moment in the backswing by maintaining this triangle and keeping the butt end of the club pointing at your belt buckle in the takeaway. You've heard that the pitch shot is actually an abbreviated full swing; I think the pitch shot is either the takeaway or just beyond it with a little bit of wrist action!

However, there is ANOTHER triangle worth mentioning: the so-called "eternal" or "magic" triangle, formed by the angle of the left arm, club shaft, and an imaginary line from the left shoulder to the club face. The longer this triangle is maintained, the greater the lag. However, the first triangle we discussed is really the key to the "eternal" triangle. Not surprisingly, this also is the "L shape" of the left arm to club and Ernie Els' "maintained box" shape (he focuses more on the angles of the right arm to the club as opposed to the left). Keeping these angles ensures the use of the joints as levers (as in physics), which produces maximum lag and energy transfer.

Here is a quick drill: Hold the club straight out in front of you and extend your arms out as far as they can. This should create a TRIANGLE between your chest and your hands. This triangle is the key to a consistent golf shot. We want to keep this triangle formed throught the entire swing.

[From Golf Swing Plane Tips: How To Develop The Perfect Golf Swing]

Take the triangle you form between your arms at the top of your swing and pump it up and down to waist high. Get the feeling that your right elbow grazes against your right hip. Don't jam it into your hip. Just make sure it connects in some way. Also, stand in front of a mirror and watch for the gap. When your right elbow grazes your right hip, you should see some space (daylight) between your forearms. If you see this, you are coming from the inside, and on your way to playing good golf.

[From Golf Tips - Lessons from the Golf Pros - The Magic Gap]

You can also imagine a triangle, formed on two sides by the shaft of the club and the left arm, with the third side an imaginary line from the club head to the point of the left shoulder. From the top this triangle must be tilted and brought down a ways without changing the length of the imaginary side.

This we call the "eternal triangle," because it must be retained as long as possible. As the speed of the golf club head increases, the imaginary side of the triangle lengthens, of course, and the arm-shaft angle starts to open up. But the triangle should be kept constant as long as possible.

[From Golf Downswing: Third Magic Move]

A one-piece takeaway also keeps your hands in front of you. Note that [Lucas Glover's] hands are still pretty much in front of his belt buckle, even though his wrists have begun to cock. (In case you're having trouble seeing it, the clubhead is just to the left of his elbow.)

Ruthless Golf: More Thoughts on Keeping Your Hands in Front of You

1. Grip Points to Belt Buckle...To ensure correct hand height, the butt of the club should point at your belt buckle at address.

2. Clubface Points at Ball...One useful checkpoint is to see that your clubface is pointing at the ball as you swing the club back (right). This will head off two Common errors: fanning the clubface open so it points at the sky, or holding it closed so it points down at the ground. Either mistake forces you to become handsy if you hope to return the club back to square at impact.

3. Wrist Cock Blends with Turn...When your wrists begin cocking up, they should blend with your turn to keep the club on plane. You can check this by stopping your backswing when the shaft is parallel to the ground.

Three 'Musts' for a Smooth Takeaway | Instruction Feature | PGA.com

When I ask amateurs to show me how they start back, most will move the club away with only their hands and arms. What I want to see is the hands and arms moving in sequence with the rotation of the upper torso. All three should move together as one unit until the left arm gets parallel to the ground--at that point the swing's momentum will keep the hands and arms on plane.

Sean Foley: Simple Swing Fixes: Golf Digest

A couple of things to notice in these photos: the shape of the triangle that she [Annika Sorenstam] keeps with her arms and chest, the way that the club head stays in the center of that triangle (in other words, no early wrist cock), and the way that her right arm stays above the left arm all the way to waist high.

The Takeaway: A Common Fault and Fix | Three Guys Golf

Notice how the upper part of my left arm is still attached to my chest, while the clubhead is outside my hands as the club has traveled about halfway back. My left wrist is still cupped, my right arm is above the left and my right knee is still flexed. These positions, though simple, are absolutely critical.

50 Best Swing Keys | GolfTipsMag.com

Compare any of the greats in history and pause the video on the DTL view when the shoulders have rotated roughly 45* you will notice all of them have the triangle at that point between their chest and arms regardless of lift of the arms or rotation only. If the left arm looks higher then the right arm at a 45* shoulder turn then likely that person has come away inside and very flat.

So it is more about arms and chest working away from the ball as a single unit not really the right elbow staying close to the body, if you look at a face on view you will see most golfers that right elbow when the shoulders get turned 45* is actually a pretty good distance from the body.

Right elbow is the key

A good way to take the club away from the ball as straight as possible without swinging the club overly outside or inside the target line is to focus on keeping the right forearm staying above the left during the takeaway. Even if you try to keep your right arm on top of the left on the backswing, it will automatically move under the left arm at the proper moment as you swing the club to the top. As your backswing continues toward its top, your right arm should start to fold at the end of the takeaway and move under your left.

Keep right forearm above the left

Simply put: The right arm should be on top of the left arm as you start the backswing, and then it should move under the left arm as you swing the club to the top.

Many amateurs fold and shorten the right arm too early as they snatch the club away. What you really want is a relatively straight right arm during the initial part of the backswing as this promotes width and good pace -- keys to hitting solid shots.

David Leadbetter: Move Your Right Arm The Right Way : Golf Digest

Most golfers ruin any chance of hitting consistent golf shots within the first 6 inches of the golf swing takeaway.

The first takeaway mistake that I see most often is for the golfer to hinge the right wrist early or bow the left wrist (often, both are done together). Simply hinging the right wrist 45 degrees will move the club about 3 feet without the body having to move an inch.

The other common golf swing takeaway mistake is pushing the golf club back predominantly with the left arm and shoulder.

This is typically coupled with early right elbow flexion (i.e., bending), which should not occur until the takeaway is completed. In other words, the right arm should remain completely straight until the club is past parallel to the ground.

Learn the Perfect Golf Swing Takeaway in 5 Minutes per Day - Online Golf Instruction

The right arms should stay “above” the left as you move the club away from the ball with the palm of your right hand pointing at the ball. This will keep the clubhead outside your hands and stop you from fanning the face open. When the club gets to parallel to the ground during the takeaway the clubhead should still be slightly outside your hands with the clubface parallel to the outside of your right arm.

Top 100 Teachers: Ask Brady Riggs Live! Golf Magazine Top 100 Teacher Will Fix Your Faults

Notice Nick Price’s right forearm and how it is comfortably above the left. This is all accomplished by pivoting the shoulders on a fairly steep plane. The higher the right shoulder, the higher the right forearm and so on…

In a correct pivot, the left shoulder’s first move is down and then slightly across. This is in direct contrast to what most golfers attempt to do with their shoulders, which is: a. turn them as much as they can and b. get the left shoulder behind the ball.

The Shoulder Pivot in the Golf Swing | Andrew Rice Golf


Thursday, February 23, 2012

Unified Grip On All Shots

Invariably, one always comes back to the TOP golf fundamental: the grip.

I just returned from a business trip and went golfing with my old boss. He gave me a putting tip that I think might be applicable to all shots in golf. (His tip had me making a lot more putts right away!) And ironically, this is something about which I once thought often, but it went by the wayside in favor of other swing tweaks and experiments.

Golfers learn early that the grip is very important in putting, because if one hand dominates the other, all sorts of misses can occur (the yips). We're taught to place the hands on the club with palms facing one another, with a reverse overlap grip and the club in the lifeline of the left hand. But when one closes the fingers, it's nearly impossible to keep the palms perfectly square; as a result (without continued attention to this fundamental), the hands can "wander away" from each other ever so slightly, and this distance is enough to introduce the yips: in my case, a right hand that tries to take over.

Golfers, including professionals, fight this tendency to drift away from the fundamentals. You can even see pros adopting all sorts of new grips and long putters to fight off the yips. I'm not so sure any of that is necessary; Phil Mickelson recently threw away the belly putter and returned to his traditional putter, and his putting improved! Maybe one simply needs to refocus on the fundamentals.

In putting, I have a tendency for the left hand grip to drift back to a stronger position like I use on full shots (i.e., the club gets out of my lifeline…out of my palm). And for the right hand, the grip becomes less overlapped (slightly drifts away from the left towards the club head), and this keeps my hands from acting in a more unified manner (really, really critical in putting). Done correctly, the grip feels like both hands have been melted together!

So, I'm starting to wonder if a more unified feel would help ALL SHOTS. I'm now trying to ensure that I pull my right hand up firmly into my left to prevent any gaps from forming with my Vardon grip. Clearly, forms of the overlapped grip (like Tiger and Jack use) are designed to keep the hands from becoming disassociated. I have a tendency to become to right-hand dominant in my golf shots, which occasionally causes my left wrist to cup and open the club face (it's obvious what can happen with putting and chipping). I think one can still have a united feel on all shots using a Vardon (or maybe even 10-finger) grip by ensuring the hands have an overlapped or unified feeling (i.e., feel melted together). Some of this involves equalization of grip pressure between both hands so that there's one pressure. This way, the hands form a single pivot point for the club and the arms.

Any feel of the hands acting separately in the golf swing is not a good thing.

There are no gaps ... everything fits nicely together. The hands are compact and unified. The grip pressure is created by the form of the grip. [From The Right Grip Produces a Solid Swing | GolfLink.com]

The Vardon Grip, which Vardon said best unified the hands for a more consistent swing, is to this day used by the majority of the world's golfers. Vardon was also known for his accuracy, which he allied with considerable power, but it was the latter that his first American audiences admired most.

[From HowStuffWorks "Harry Vardon"]


Sunday, February 19, 2012

My Golf Lesson: Laid Off

I recently took some online video lessons with famed teaching professional Bobby Eldridge out in AZ. I highly recommend giving Bobby a shout; he's very good!

To my surprise, Bobby immediately picked up on something I hadn't considered: I was too laid off at the top. In other words, my club shaft pointed well left of the target line instead of more parallel to my target line. This move was causing my pulls, pull hooks, deep divots, and slices, because one unconsciously corrects for this by coming over the top (OTT). This is something that is hotly debated among golfers and professionals, as there have been many great golfers who appear 'laid off' at the top of their swings. Ben Hogan has even been accused of this sin. For clarity, the opposite of being laid off is being across the line, meaning the club shaft points right of the target at the top, and this move supposedly leads to hooks and coming too much from the inside.

It's also important to note that having the club point left of the target doesn't necessarily mean that one is "laid off" in the negative sense. What's important is being "on plane." When you're on plane it's not neccessary to get the club to parallel (reference Hank Haney's 7-Steps book). A better description of being "laid off" is a swing plane that is too flat, regardless of where the club points at the top.

Bobby didn't think so, but from my previous Hank Haney online lesson, I know that I have failed in the past to get a full 90 degree shoulder turn; this can contribute to a laid off backswing. It's easy to comprehend that an incomplete shoulder turn will cause the club to point left at the top.

Now, what I'm describing flies in the face of a reversed loop swing that I've championed before; let's face it, a reversed loop swing is a correction (i.e., defeating a steep backswing with a shallow downswing). It works well for some professional golfers with impeccable timing, and it helped me too (for a while). But because it's a correction and requires timing, it's not easy to do (for me anyway).

As I'm a mere mortal (beginning golfer), how much better would it be if I could keep the club on plane all the way through? This is what Bobby was getting at with my backswing. The correct feeling has more to do with the arms and club staying in front of the chest, back and through. For me, it feels very vertical, but it definitely agrees with Shawn Clement's commentary on the arms "falling down the plane." It seems easier to hold the lag and allow the arcing motion of the club shaft to happen late (more due to arm rotation than shoulder rotation), thereby producing an inside-out club head motion. When I swing down this way, I focus on the inside of the ball, as if that's where I'm trying to hit it (the only way to do that is by this arcing motion with retained lag). Extension back and through seems more natural as well, and a 90 degree shoulder turn is important to get the club pointing down the target line (without the arms collapsing). And as you can see from Clement's explanation, the right elbow-right hip relationship is important too, with the right elbow falling down IN FRONT of the hip--not attaching or crashing into the side of the hip. The hips must rotate to shallow out the vertical motion.

One should feel as if one is pointing the club shaft at the target at the top of the backswing; if the club points to the left of the target, it will be too laid off, which can cause nasty slices and pulls on the way down, depending on the corrections one makes in the downswing. Here are some tests to determine whether one is laid off at the top:

Take a full backswing but stop at the top of your swing. Simply loosen your grip and allow the club to fall on you. If the club is on plane correctly, it should fall on the tip of your right shoulder. If the club falls too much toward your neck or head, your plane is too steep. If the club falls below your shoulder, your swing path is too laid off or flat.

[From Golf Swing Plane Tips]

Wherever your eyes are looking, your hands and the clubhead will want to go. If your eyes are looking at the back of the ball at address, then you are probably trying to square the clubface to the back of the ball at impact. Address and impact are two very different alignments in golf. Focus your eyes on the inside quadrant of the ball at address and your hands will strive to reach your new focal point. By making this small change, you will be well on your way to improving your downswing and obtaining much more manageable misses.

[From Classic Swing Golf School]

Following the takeaway, focus on folding the right elbow up, not out behind you. Your swing should feel much more vertical than before. More importantly, it should feel shorter. That’s a good thing since, whether you believe it or not, a good backswing is only 18 inches long. From setup to the top, your right elbow should move just about a foot and a half, from the center of your torso to just outside the right hip.

[From Golf Tips - Elbow Room]

The key is we have to fight this by trying to keep the shaft as vertical as we can in the transition and down to impact. If we let the shaft fall back it will lay off as much as parallel to the ground or more and also fall more inside. This will cause getting trapped behind the body approaching the ball, causing a big inside out swing path that will hit big blocks. To stop the blocks, big time over rotation of the arms hits big pulls.

[From Laid off at the top of the Backswing…Cures, Tests and Drills - Surge's Daily Golf Swing Tips]

One classic problem is leaving the club pointing left at the top or as we call it laid off. This can be caused by an inability or unwillingness to complete the turn on the back swing. If you only turn your shoulders 45 degrees instead of the preferred 90 degrees, the club will likely be 45 degrees left of target, a major cause of the classic pull or slice swing. Even players who typically do it correctly on the range may find that the tension of the golf course prevents them from completing the back swing and causing an improper path.

[From Club Position]

Think of yourself as a righthanded batter, with a golf ball sitting on home plate. As you move into impact, try to sling the clubhead toward right centerfield. Approaching the ball from inside the target line like this—as opposed to down the target line when you try to hit the back of the ball—relates the shallow arc necessary to make centered contact and compress the ball so it shoots off your clubface like a rocket. At impact, your clubface should strike the lower-left quadrant (the one closest to you) of the ball.

[From How to Max Out your Irons | GOLF.com]

When you reach the top of your backswing, allow your hands to drop the club straight down. If the shaft hits your shoulder, then great—you’re on plane. If the shaft missed your body and the clubhead falls behind you, you’re probably laying off too much and you need to keep your hands and shaft above your shoulder in order to get back on track.

[From No Layoffs! | GolfTipsMag.com]


Sunday, February 12, 2012

Putting Tips and Yip Cures

I've already posted about lag putting and how I simply avoid looking at the ball to help control distance on long putts (more so as a drill than during play). But in reality, there's more to it than that. After all, one wants to roll it close, so there's always a marriage of distance and line.

I've noticed that if I'm not paying attention, my right hand becomes overly active in all my golf shots--including my putts. This can cause the left wrist to break down and flip. One often hears the analogy that putting is like rolling a ball toward the hole; many pros (like Jackie Burke) favor an active right hand with a passive left hand, while Dave Stockton likes the left hand/wrist and arm leading (with a forward leaning shaft with the left wrist tracking right down the line). This is often called the "forward press." However, a forward press can cause problems depending on the style of putter (see below on putter style) and the lie of the putter on the ground. In other words, pressing too much can cause hitting down on the ball and applying backspin, which will cause the ball to hop at impact and then stop well short of the target. Instead, I focus on keeping my wrists and hands out of the motion, with my arms and club forming a firm Y shape, so that only my shoulder motion transfers energy into the ball. My left wrist is straight (slight forward press) but unmoving, and my right wrist is bent more but still unmoving. The longer the putt, the less grip pressure I use, such that the weight of the club head is utilized to transfer maximum energy into the ball. The shorter the putt, the more grip pressure, because this makes for a more accurate putt that stays on its line.

But as important as the forward press is, it's also crucial to keep the hands unified during the putt (as if the hands were melted together). The closer the palms can be to each other (mirroring each other in a "praying hands" style), the better the putt will be. This is why a reverse-overlap grip with the putter running through the lifeline of the palm is also important. Another way to think of it is that the forearms should be on the same plane, facing each other (i.e., the right forearm should not extend above the left forearm at address) and forming a Y shape. Then, you just rock the shoulders to move the Y back and forth. Sometimes, I tend to let the club wander from that lifeline in my palm, and this can produce too much hand action; the putt should be driven by shoulder motion only.

Also, be careful with the angle of the wrists and position of the ball relative to the head/eyes. One should be looking in at one's hands when in the address position. The ball should SEEM like it's on the inside of the eye line, but if you plum bob using your putter, you'll see that the ball is actually directly below the eyes.

I have to concentrate on NOT moving my lower body and ONLY rocking my shoulders (again, with firm wrists). If I'm not careful, I will move my lower body like in a chip shot. The legs must remain perfectly still, and the upper body should NEVER turn to face the target (even slightly). The best way to do this is to keep the head down until after the putt is away; take practice strokes focusing on keeping the lower body completely still. It's a huge mistake to look up early, as the tendency will be to unconsciously steer the putt instead of relying on the initial line and practiced motion relative to that starting line.

I have to remind myself to get the putter head close to the ball during setup, as this can also affect the spin put on the ball (ideal spin is end-over-end or topspin). Believe it or not, it's easy to slice or hook putts just like full swing shots. It's also easy to apply backspin (if you hit down, the ball will often hop and then stop well short of the hole because it checks up). It's also important for me to slightly raise the heel of the putter off the ground (toe more down), which makes the shaft more vertical and allows for more of a straight-back-and-through stroke.

The style of putter also has an effect on the address position and chosen stroke style. The putter I'm currently using is a Nike OZ-2 blade style putter, with an offset shaft. The offset is designed so that one can address the ball with the hands and eyes directly over the ball with a vertical shaft; too much forward pressing (leaning the shaft forward and locking in the left wrist in too straight a position) causes backspin with this putter. This offset makes it easy to take a neutral stroke--either arcing or straight-back-straight-through.

Finally, it's important for me to hover the putter head ever so slightly before stroking the ball. If I begin the stroke with the putter resting on the ground, I have a tendency to jerk the club either too much outside or inside, whereas hovering it allows for a pure back-and-through roll.

Though I admire the rolling analogy (because I know how to roll a ball with my right hand), I think I putt better--especially on closer putts--if I can take my right hand out of it more. I've tried cross-handed putting and the "eagle claw" putting grip, but I don't really think they help in the long run (many gimmicks like this often seem to help at first). What I'm trying now is to flatten my left wrist (and thus lean the shaft forward).

One caveat to the firms wrists: Don't be afraid to release the right hand to lag long putts closer.

Mr. [Jackie] Burke tells me out on the practice putting green. "Just let the weight of the putter make the swing and you stay the hell out of the way. Whatever speed you go back with, that's the speed you want going forward."

[From Putting Tips From the Master - WSJ.com]

Hold the putter with the top hand with about a 4 pressure (on a scale of 1 to 10) and use the bottom hand to only guide it while holding it with a pressure of about 2. Make the stroke primarily with the top hand. This will prevent the wrist from breaking and also keep the putter in line during the stroke.

[From Best Putting Tips - Golfers Share Most Helpful Advice They've Received]

An amazingly simple tip that will help you get those long putts closer is just to stand taller.

Seem to easy?

[From Avoiding 3 Putts – Stand Tall on Long Putt | Perfect Connection Golf Swing]

The key to rolling a long putt close to the hole, or even knocking in a few of them, is to make a long, flowing stroke. And the best way to do that is to stand taller.

[From Stand tall on long putts: to lag it close from across the green, pretend you're tossing a ball | Golf Digest | Find Articles]


Wednesday, February 8, 2012

Right Elbow in Front of Right Hip

I thought it might be prudent to explore the right elbow-right hip relationship introduced when I posted about the reverse loop downswing and allowing the hips to drive the swing . If you study slow motion video of most professional golfers, you'll notice this relationship: The right elbow--at a minimum--gets back in front of (and points to) the right hip during the downswing, and the right hip fires through the impact zone. This re-marriage of the right elbow to the right hip during the downswing hip rotation is an absolute must-have for a good golf swing!

For most golfers, this right elbow should become reassociated with the right hip WHILE the back remains turned and facing the target. In other words, it's as if the right elbow is moving towards the target (along with a slight left hip bump) before any other part of the upper body turns and opens up.

But this idea can be taken further into the backswing as well. Keeping the arms always in front implies that the right elbow-right hip relationship (elbow pointing down to the hip) maintains itself throughout the backswing and downswing. It also keeps both elbows CLOSE together, just as Hogan described. So this means the right elbow travels mostly in an upward motion to raise the club, NOT in a backward motion (leading to a flying elbow). Many great players have had flying elbows, but they always get that club back on plane coming down, with that right elbow coming in close to the right hip.

Keeping this elbow-hip relationship DOES NOT MEAN keeping the elbow always touching the hip either!! The elbow starts off close to the hip at address, travels almost vertically a small distance away from right hip on the backswing, and then returns close to the right hip on the downswing, while the hips are rotating.

As you will see, one very simple swing key involves pointing your right elbow at your right hip as you take the club back. Just this one simple swing key, easy enough to remember on every full swing you take, will help keep the club on the proper plane, and keep it in the ideal position to launch longer, straighter and more consistent shots than you have even managed before.

[From 10 Yard Guarantee – Right Elbow Right Hip | Perfect Connection Golf Swing]

Contrary to popular belief, the arms and elbows, from address to the top of the backswing, travel only a short distance. This is a reality few recreational players grasp. Most choose to believe that the arms and elbows travel a very great distance, and this is what provides power in the golf swing. These golfers are drastically misinformed. Power isn’t generated by swinging the arms and elbows out and away from your body. In fact, just the opposite is true.

Following the takeaway, focus on folding the right elbow up, not out behind you. Your swing should feel much more vertical than before. More importantly, it should feel shorter. That’s a good thing since, whether you believe it or not, a good backswing is only 18 inches long. From setup to the top, your right elbow should move just about a foot and a half, from the center of your torso to just outside the right hip.

[From Golf Tips - Elbow Room]

At the start of the downswing you must remember to tuck your elbow back into your right hip. If at that point your elbow moves to the right—it's called letting your elbow fly out—then you will hit a poor shot. If you can keep your elbow on your hip during the downswing it will help keep your drives in the fairway.

[From The Hip Bone's Connected To The Elbow - 03.11.68 - SI Vault]


Sunday, February 5, 2012

Royal New Kent Golf Course

RITUAL JAPANESE SUICIDE RATING: FIVE CUTS with the short sword out of FIVE!

I played here this past Saturday. We played from the Black Tees. Stupid us. Next time I'll play from the White Tees! Still I got off the tee box well most of the round (very tough carries); the approach shots were a different story--there are no friendly lies here on the fairways (ball above or below feet; downhill and uphill lies). My chips and pitches were mostly good, but I putted horribly most of the round.

416874_907226948189_42807751_37425150_1666054167_n.jpg

This course in Providence Forge, VA (located between Williamsburg and Richmond) was as hard or harder than the round I played last year at the TPC in San Antonio. Definitely a course for advanced players, unless you're willing to swallow your ego and play from the front most "ladies" tees (Green). Any lady playing well from the front tees is no slouch at RNK.

I found myself in a few of those crazy 15-foot tall bunkers and got out of one of them in a single shot. We didn't keep score…thank the Lord. That would have just been more humiliation. Still, it's a beautiful course, even in the winter. No walking this course, unless you want your body found by other golfers in a few weeks.

Back to the humiliation: Make sure you bring your ceremonial Japanese swords to commit ritual seppuku on the 18th.

But players should not get distracted by the views – each hole is also another opportunity for the course to wreck a player’s scorecard and shatter a golfer’s ego. Royal New Kent is designed for experienced golfers – it is a double black diamond ski run, two blitzing all-pro linebackers, and a Randy Johnson fastball all rolled into one.

At the start of the round, pick the correct set of tees. The regulation tees (whites – Rating 70.8, Slope 135) appear short on the card (6,126 yards), but the forced carries, wind, enormous mounds (to play in, around and sometimes over), and constant uphill approach shots make the course play much longer. The advanced tees (black – Rating 73.1, Slope 141) play a seemingly manageable 6,560 yards, but the forced carries and angles are much more pronounced.

[From A Walk In The Park » ROYAL NEW KENT – PROVIDENCE FORGE, VA]

Saturday, February 4, 2012

A Changing Radius

The radius of a golf swing can change due to a number of swing flaws. But the bottom line is that it's usually a BAD thing when the radius lengthens or shortens in relation to the swing center that was established at address. After all, the club face is only a few inches high and the sweetspot is very small. If the radius lengthens, fat shots and/or deep divots can result. If it shortens, thin and topped shots can result. I've gone back and forth with first thin, then fat, and now thin again. Not fun, especially when that thin shot goes straight. Difficult lies can aggravate changing radius problems.

So what are the swing flaws that I've seen in myself?

I think the top one for me has been flipping the wrists at impact, such that the left wrist cups instead of bows. This is an unconscious reflex of the beginning golfer, who deduces that this motion will help the ball into the air. When the ball is caught flush, it will increase the loft of the club and make for a higher shot (basically turning a 7-iron into an 8 or 9-iron). Distance suffers as a result. But when the ball isn't caught flush, a thin or topped shot results. This, I believe, is what's currently causing me the most trouble. The cure is to work on the opposite, correct feel--a flat left wrist at impact. Think of turning the knuckles down at impact (or revving a motorcycle throttle). This delofts and closes the club face, turning a 7-iron into a 5-iron and resulting in a straighter, longer, lower trajectory ball flight. The right wrist, analogously, stays cupped or bent back more through impact, so one can also try bending the right wrist back more at impact to counter the instinct to flip the right wrist forward. Doing this also increases lag in the downswing. Hank Haney says that this needs to be a conscious swing thought for most golfers, though others feel it happens naturally. It makes sense, however, that if flipping is part of my muscle memory that I'll have to consciously work to make the correct move.

Maintaining the posture or "spine angle" is an oft-cited fundamental. Basically, losing one's posture changes the radius created at address. A basic example is losing the bend from the waist, which can occur in the backswing or the downswing. One of my bad habits is that I occasionally raise up slightly from the waist on the backswing. It's possible to compensate for this one by returning to the bend established at addressed…not easy, but possible.

The knees also play a role in a proper return to the ball. Many beginning golfers like me think the right leg should be straight on the backswing and the left leg straight at impact. Not true (unless you're after the S&T swing). I have a tendency to over straighten the right knee on the backswing , but I usually compensate by rebending the knee before impact. The left knee should also stay slightly bent in the downswing and only fully straighten into the followthrough.

Finally, the elbows. Chicken-winging can result for a variety of reasons and can occur on the backswing or downswing. I do this less now, but I need to work on extending more in the through swing and followthrough.