The relationship of club head path to club face angle at impact determines the shape of your ball flight (i.e., left curve, right curve, or dead straight), while it's mostly club face angle at impact that determines your ball's starting direction. This is all based on the proven "new" ball flight laws (9 potential shapes) and D-Plane theory. Stated simply, the "old" ball flight laws taught that the starting direction of the ball flight was determined by the path, while the face pointed at where the ball flight would finish. The "new" laws state the opposite.
Problem: You usually hit a draw but today you're hitting fades and pull-hooks that are not terrible but are leaving you in the rough. You can't figure out how to get your draw back. You strengthen your grip, close your stance, feel like you're swinging right, rotate your left forearm, and nothing you try is really bringing your nice draw back. Should you be trying to adjust your club path or club face angle? For most golfers who have hit nice draws in the past, they should be trying to fix their path. It's likely that MOST golfers should be scrutinizing their path, especially if their ball is starting on the right line. Because the face and path have a relationship that's actually reasonably fixed with a good grip, adjusting the path will often adjust the face angle automatically, without doing anything different. This is why better players who often "lose" their draw start hitting pull-hooks; the face and path still have the same relationship, but the path is now outside-in. The entire club face-club path relationship shifted left.
No matter what the shape of your backswing, it's the first six to twelve (6-12) inches from the top of the downswing that programs what path the clubhead will take back to the ball. So it's the initial drop of the hands and handle that need your attention, though it's true there are many ways to influence how a particular path witll occur.
When the club head is still above the hands during the transition and downswing, the butt end of the handle is automatically pointing at the path the club head will take into the ball at impact. The club head will always follow where the end of the handle is pointing at this point during the downswing. Try this drill: Go to the top of your backswing and then start down but stop after about 6-12 inches; your hands should be somewhere vertically between your sternum and your waist. Where is the butt end of the club pointing? Chances are it's pointing at the target line or even left of it already. This means you're already over-the-top and swinging outside-in. This may be what you want if you're a skilled player and trying to hit a fade, but that's not the case for most of us. If the butt end of the handle is pointing out to the right, you can probably expect one of the following ball flights: 1) push; 2) push-draw; 3) hook; 4) push-slice. Which of these you see depends entirely on the face angle relative to the amount of inside-out swing path you're using at impact. Could you see a pull-hook with an inside-out swing? The new ball flight laws say yes, but this is a highly improbable occurence, as most golfers--even beginners--would not have the impulse to swing outside 45 degrees with a club face closed the other way (this would make me feel as if I was trying to hit the golf ball with toe edge of the club).
How do you ensure you have an inside path back to the ball? First, ensure you make a good, compact, connected backswing, where you keep both elbows close together--the same distance between the elbows that you started with at address. This may not be a problem for you, but I personally fight a flying right elbow. The right elbow must be able to drop back in front of the body unhindered by crashing into the right side, and keeping good external rotation in the right humerus is crucial. Next, keep your attention on where the butt end of the club handle is pointing during the first 6-12 inches of the downswing (i.e., while the hands and handle are dropping); you must keep it pointing out to the right or towards the left-rear quadrant of the golf ball during this period of the downswing. The only way to do this, you'll find, is to keep your back facing the target just a touch longer during this period, so thinking of where the handle end is pointing helps you automate this move. This keeps you from opening your shoulders too soon, which is a major cause of swinging outside-in.
There are numerous other swing thoughts and feels you can use to achieve an inside-out delivery. I've already alluded to one of them: Keep your back closed while your hands begin to drop. You can also focus on the club head end, ensuring it falls behind you somewhat before arcing down towards the ball.
As a former slicer, you may--through various compensations--have developed a hook that occasionally--or maybe usually--turns into a vicious hook. On a bad day, you pull-hook a lot, which is partly left over from your slicing days. And then suddenly one day, you'll go back to slicing the crap out of the ball. And you'll marvel to yourself and wonder why and set out trying to hook the ball again. That's golf. Fun huh? But wait! Maybe you've never broken the slicing curse and have resigned yourself to trying to make the slice work.
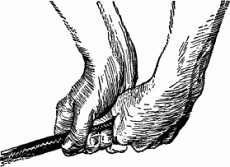
The Thumb Press
I've posted before about ways to square the club face and ingredients for various ball flights. If you start slicing the ball (i.e., curving left to right unintentionally), your club face is open to the path upon which the club head is moving; this is why you can hit a pull-slice (ball starting left of target usually with an outside-in path), straight-slice (ball starting at target usually with an in-out-in path), or push-slice (ball starting right of target usually with an inside-out path). So path has an effect, but you can see that slice basically means 'open club face' in all three situations. If you're hitting a push-slice (starts right and curves further right), you're almost there and just need the club face to close through impact! If you're hitting a pull-slice, you've got the most work to do, because you're likely over-the-top (OTT) with an open club face. But in all cases, the club face must be squared! That should be your first priority; then you can work on ingraining the correct plane and swing path. As the saying goes, you can go from slicing to hooking to good golf but can never go directly from slicing to good golf.
Many fine instructors, such as Brian Manzella, teach that OTT (and many other related golfing errors like flipping) is a symptom of an open club face, not the cause (though you'll find others that absolutely attribute a slice to an OTT path). Why is OTT a symptom instead of the cause, some say? Because in an effort to compensate for the open club face, you move OTT (and again, the open face could be causing other swing flaws) in an unconscious attempt to get the ball moving left, so that the ball might slice into the fairway instead of the right woods. So OTT may very well be a compensation for the open club face, not the cause. This means that the open club face is actually discouraging you from hitting inside-out, which is the correct path into the ball!
Assuming a netural to slightly strong left hand grip, you should use a dorsiflexed right wrist (DRW) to hit the golf ball, because you'll ensure a flat left wrist (FLW) at impact, and this may be one of the few universal fundamentals espoused by all great golfers and teachers. And I believe there are various places in the swing sequence where great golfers achieve this position. Some great golfers cup the left wrist at the top (e.g., Hogan, Couples, Watson, Clement, etc.) but dorsiflex the right wrist coming down (thereby flattening the left wrist). Others (e.g., Tiger Woods and Steve Stricker) achieve a FLW at the top, and thus, a DRW at the top before starting down. And some teachers espouse creating the DRW as you move off the ball in the takeaway (the point of this blog post). Most weekend and high-handicap golfers should only hinge or dorsiflex the right wrist in the backswing and forget the temptation to squeeze more power out of the conventionally taught upward vertical wrist cock (i.e., radial deviation or thumbs pointing more and more toward you); vertical wrist action feels powerful (and it may be marginally), but it will cup the left wrist and straighten the right wrist at the top, and that all has to be undone properly by impact to square the club face.
Duval's Closed Takeaway
Grip strength plays a role on the left wrist. Stronger grips tend toward cupping at the top, while neutral to weak grips tend toward flattening or bowing at the top. Want to slice on purpose? Use a weak grip and then cup the left wrist at the top--instant banana ball without major compensations. That's actually a good combination to use in a greenside bunker; but I digress.
Why is a FLW at the top antithetical to left wrist radial deviation at the top? Because of biomechanics. It's easy to see how a FLW limits or restricts radial deviation (i.e., upward vertical wrist action); the more you cup or dorsiflex the left wrist, the more you can vertically cock the left wrist up and create what Shawn Clement calls 'snuff boxes.' With a FLW at the top, the left wrist is restricted and can't radially deviate more than 90 degrees, which is all that's needed--especially by weekend golfers. Likewise, the DRW can radially deviate slightly but is prevented from going too far because of the blocking action of the FLW.
Too much vertical wrist cock can contribute to collapsing at the top (in addition to opening the face), especially with weekend golfers. In Stricker's case, he uses very minimal vertical wrist action, and so he's very consistent and long enough to score well against the best professionals; he may have the best professional golf swing for amateurs to mimic because of its simplicity and minimal vertical wrist action; however, he uses plenty of right wrist dorsiflexion!
And now for the point of this post: Using one of Brian Manzella's teaching points (which other teachers such as Joe Dante and Tom Tomasello have also espoused in one form or another), try setting the club face in the correct position early--even as you take the club back, using only one conscious wrist motion. Manzella calls it "twisting" the club (i.e., "twistaway"), such that you dorsiflex your right wrist, palm down, without radial deviation, as you take the club away. The left wrist flattens immediately; it may even arch or bow slightly, and the back of the left hand faces slightly towards the ground. The club face is pointing more down at the ball, as you take it away, staying square to the arc (some detractors would argue "closed to the arc"). Then take it to the top (the club face pointing more skyward than a slicer is likely used to), keeping in mind that you must keep good width, good lower body pivot to start the downswing, and then return the DRW back to the inside part of the ball.
Some notes of caution about the downswing. You'll notice, when you "twistaway" like this on your takeaway, your right palm is roughly on top of the shaft, which means that your right arm is above your left arm. You should immediately discern that you can't come back down exactly the same way, or you'll be OTT, hit pulls, pull-hooks, tops, toe shots, and produce thin, toe-deep divots. During your downswing, you have to shift left (left hip bump over the left ankle) and your arms sort of reverse positions: The right arm feels as if it initially comes down UNDER the left arm (instead of on top of the left arm as it was in the takeaway). The right shoulder feels like it's moving down towards the right pants pocket. In a sense, you're opening the face up just slightly as you come down, because a strong lower body move to start down--in addition to adding tremendous power and great sequencing--has an opening effect on the club face that counteracts the closing affect of the palm-down DRW. This really puts you in a powerful impact alignment, pressuring the shaft, with the hands leading the club head down, with a FLW and DRW right wrist. You're making a bit of a loop--back steeper and closed, and down shallower and a bit more open, instead of trying to go back open and then close the face quickly on the way down (what's conventionally taught but is very tough to do consistently). In reality, your wrists aren't changing positions at all to create this more open club face position; your body and arms are changing to allow for the correct contact, so that your right palm comes back down a little more to the inside of the ball, as opposed to on top of the ball (which is how you executed the "twist" takeaway). Using the "twist" takeaway, get the feeling that the right arm and right hand are coming UNDER the left on the way down and you'll hit inside-out with a club face that's closed just enough--not too much, and with no extra, crazy squaring manipulations needed on the way through.
You no longer have to swing OTT, cast, or flip to keep the ball from going right; you've removed the cause. You no longer need to rotate the hands over in a flash to close the club face. You have to learn to trust that you can hit inside-out, start the ball to the right, and then draw it back to the left, because you've already ensured a square club face. No manipulation coming down is necessary, other than just starting down properly. Manzella teaches this in his "Never Slice Again" video, but he's also published parts of it on his web site and in Golf Magazine. Joe Dante's "Four Magic Moves" book is also an old classic that covers this precept. Many others teach very similar concepts, and just as many are opponents of this kind of thing (like many golf theories--lots of contradictory opinions, with everyone of them thinking their way is the "right" way).
Duval Closed at Top
Are there touring pros who are or have been shut or appear shut at the top? David Duval, Zach Johnson, Lee Trevino, Graeme McDowell, Greg Norman, Boo Weekly, Payne Stewart, Tom Lehman, Tom Weiskopf, and Dustin Johnson to name a few. But remember that this "shut face" position can be achieved at the beginning of the downswing or at any point before impact, and many pros, including Tiger Woods, do it this way (i.e., club face angled more toward the ground coming into impact due to the right palm rotating down toward the ground). Hogan went from cupped at the top to bowed left wrist at the bottom. Taking the club back already in this position and keeping it that way prevents the timing issues associated with achieving the position on the way down--very important for weekend golfers!
Why do you think you slice, because you come ‘over-the-top’? Reverse Pivot? Cut across the ball? ‘Hang back’ on your back foot, etc.? Nope. You may do one or all of the above, but these ‘flaws’ don’t cause the slice, you do them because you slice. You slice, because the clubface is too open. Period. Fix the clubface, and the slice goes bye-bye forever. The compensations will often also go away quickly when they are no longer needed.
Once the hands move beyond the right thigh, the right wrist will start bending back which is classified as "dorsiflexion." This bending back of the right wrist creates the corresponding "flat left wrist" that is so well known in golf instruction.
As the backswing continues to progress beyond the right thigh area and the wrist bends back, the right elbow will start to fold. The right elbow actually does not travel very far in a good backswing. It simply folds and points toward the ground as the right palm faces the sky in the classic "waiters’ tray" position at the top.
The best way to describe the right arm on the downswing is that it should be "pushing down and out."
"Pushing down" allows the right arm to actively straighten while maintaining its bend in the right wrist.
"Out" is the second half of the equation as it directs the right arm to deliver the club head from the inside. Most players need to feel as if they are driving the right arm not only "down," but "out." I often times describe this feeling as if the right arm is being directed more towards right field.
The down cock of Hogan and Garcia has nothing to do with achieving distance. It is the maintaining of the cock [the hinge or DRW] in the right wrist until waist high in the down stroke that produces club head speed. The left wrist cock is unnecessary mechanical motion that must be recovered from. The left wrist cock[s] in a plane that is 90 degrees to the plane of the swing. Left wrist cock is one of the most unnecessary and hardest to recover from mechanical motions in golf.
When it is done, without moving the hands other wise, the right hand breaks backward at the wrist and the left hand breaks forward or inward, the hack of the left hand going under and facing, in a general way, toward the ground.
Good wrist action is no wrist action. This is something I have been saying for years and years. It's one of my Surgisms. Yet, every so often I get a critic who is adamant that I actually cock my wrists. Well Surgites, today I'm going to let the video do the talking!
A strong grip is by far the most common error I see with players who curve the ball too much from right to left. The right hand drifts to the right--away from the target--and moves underneath the club, as shown in the photograph below. With the right hand in this position, it will tend to turn over too much through impact. Because the position of the right palm roughly replicates the clubface, it's easy to see why this turning over of the right hand causes the clubface to close and the ball to curve left.
As you drive through the hitting zone, give the ball a slap with your right hand, changing your right wrist from bent back to bowed. Check the positions at left to see what it looks like.
I have had tremendous success with this technique – primarily, I believe, because it taps into a [slicer's] instinct that screams – in order for my ball to not leak right I must swing as much to the left as possible. Essentially the drill gives the golfer a reason, something they’ve never had, to swing to the right.
Tilt the face down 30 degrees (1 hour)
Take normal grip
Adjust shoulders and arms to square the face at address
If you understand the above-described biomechanical maneuver, then you should realize that this "twistaway" maneuver is automatically/naturally used by a TGM hitter, who doesn't use a takeaway swivel action.
At this stage [downswing, shaft parallel to the ground] the right wrist should still be bent back fully but the palm is now facing the ground not the sky. With the palm facing down this insures the clubface is also facing down or toward the ball and requires no scooping or manipulation to be squared up in time for the hit.
A clubface that points down was said to be a closed clubface. We now know that this is not true and in fact is a square clubface position. The clubface angle should match the angle formed by the back of your left hand on the takeaway. The more you have to manipulate the hands, the more clubface control you will lose. So next time you swing a club look at the toe position at your waist height. Is it open, square, or closed? [Toe-up means the club face is open.]
This golfer eliminated the shank very quickly when we got him to stop rotating the face open during the take-away. At the start, he was rolling his arms, right palm toward the sky, on the backswing, and he changed that to keeping the right palm facing down toward the ground for as long as he could throughout the backswing. Yes, it felt awkward as could be. The shanks disappeared instantly, but returned every time he failed to execute the new move. That’s good. There’s nothing like immediate feedback! But now his solidly struck shots went well left of the target. I explained that he no longer needed to try to flip the club closed through impact to correct the formerly wide-open face. He began to hit far better shots when he felt like he was keeping the face from closing through impact. His sensation was closed back, open down. It worked! Funny game.
The philosophy of the golf swing is that the position of the clubface throughout the entire golf swing is the single most important fundamental there is. It effects all other major fundamentals and is the glue that holds the golf swing together. When we swing the club with a square clubface, we naturally improve the path in which the club head comes into the ball, the angle that we approach the ball, our ability to get into a great impact position, our acceleration through the shot and our overall rhythm.
[Tiger Wood's] right palm twists outwards as he starts the downswing. The motion is as if you are directing traffic to stop coming from your right side. There is a little straightening of the right arm along with the palm rotating to face away from you. This is the little secret that no says much about. Yet it happens in most good golf swings.
One of the biggest misunderstandings of the golf swing is that the hands have to rotate through impact. While this may be partly true, it directs the attention of the golfer to a point in the swing where all is lost already. This golfer has the same odds at getting the clubface squared at impact as me getting into a size 32 pants There’s too much error built into the swing and we already know what’s going to happen.
Do you know why golfers don't change club path on the course? It is because they don't understand and cannot control the club face. When you have a club face that is open, the golfer will always correct this by swinging over the top, or left. Simple.
In addition to Dustin Johnson, many tour players have played successfully from a closed-face position, including Zach Johnson, Paul Azinger and Rory Sabbatini. The common denominator amongst them is they all rotate their body very aggressively through impact. This rotation neutralizes the clubface and prevents the ball from curving left. This technique can hold up very well under pressure because these players are not required to consciously close the clubface at any time through impact. Rather, the opposite is true: the harder they rotate and do nothing with the clubface, the straighter the ball will typically fly.
"David’s [Duval] clubface is amazingly square through impact," says David Leadbetter. "His clubface is closed at the top, the face pointing a bit toward the sky, which along with the strong grip would be a recipe for hooking for some players. But David works the club `under’ on the downswing, a bit like Lee Trevino, and that move can make a player incredibly accurate, especially with the irons."
Most professional golfers would tell you that the biggest and most likely error seen among amateurs in terms of stance distance to the ball is standing too far away--in a sense, reaching for the ball. However, Tom Watson and others' opinions aside, I'm telling you that you CAN stand too close to the ball, because I did it for a while.
What are some symptoms of standing too close? Over-the-top/outside-in swing, pulls, slices, shanks, divots pointing left, fat shots, steep swing plane, standing up through impact, etc. True that these mishits and characteristics can originate from other swing problems, but I believe it's true that many--if not most--errors can be traced to the setup (GASP - grip, alignment/aim, stance, and posture/position).
You will find numerous methods online and in books to explain how you can judge the correct distance to the ball, and you'll notice that it's not an exact science. And two additional factors probably account for this inexact advice: One's body type and equipment (and whether that equipment is fitted to one's body type). For example, maybe you're 6 feet tall and skinny but your arms are short for your height. Or maybe you're 6 feet fall with a long, thick torso but you have short arms and legs. No matter, all of these characteristics can affect how far away you should stand from the ball to get an ideal swing plane. To me, the best advice is to just allow your arm-triangle to hang straight down from the shoulders, such that there's some open space between the arms and body; a down-the-line view would give the arm-triangle plane a perpendicular-to-the-ground appearance (though the arms may reach out towards the ball a bit more with the driver). I like to think of this triangular arm plane as floating on top of the chest and swinging around the neck and NOT underneath the chest; this should help you to visualize how to assume the proper distance to the ball with a given club.
I had experimented with a taller posture, which can cause one to stand closer to the ball, especially if one is not a tall player. Anything in golf can be taken too far, and what was a good thing, in retrospect, had gone too far for my body type. Standing closer to the ball, with a narrower stance and a taller posture, can lead to a swing plane that's too vertical, especially troublesome for shorter players. I had pulled my arms in closer to my chest, such that my elbows were REALLY close to my stomach. My arms were no longer just hanging from my shoulder sockets as they should be; I had been using unconscious tension to pull my arms inward, with my hands too close to my thighs at address. I had become that version of golfer that Tom Watson said didn't really exist: I was standing TOO close to the ball. My arm-triangle plane was angled inward; it no longer hung straight down. I had become TOO connected, meaning my entire upper arm was pressed against my torso, when only the top part of the upper arms should be pressed against or connected to the chest.
To correct my mistake, I had to let the triangle formed by my arms at address hang a little more freely from my shoulders, and because of this, I had to back away from the golf ball a few inches and bend over more. The club shaft automatically lowered into a flatter position at address, and I could focus a bit more on the inside of the ball instead of the top of it. It felt like I was much further away from the ball, and my posture was more bent over, covering the ball more. If you're 5-9 like me, chances are your posture should be more bent over, and your swing plane more flat. Getting further away from the ball (still only far enough so that one's arms hang freely) automatically shallows the swing plane and makes it easier to hit from the inside-out. It's also easier to stay in one's correct posture, covering the ball through impact, because the arms have space to move through without crashing into the body.
I finally started seeing a push again, which was a welcome sight after lining up on the left side of tee box, hoping to hit a push-draw, and instead, ending up with a pull-hook into the left rough or trees. If you do this and start pushing the ball, you will only need to close the club face more to get the ball drawing. If it starts hooking too much, you'll need to work on closing the club face less. This works hand-in-hand with a correct takeaway; be sure to keep the club outside the hands in the takeaway and avoid jerking the club inside, which will just cause another pull situation due to rerouting the club on the downswing.
Standing too close to the ball causes golfers to stand too upright, losing the forward upper body tilt. The arms won’t have enough room to hang and swing freely, causing the club to be lifted by the hands in the backswing, forced down on the downswing, and lifted again to the finish position. Since the hands are overly active, the body will remain relatively inactive resulting in poor club contact with the ball and very weak shots.
Your posture determines your swing plane to a large degree. It seems that golfers who stand very tall and close to the ball have very upright swings and golfers who bend over a lot and are farther from the ball tend to have flatter swings. I would encourage the average golfer to bend forward more in order to make it easier to make a flatter (more rounded) swing as this will help him hook the ball and also help him take a divot after the ball is struck.
Heck, if we can stand too far where we're reaching or stretching for the ball that takes us out of dynamic balance. It should be obvious that the exact opposite could be true. We can stand too close to the ball and be out of dynamic balance. In fact, being way too close to the ball, we're in trouble when we swing down with our hands and arms and club to impact the ball. We could very likely start bumping our arms into our body or into our hips or into our legs and have to spin out of the shot too fast to make room. So yes, we can definitely stand too close.
Interestingly enough, Martin Kaymer just brought this up last night on the Fix. He said when hitting a draw, he sets up a bit further away from the ball. This results in 2 key things for shaping a draw: I allows him to come more from the inside without getting stuck, and it flattens out his swing plane a bit more.
Standing with your body too close to the golf ball so you don’t give yourself enough room, then you try and lean back to create room, there’s another big cause of the fat shots.
If you stand too close to the ball the club gets too steep in the back swing and if you are too far away, the club becomes too flat. You need to get a feel for this and ensure that your weight is in the center of your feet. If you are too far away from the ball, you will feel like you are too much on the balls of your feet. If you are too close you will be on your heels.
I must have a ga-ja-billion posts on shaping shots (i.e., coaxing fades and draws), and that's because I'm always in search of the best way to do it. The best way is the way that is consistent and reliable for you to perform on the course (i.e., 90% of the time the ball bends as you intended). Click on the tags or keywords at the end of this post and you'll discover the numerous ways it's possible to influence the ball's starting line and follow-on ball flight.
I think this method--along with Jack's method--may be the easiest.
To fade the ball, tee up the ball LOW (even with the top of the driver) and on the right side of the tee box. Aim the club face towards the left side of the fairway (pick a tree or other target on the left); this represents the starting line. Place the club down aligned with this starting line. Make the address stance slightly open to the starting line; this means the hips, knees, feet, and shoulders should be aligned to the left. The upper body should still be tilted away from the target, and one must still shift the weight correctly and stay behind the ball for this power fade (sort of a push-fade, as you're still hitting inside-out ala Lee Trevino). Position the ball off the inside of the left instep (or roughly with the left shoulder). The further forward the ball position, the further left the ball should start on line before curving. Experiment with tee heights and ball position to get the right mix for the shot shape you want. Hit through the ball as if hitting four balls in a row on the starting line. Finally, use your normal grip, as most amateurs and high-handicappers hit with a slightly open club face even when trying to close it. Done correctly you should impart a nice, narrow fade on the ball.
To draw the ball, tee up the ball HIGH (one quarter to half the ball above the driver) and on the left side of the tee box. Pick a target on the left side of the fairway and place the club on that starting line. Make the address stance slightly closed to the starting line (pull the right foot back and align the shoulders and knees to the feet). Position the ball back in the stance (a few inches to the right of where it would be for the fade); the ball should be inside the left heel or roughly even with your shirt logo. Finally, rotate the club face slightly closed compared to the stance and then take your normal grip (most amateur golfers have trouble closing the club face enough for a push-draw, so manipulating the club at setup is easiest). Instead of hitting through all four balls, pretend you're hitting only the first ball of the four. Experiment to find the right mix; you will draw the ball (if you hook it then either move the ball slightly forward, tee it lower, lessen your closed stance, or try combinations of all).
A few notes. The lower the loft of the club (6-iron and up to driver), the easier it is to slice and the harder it is draw (another reason for manipulating the club face slightly closed for a draw). The higher the loft of the club (i.e., 7-iron and higher), the easier it is to hook and more difficult to fade. Draws tend to fly lower, further, and run more on landing. Fades tend to fly higher, shorter, and land with less roll. Take this into account when selecting a club. Don't be afraid to exaggerate adjustments to get the ball spinning like you want (i.e., if you lose your draw, get the ball hooking by standing with your back to the target and hitting balls).Full extension adds power and helps close the face (obviously useful for a draw but maybe for the fade too if the fade is too close to a slice). Hit both shots with the same swing shape--inside-out. And inside-out fade is called a power fade, and this was used by the greats like Hogan, Trevino, and Nicklaus.
Trevino’s swing is unorthodox, and so is his method for hitting the fade. The conventional way is to align the body left of target, aim the clubface at the target, and swing along the line of the body. Trevino follows the first two steps, but swings down the target line rather than with his body. The deviation actually produces a swing path that’s inside-to-out relative to the body, and directly down the target line. Trevino produces the left-to-right spin necessary for a fade by delaying the release (rolling over) of his hands through impact. According to Trevino, his routine produces more power than the traditional technique. He acknowledges that the ball will finish right of the target, but suggests simply lining up the body and clubface farther left to compensate.
Most players think of the swing as a circle. Trevino saw it as something different. Instead of folding his arms up after impact to remain on the circle, he chased his right shoulder toward the target to the point where the club pointed straight down the line. He made this move with such force that it looked like his right arm was going to rip straight out of its shoulder socket. It’s actually a move that most great ballstrikers have used over the decades.
Eventually, your left elbow must fold and get the club moving up the circle again, but try chasing down the line first, like Trevino did. I bet you’ll find yourself hitting the ball a little straighter and, if you can hold off your release just that much longer, creating a power fade. While the word “fade” has negative connotations for a chronic slicer, a controlled cut in the hands of a good player like Trevino leads to a Hall-of-Fame career, five Vardon Trophies and half a dozen major victories.
"Inside out?" you might ask. "Doesn't that cause a draw?" Yes, it does, but only when your swing is inside out in relation to your target line. This swing is inside out in relation to the body alignment, but straight back to straight through in relation to the target line (see illustration). You won't draw the ball with this swing. If anything, you will contact the ball after the club has swung down and back to, the inside on the forward swing, thus putting a slight left to right spin on the ball .
So you have two big pluses here: First, you have an inside to outside attack in relation to your body. This is much more powerful than the outside-to inside swings that many amateurs use to fade the ball. Second, you have the club moving down the target line, producing either a straight ball or slight fade. You can't beat that combination.
Here's a trick that might help you understand this a little better. After you set up, imagine that there are three golf balls in front of the one you're about to hit. For the fade, you want to hit through all four balls. This will force your right shoulder down rather than around on the downswing, with your arms extending toward the target on the follow through. Keep in mind that the right shoulder doesn't dip. That would cause fat shots. Instead, the shoulder simply swivels underneath the chin. As a result, you will hold your release, keep the club moving down the target line, and push the ball to the hole, with very little sidespin.
I have, however, encountered one "problem" among people who have tried this method. They say to me, "Lee, when I swing your way, I hit the ball way to the right. I just tell them, "Aim farther left.” Don't open your stance more; just shift your entire orientation to the left. In other words, rather than aim the clubface down the fairway or at the pin, aim it at an intermediate target more to the left and shift your body alignment farther to the left as well. There's no rule that says you have to aim down the middle. Line up for the trees on the left and push it down the fairway. It's easy, when you know for sure that you can hit the push/fade.
The beauty of the balls in a line image is that you can use it to draw the ball, too. For the right to left shot, line up your body parallel to the target line and aim your clubface at an intermediate target to the right, to allow for the draw. Then, simply think of picking off the first ball in line, the real ball, without touching the three imaginary ones. This brings the right shoulder and club up quickly in the follow through, and whenever the club and shoulder move up, they go counterclockwise as well, which closes the clubface. Result: a draw.
We've all heard time and again that we need to swing inside-out, and there is no shortage of drills and instruction out there designed to help us do just that. But like most things in golf, there's usually a huge difference between what we THINK we're doing and what we're ACTUALLY doing during our facsimiles of a swing. Often when we try hard to follow the target or aim line with the club, we end up unintentionally swinging over the top (OTT). That might be okay if you're trying to hit a fade or slice, but this isn't preferable or as powerful as swinging from the inside and hitting a draw.
I've written about swinging inside-out numerous times (including Ernie Els' clever "keep the box" thought)--a move that produces an inside path to the ball, which is one half of the equation to hitting a hook or draw. The other half of the equation is that the club face at impact must be closed to the path to some degree. Too much club face closure relative to the club face path and the ball will hook wildly or pull-hook. We've been told to swing to right field, swing towards one o'clock, hit the inside-left of the ball, etc. I've tried all of these and they've all worked and then later failed me in one way or another, and I believe that's because I was still making an unintentional OTT move by being fixated on the target or aim line and fixated on getting the club head back to the ball with respect to the target line.
I think it might be best to occasionally drill what a REAL inside path to the ball feels like. One should start with imagination: imagine a half semi-circle behind the ball. The smaller the club, the tighter that circle should be if attempting to hit the inside. Now, how can one swing inside WITHOUT trying to steer the arms through impact, which relies on timing and small muscles too much? In other words, how can you make an inside swing using--mostly--the big muscles in the lower body to drive the swing?
I don't think I've seen a better description lately than Martin Hall's drill/feel for hitting inside-out (video below). At address, imagine there's a large tent stake that's about waist high, inline with your rear foot, and about three feet away from you. Your first thought coming down should be to use your club as a hammer to hit that stake before rotating down. This will shallow the swing path to inside-out instead of the steeper outside-in move.
Another thought is to feel like the butt end of the club handle (and thus the entire club) is pointing out to right field shortly after starting down (back is still turned at this point and hands and wrists remain passive). But avoid the impulse to throw the club head at the ball from the top. When the club reaches nearparallel to the ground and the hands are located close to belt level, the shoulders and the end of the club handle (and thus the whole club) will be pointing out to the right and appear to be pointing at the inside left of the ball or inside the target line. The right elbow will have dropped in close to the right hip and the right wrist can dorsiflex (bend back) even further (right palm facing the ground) to keep the end of the club pointing off to the right and on plane. Keep the club and shoulders pointing this way for as long as gravity and centrifugal force will allow. You may notice that the weight shift driving all this is naturally moving the way many teaching professionals (such Hank Haney and David Leadbetter) describe: The weight shifts first into the left big toe and then around to the outside of the left foot. The reason is that the weight of the club and arms are moving in this direction initially!
The club head will "fall" (creating the appearance of a loop) and be located well behind you at this point--NOT pointing at the target line, which would be an OTT move. This swing thought solves several problems. For one, it helps ensure an inside approach to the ball, which is essential for hitting a draw and avoiding a slice. It also ensures that lag is retained because of how late the butt end of the club is still pointing out to the right; as a matter of fact, lagging the club and swinging inside-out are closely related, just as casting and swinging OTT are closely related. The club head shouldn't just lag behind the hands relative to the target line; it should ALSO lag behind the hands relative to right field (lags behind the hands and also behind the body for a time). Finally, it flattens a steep swing and should therefore lessen fat shots.
In order for the club to return to that lined-up position at address, it must approach the ball on the downswing on an inside-out path. In fact, the proper swing path will cause the club to strike the inside quarter of the ball.
“On line” and “target line” are not the same. If you could take a string and attach it to the inside quarter of the ball on one end and to the butt of the club at the top of the backswing, then keep the butt of the club sliding straight down that string on the downswing, the swing would be “on line.”
So, the question is, “How do you get the club to the inside and in the ‘slot’ on the downswing?”
There are many ways to feel this. One of the most popular thoughts is the clock image. Feel like you are swinging the club from 7 o’clock to 1 o’clock. Some golfers need a body thought to get the club to the inside on the downswing. If this is you, you might want to think of getting your right elbow close to your right hip on the downswing. Too simple, you say.
Other golfers need to focus on the ball. If this is you, try to hit the inside edge of the ball at impact.
A good thought for you might be to keep your back to your target and swing your arms down to the inside. Just try to avoid starting your down with your shoulders and upper body as this will throw the club down on a steep and outside path.
For those of you who are very athletic and have strong legs, a good thought would be to move your weight to your front leg during the transition. This will allow the arms and club to fall down to the inside on the forward swing. Other people can relate to the butt end of the club. These people seem to gain distance (maybe 10 to 15 yards) simply by feeling the butt end of the club being pulled down at the ball. In any case, this seems to get the club on a good inside path.
Speed is another issue. If you have a fast change of direction it is called “hitting from the top.” If you are too fast during your transition, your club will never come down in the proper inside-outside approach angle. A good thought for you might be “slow at the top.’’
You may be hitting the outside of the ball at impact, imparting left to right spin. To correct this, you need to hit the inside of the ball at impact instead. To help you achieve this position, have the butt end of the club pointing inside the ball-target line as you swing your arms down. This will help you hit the inside of the ball.
As the downswing starts, the right arm and shoulder simply drop straight down as the feet press firmly into the ground and the knees make a slight lateral shift. There is no body turn at this stage the right arm cant drop straight down if the chest starts turning.
This straight down drop is what stores the lag angle at right elbow and right wrist as the club drops on plane into the slot half way down. The secret at this stage of the swing is to feel the pressure against the right hand trigger finger as the right palm faces down at waist-high. From the top of the backswing it feels like hitting your right thigh with the heel of your right hand while your right wrist stays bent all the way back.
At this waist-high downswing position of the hands, the butt of the club should point at the golf ball, toe of club points upward (but not quite straight up) and right palm is facing the ground, or more technically faces the ball on the ground.
There's a reason Jack Nicklaus is still the greatest player of all time (at least in terms of majors won). I've blogged so many times about ways to hit fades and draws. All of the methods work on the same D-plane principle (i.e., all roads lead to Rome), but some methods are easier to understand and pull off than others. Feel free to review my early post on factors that are associated with various shot shapes or ball flights.
To hit a draw, you could strengthen your grip, close your stance, move the ball back, swing out to the right, and do any number of other things that we've been told will help hit a draw. Same thing for a fade (except the reverse). But I've found that these methods sometimes have too many variables and don't always end up giving us the shot shape intended; sometimes the ball hooks wildly instead of mildly drawing, slicing instead of mildly fading, or ironically going straight! Being able to shape the ball is important in order to advance in skill. Shaping the shot allows one to bend the ball around obstacles, fight the wind's influence, reach a tucked pin, control trajectory, control roll upon landing, and generally avoid trouble.
I think Jack's method (being taught in the video below to beginning children of the First Tee program) might be the one to use because of its simplicity. Jack Nicklausadvocates using the same swing for all shots. What he changes is the club face and maybe the ball position. In other words, he loosens his normal, neutral grip, opens or hoods the club face slightly (depending on the desired shot shape), and then regrips with the same neutral grip. However, keep in mind the caveats below.
Many instructors correctly advocate creating a divergence between club face and swing path to shape shots, but they often are nebulous in their explanations (i.e., "aim your club face at the target and swing either left or right of the target"). However, one must either change the grip on the club (i.e., stronger or weaker), change the club face position at setup (as Jack describes), or use the hands/arms to control the club face during the swing. Simply "aiming the club face" with no other modifications will do nothing except cause one to lose another ball. Actively rolling the forearms (closing the face for a draw) or blocking the forearms (slowing the face for a fade) is a method best left to the timing of professionals.
Here are my embellishments to Jack's simple method. Stand behind the ball and pick a desired target. Set up on that target line as if you were going to attempt to hit a perfectly straight ball. To hit a draw, hood or close the club face a few degrees as described above (ungrip and regrip the club to do this). Now adjust the body and stance such that the newly hooded club face is aimed at the desired starting line (i.e., for a draw, aim the face and body further right of the target line). Now take a normal swing as if you were trying to hit the ball well to the right of the target. The ball flight should start right (where the club face was aiming at address) and draw or turn back towards the intended target.
For a fade, reverse every step above; you should ungrip, open the club face a few degrees, and then regrip. Aim the body, stance, and club face left of the target line and take the swing as if you were trying to hit the ball well left of the target. The ball flight should start left and fade back to the right. Use the exact same swing for both. We're following Jack's advice by reducing variables and making the swing simpler.
Now a few caveats.When attempting a fade, go with at least one club of lesser loft (e.g., 5-iron instead of 6-iron) for the required distance; this is because the fade shot will tend to go higher, shorter, and land softer, with little or no roll. The opposite is true for a draw: it will tend to go lower, longer, and run after landing, so choose a club with more loft for the required distance (e.g., 8-iron instead of a 7-iron). When you open a club you're adding loft and taking away loft when you close a club (closing down a 3-iron will turn it into a 2-iron or less).
Also, clubs with lower lofts (like a driver) don't need to be opened or closed quite as much to impart the same amount of side spin as higher lofts (like a pitching wedge). So you should hood or open clubs with lower lofts (e.g., driver or 4-iron) much less than you would with higher lofted clubs (e.g., 8-iron or wedges). As always, experiment!
Next, close your face a bit at address. But be careful not to close too much. Drivers don't have much loft so if you close the face too much, you can't get the ball airborne and lose the distance.
Then all you do to play a fade is aim your body slightly left (as Jim is making sure I'm doing above), open the clubface, and make the exact same swing.
You are starting the ball to the left because you aimed your whole body to the left. In other words, you are purposely trying to hit the ball left of your target. In trying to teach this shot to people this is where they go wrong. They aim there stance and body to the left yet they swing down the target line. REMEMBER: if you aim left, you have to swing left. The ball will spin right because of the clubface position.
In order to hit fades and draws or to hit the ball low or high, Nicklaus uses the same swing. It is the angle of the club head at impact that enables you to hit these variations in your shots. To get the club head on these angles, Nicklaus simply adjusts the position of the club head at address.
Adjustable drivers are all the rage these days; golfers can adjust various attributes of the club to suit their swings and help correct ball flight errors. My Nike SQ Machspeed driver is a square-headed, thud-making monster; I keep it adjusted to a flatter lie with a slightly closed club face position (because my ball flight error tends to be a slice).
However, I've noticed that on days when I'm making a good turn behind the ball and using a reasonably strong grip (slightly more than neutral), I can start pulling, hooking, and hitting really low shots off the tee with it. This is why it's important to be able to diagnose what's going on while playing. Two primary components of ball flight are swing path and club face; the two are joined at the hip and synergistic.
When I know I'm making a good turn behind the ball (full shoulder turn) and getting an inside-out swing path and the ball is hooking, pulling, or going low, I know that my club face is too closed to match that swing path. Suddenly, my adjusted driver becomes an enemy. True, I'm not slicing…I'm just doing the opposite, which can be disastrous too.
In those situations, a slight grip change may be all that's needed to correct the ball flight. I've noticed that the stronger grip I use for my other lower lofted clubs (like the 3-hybrid or 5-iron) can produce low and/or left ball flights with my adjustable driver, if I'm swinging on a good inside-out path. So (and every day on the golf course is different), I will slightly rotate my grip to the left (V's pointing between my neck and right shoulder as opposed to directly at my right shoulder) as a fix. Usually, this small change will straighten my ball flight and produce a higher draw shape.
However, go too far with the grip (or start making an incomplete turn) and the ball will start fading or slicing again. Golf is great, huh?
Stand behind the ball and picture where you want the ball to end up. Then (depending on the desired ball flight) pick a line on which you'd like to start the ball that makes sense (i.e., if you're trying to fade back to a target, pick an aim line to the left of the target). Now, align oneself as if trying to hit a straight shot along the aim line (completely neutral stance). If trying to hit a draw turn the back foot out more and the front foot perpendicular to the target line; for a fade, do the opposite.
This encourages either more shoulder and body turn on the backswing (draw with back foot flared out) or more shoulder and body turn on the downswing (fade with front foot flared out).
I initially read about this in Hank Haney's book, The Only Golf Lesson You'll Ever Need, but it makes complete sense if you think about it. The cool thing about doing this to encourage a certain ball flight is that it seems to give just the right amount of inside-out or outside-in, providing slight draws and fades as opposed to more extreme hooks and slices that can come from the other methods (like the traditional setup method--link above).
For a straighter shot attempt (encouraging an in-out-in path), flair both feet out slightly.
Flare your right foot to 2 o'clock and position your left foot at 12 o'clock. Now swing the club for real and feel the increase in shoulder turn going back and the lessening of it into your follow-through.
As you do this, make sure you maintain your posture and forward tilt. Straightening up through impact only encourages a slice. This tricks also works if you hook the ball. In this case, position your right foot at 12 o'clock and your left foot at 10 o'clock. This will decrease your turn back and increase your turn through. You'll hit the ball more with your body and less with your hands so they can't take over and shut down the clubface through impact.
To increase your ability to turn back and through the ball, flare your feet between 15 and 30 degrees at address, depending on your flexibility. The less flexible you are, the more a flared back foot will allow you to turn behind the ball and then approach the target line from the inside on the downswing.
The correct amount of flare in your front foot at address makes it easier to rotate your front hip and knee correctly as you swing through the hitting zone. If your swing is too steep, use more flare; if it's too flat, use less.
I've posted already about setups to hit the fade and draw and the D-Plane (which explains the ball flight laws). My big fall flight error (like most amateur golfers) is the slice. Sometimes I set up to hit a draw and still end up hitting a slight fade (works out okay sometimes), or sometimes I'll set up to hit a fade and it will become a slice. That tells me that I'm compounding the left-to-right ball flight with my setup. And I've done the same thing with the draw too--setup to hit a draw and then end up hooking the ball off the course. Unfortunately, there are times when I've set up to hit one and hit the opposite (I'd rather not talk about those times right now).
Recently I was hitting fairly straight tee shots with a slight fade and was trying to figure out why I couldn't hit the tight draw that I was hitting a few days before. Everything SEEMED the same, but it obviously wasn't. Then I hit on it: I was NOT turning my shoulders back fully to 90 degrees. I noticed that my left shoulder pointed in front of the ball at the top of my backswing, which was giving me a slight outside-in swing path. That path along with a square club face should produce a fade; if the face was open, it would produce a slice (basically a severe fade from which it's hard to recover). Anything used on top of that to exacerbate the outside-in swing path would produce a more severe fade or slice, even with a relatively square club face.
Golf is really about trying to diagnose and repair what's screwed up during a round, because it's easy to get lazy and let bad habits or old tendencies creep in without realizing it (e.g., partial shoulder turn, right leg straightening to much, not keeping the arms in front, etc.). If you're getting a slice, it can be a lot of things, but I know I have a tendency to get lazy with the shoulder turn (which can cause a laid-off position at the top). I have a tendency to let the arms get too much across my chest (too inside leading to outside-in), and I have a tendency to get too handsy with my takeaway (too inside on the backswing that can lead to OTT).
The reason it's tough to diagnose why one might be fading, slicing, hooking, pulling, pushing, or drawing when it's not intended is that ball flights are a marriage between swing path and face at impact. If you KNOW your path is inside-out but you're push-slicing then you have an open club face. I believe this was more my issue when I first started golf--I simply was blocking the club face open and would often end up with a push-slice. Sometimes (unless you're really paying attention to yourself compared against the fundamentals), you may have trouble diagnosing what you're doing wrong.
Given that I noticed (this time) that I wasn't getting my back to the target at the top, I hit on the idea of using a variable shoulder turn to try to hit cuts, straight, and draws, especially since the traditional setup ideas to hit them usually give me severe slices and hooks instead of the intended flights. What if I simply used less shoulder turn for a fade and more for a draw? Then I could aim left of my intended target and hit the fade and vice versa for the draw. I wouldn't have to worry about all the other aspects of hitting fades and draws. If you think about it, it's the equivalent of opening or closing the stance to hit a fade or draw, but adjusting the stance requires the same full turn on both.
Here's something to try: To hit a fade, try turning the shoulders so that the left shoulder points in front of the ball at the top (from your perspective looking down); you shouldn't be able to see your left foot because your left shoulder will be shielding it from view. For a draw, turn more fully so that the left shoulder points behind the ball and covers the right foot from view. A straighter ball will be somewhere in between. Don't do anything else differently (except for where you aim)…use the same grip, square stance, takeaway, and ball position. The point here is to manipulate only one variable: swing path (and to do so as simply as possible).
Probably one of the best bits of golf swing advice I've ever seen or heard comes from the great touring professional Ernie Els; touring pros aren't usually the best golf teachers, but this small tip from Els has become one of my top swing thoughts.
Simply stated it's this: the right elbow, right forearm, and right wrist (and thus the club) form a box shape (actually more of a rectangle with 2 90-degree angles) at the top of the swing. During transition, one simply allows this box shape to remain intact and fall down in front (right elbow coming close to the right hip while the shoulders REMAIN turned) and then release it past the ball. As Ernie so simply puts it, "Keep the box and give it a lash!"
I believe it's probably best to focus on the right arm only in the backswing, because doing this properly will keep the left arm straighter and help set the wrists earlier. And thinking of the box shape in the downswing is a given; maintaining it as long as possible gets 2 crucial levers working in the swing: the right elbow and right wrist straightening in the right sequence and at the right times. This adds tremendous, effortless power to the swing (for all shots…include bunkers and pitch shots).
This is Els' way of describing what TGM'ers call the use of Pressure Point #3: "Keeping the box" as Els describes will place pressure in the base knuckle of the first digit on the right hand from the start of the downswing until past impact. This is often referred to as "lag pressure," and it's maintained all the way down into the ball. As a matter of fact, one can think of the base knuckle or first phalanx of the right finger as analogous to the club face; it's often called the "trigger finger," though most of the finger should do NOTHING during the swing.
By using this "box" method, you will notice that the left and right wrists can cock up and down WHILE the right wrist remains hinged backwards, and it's this backwards hinged right wrist that creates a flat left wrist at impact, maintains lag pressure in PP #3, gets the hands leading the club head, compresses the ball, and creates a forward leaning shaft. A key is to start down or transition slowly; the greatest speed is added at the bottom, not the top.
In reality, Ernie could have called this "Avoid the cast!" instead of "Keep the box!" Casters apply an active pushing force, unhinging force, and/or uncocking force (either consciously or unconsciously) at the top (and thus have to flip the wrists at the bottom), while laggers (i.e., good players) form the angles at the top and then drop that arm-club "power package" intact from the top (the right wrist remains hinged backwards through impact). Thus, the angles formed in the right arm during the backswing are retained late into the downswing. Casting is often associated with an early shoulder rotation; the arm-club power package should ideally begin dropping in response to the lower body BEFORE the shoulders open up.
Many instructors will tell you that maintaining lag pressure is not something you can do actively, but that poses the question: Is consciously fighting the urge to cast considered an active attempt to maintain lag? One could argue that "keeping the box" as Els describes is a means of actively keeping the angles and lag pressure in PP #3. Martin Hall's take on this is to "keep the thumbs pointing up in the air as long as possible," which also implies an active effort to maintain lag. As with all things in golf, let your results be the arbitrator.
A good way to practice this move is using the Pump Drill (see videos below); Hogan doesn't refer to it as the Pump Drill, but you can see him demonstrating it in his video. Another drill advocated by Hogan and Brian Manzella is to simply remove the right thumb from the shaft and hit some balls (Sam Snead used to remove his right thumb and right index finger entirely to practice). There are also drills that advocate holding a wet mop like a club (or using a club with a towel on the end) and dragging it across the ground. An impact bag is also used to instill the correct feeling at impact.
My take on the Pump Drill is to completely remove the right hand thumb and index finger from the handle to accentuate the pressure feeling in the base phalanx of my right index finger. From the top of the backswing, use the left hip motion to cause the arm-club unit to pump up and down a few times. The end of a "pumping action" gets the hands over the ball with the club shaft still parallel to the ground. After one or two "pumps," let it go at the bottom.
What happens when lag is taken too far? Skull shots (not really thin shots) because the club bottoms out late and balls that fly off to the right because the club face doesn't close in time. Rejoice if you see these occasionally instead of weak fat or thin shots that come from casting and flipping.
It's very crucial to keep your head behind the ball (i.e., maintain a tilted spine angle); just get the feel that once you get over the right leg in the backswing that the head stays there while the lower body weight shifts to the left. Keeping the head back assists with shallowing out the swing and with hitting inside-out.
Even cooler, if you "shake hands" with your right hand towards the target, you can coax a draw or straight-ish ball flight (the toe of the club overtakes the heel), or you if you hold off the right hand somewhat (toe and heel come through more together) you can get a fade.
As Ben Hogan rotates his lower body towards the target, the "straight left arm + bent right arm" act as a single unitary structure and they are both passively pulled down towards waist level as a single unit. Homer Kelley refers to this unitary structure of the left arm and bent right arm as the power package assembly [6]. In other words, Ben Hogan does nothing actively with his hands/arms/club during the early downswing - he simply allows them to respond reactively/passively to the shift-rotational movement of the lower body, and he simply allows the entire power package assembly to be passively pulled down to waist level.
BM: "Grip the club normally. Take the right thumb off of the club and point it at the target. Hit it."
[Why does this work?]
Forum Member: "...when most of us begin to lose the lag, we compensate by feeling/adding pressure from the right thumb to try and stop the throwaway....without the right thumb on the club, we must store and hold the lag or be ready for the club to flop around coming into impact (especially if there is throwaway or if we lose the lag on PP#3)."
BM: "Helps Slicers too!
...but why???"
Forum Member: "Without the right thumb exerting pressure on the club, one can drag the sweetspot onplane via the right index finger, thus closing the clubface by impact."
In the Golf swing there are 4 distinct pressure points (more on that in another article) but again, for simplicity stakes, we will focus on the easiest and more convenient to feel: the meaty part of your index (the "trigger finger") of your trailing hand where it touches the club.
Here is the trick: Are you able to perform a Golf stroke while feeling pressure in this index from start down to both arms straight (the end of the follow-through and before the finish)???
Even better: if you can feel this pressure not decreasing (unrelentless pressure), I bet my shirt you must be a 1 digit handicap as you must have Lag in your swing with all the good things that come with it!
A player who casts the club (club head throwaway) does exactly that: he feels a lot of pressure in the start of the downswing (by accelerating the club very hard and convulsively). Such a sudden accelartion thows the club away with no chance to catch it up before impact.
Needless to say, that player feels no pressure at all in the index finger when the club head arrives at the ball.
The correct way to do it is to push your cart evenly with no over-acceleration.
I wrote about this briefly and anecdotally in another blog post, but I decided it needed a post of its own; it's that important. At least for me. I don't begrudge the many teachers out there who think the ball should appear blurry or the focus should be only on the target. But if you're focused on the target and then launch the ball into the woods 45 yards to the right of the target, focusing on the target does you little good.
We know that lagging the shoulders behind the hips is important to swing inside-out (the so-called X Factor). And we also know that the head should stay behind the ball through impact (or not move past its initial position created at setup for the woods and driver). We know, too, that the ball should start to the right and curve left to REALLY hit a draw (i.e., not a pull hook or straight hook).
I believe that focusing on the inside-edge or inside-left quadrant of the ball throughout the swing will assist in achieving all of these goals. First, it telegraphs to the body that you want to hit the ball on that spot, which encourages an inside-out swing. This means that one MUST keep the back to the target longer to avoid coming over-the-top by hitting the outside-right quadrant of the ball.
Second, focusing on that spot will tell the body to keep the head (and therefore upper body) from swaying ahead of the ball on the downswing. Keeping the head back allows the arms to come through, make impact, and then pull the golfer up to a nice, balanced finish. Get the feel that once you get over the right leg in the backswing that the head stays there while the lower body weight shifts to the left. Understand, however, that keeping the head back can cause the club face to close earlier.
Wherever your eyes are looking, your hands and the clubhead will want to go. If your eyes are looking at the back of the ball at address, then you are probably trying to square the clubface to the back of the ball at impact. Address and impact are two very different alignments in golf. Focus your eyes on the inside quadrant of the ball at address and your hands will strive to reach your new focal point. By making this small change, you will be well on your way to improving your downswing and obtaining much more manageable misses.
Other golfers need to focus on the ball. If this is you, try to hit the inside edge of the ball at impact.
A good thought for you might be to keep your back to your target and swing your arms down to the inside. Just try to avoid starting your down with your shoulders and upper body as this will throw the club down on a steep and outside path.
When your head moves forward during the downswing, your whole swing plane moves ahead. That means you will tend to lose the ball to the right or leave the clubface open through impact.
One day, Lee Trevino was playing with the amateur golfer. Trevino gave only one advice to this golfer. He told him to keep his head back.
This amateur golfer was hitting a strong draw on that day.
[Bobby] Jones was quoted: "Stay behind the ball is a splendid maxim. Should your head ever get ahead of the ball, at any point in the swing, a poor shot will no doubt result."
In Harvey Penick's, The Little Red Book, published in 1992, page 75 is entitled "Stay Behind the Ball" "All great golfers move their head slightly backward before and during impact, but never forward. A golfer must stay behind the ball. I mean set up with your head behind the ball and keep your head behind the ball. If you move your head forward during your downswing or through impact, you will hit a wee, ugly shot, probably a pulled slice."
Leaning back through impact can cause the face to shut quickly. For a power draw, Brett [Wetterich] releases the club straight down the line with the toe up.
If you're like me and have a net in your garage for practice when the mood strikes you (or when it's freezing outside), here's a little trick that will determine your likely club face direction and even clue you to the path upon which you're swinging and thus determine whether the ball likely would have faded or drew (not all of us can afford one of those fancy-shmanzy OptiShot style simulators).
Take some chalk (I recommend colored chalk designed for kids to use outdoors) and rub it all over the face of your club (you can also use masking tape or other materials designed for this purpose). Now hit a ball into your net. You should see a nice impact spot somewhere on the club face. If it's in the middle…you've just pulled of a great shot (if the path of the club head was correct - see D-Plane). Pay attention to the blur of the arc down at the bottom of your swing for the other piece of information; if you're swinging inside-out (like you should be most of the time) then you needn't worry over this variable. However, the position of impact on the club face can clue you to the path you're swinging on as well.
More likely, you'll see an impact spot near the toe. Slicers (most golfers who swing outside-in for various reasons--i.e., chicken winging, coming out of posture, etc.) will tend to hit towards the toe, because that's a typical condition of an open club face and outside-in motion. Toe impacts tend to worsen a slice, because the club head will open slightly at impact. Hookers (golfers, not streetwalkers) will tend to hit towards the heel, due to the club face closing through impact and the inside-out motion. Heel impacts serve to close the face even more. Sometimes, the club face is so closed that a shank occurs, and the ball will shoot low and right or run along the ground straight (making you think you topped the ball)!
Where you address the ball on the club face can also affect the mark. It's technically correct to address the ball more towards the toe if you prefer to rest the club on the ground behind the ball (i.e., instead of hovering it), as centrifugal force will pull the club slightly away from your body on the downswing. If you suddenly see your practice shots go low and dramatically right, you're probably shanking off the heel. Use chalk to verify this and then adjust your address position accordingly: Address the ball towards the toe and see what happens to the mark. Note: This assumes you address the ball with the arms naturally hanging; if you vary the extension of your arms towards the ball then this is a variable that will negate learning where you typically impact the club face; work to ensure you address the ball with the same posture and arm position each time!
You may discover that the difference in the club and stroke imparts varying impact points on the club face, depending on the manner in which you stroke the ball. For example, I need to address irons more off the toe to get closer to the center, while woods require me to address closer to the heel (even hovering the club). The reason, I believe, is that irons (shorter clubs) require more of a downward blow, while woods and drivers utilize more of a sweeping action.
However, if you start seeing your ball marks move from the toe towards the heel, it's a GOOD THING. It means that you're learning to keep your extension, swing inside-out, and close the club face…ingredients needed for the draw. As a matter of fact, making changes to achieve an opposite result in golf is usually a good drill (e.g., if you sliced during a round, stop at the range and hit balls until you're hooking it).
Since the club is pulling in towards you, the ball is struck with a glancing blow and on the toe of the club resulting in a slice that doesn't go very far. Does this sound familiar? It is a very common fault, so here is a three-part drill to get you on your way to correcting the problem.
Most golfers think the shank and its violent, clanky offline flight are caused by an open clubface. However that is almost NEVER the case. In fact for most golfers the face is actually closed when the ball makes contact with the neck or hosel. The ball first contacts the rounded, angled portion of the inside of the neck and starts flying offline before any true contact with the flat clubface can be made.
Third, check your clubface. If the golf ball leaves an imprint on the inside part of your clubface (near the hosel), then you have most likely hit the ball from inside-out. If the imprint is on the outside of the clubface (near the toe), then you have most likely hit the ball from outside-in.