Showing posts with label pressure. Show all posts

Saturday, June 1, 2013

Back to Gripping: Unified Pressure Points

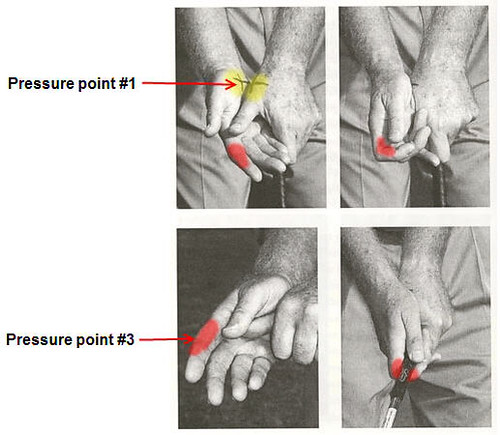
My previous two posts have been on the TGM concepts of grip pressure points. This is the last post of the grip pressure points series. I first talked about PP #1 and PP #3 often associated with the hitter style, and then I posted on PP #2, often used along with PP #4, in the swinger style.

PP #2
PP #2

The references in the first post of this series alluded to the fact that there is no clear demarkation between a so-called hitter or swinger. In fact, most players have some elements of all of them to one degree or another. The pressure points are primarily about feel, but I now believe that awareness of them will help make a proper grip. Pop golf instruction often teaches grip fundamentals but leaves out the important points of where you should feel pressure in the grip, and it often confuses students with meaningless analogies about grip pressure.
PP #1
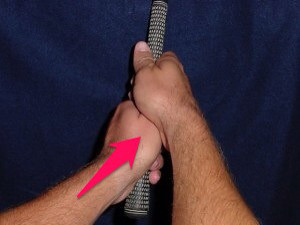
Proper use of PP #1

After experimenting with this for a few weeks now, I feel I have found the correct pressure points for my focus. First, awareness of PP #2--specifically the pinky and ring fingers of the left hand--is crucial. When I take my grip, I want to feel those two fingers gripping a touch tighter than the middle finger, and I want no pressure exerted by my left thumb and index finger.

Next (and I think most important), you must feel PP #1! This is one that I absolutely was not using before. As a matter of fact, my two hands would often disconnect from each other at various points in the swing, even though I was covering my left thumb with my right palm. It's not merely enough--at least for me--to hide the left thumb in the lifeline of the right palm; it's an absolute necessity for me to apply pressure to the base of the left thumb using the crease in the base of my right palm! And it's important to keep it that way from setup to followthrough! This right hand palmer crease forms a semi-oval clamp that attaches firmly to the base of the left thumb.
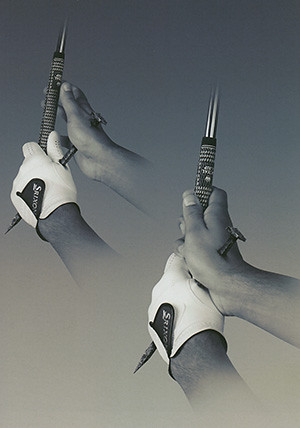
PP #1
Nail illustration of PP #1

I'm not certain yet why PP #1 is so effective at increasing the quality of my contact (other than it unifies my hands so well), but I can post references below to what others say on the matter. And it's interesting that this is one part of the grip that is often glossed over or not mentioned at all.

As to PP #3, I believe it's better to sense it passively; I personally don't want to actively push with it. I do, however, think that PP #4 is a great power generator to use along with PP #1 and PP #2. So, yes...I've mixed a bit of hitter with both swinger qualities. Sue me.

He [Ernie Els] then wraps the right palm over the left thumb so that the lifeline palmar crease ("cup" of the right palm) rests over the right side of the left thumb and slightly over the top of the left thumb. This will cause part of the right thenar eminence to lie on top of the left thumb. Placing the right hand firmly over the left hand in this manner helps to interlink the hands, so that they can better function as a close-knit unit. Also, note that the right 3rd and 4th fingers are used to firmly grasp the club's grip, and that the grip is in the fingers and not the palm of the right hand.

Grip

You will find that the palm of the right comes up and faces directly to the left, and that the center of the base of the right hand fits snugly over the big knuckle at the base of the left thumb.

Golf Grip Part 4: Placing The Fingers

Grip check #2: Turn your hands to the right and check the underside of your grip. The lifeline on your right palm should fit snugly over your left thumb, again with downward pressure. If there's space between them, your swing will suffer.

How to check for a perfect grip - How to Check for a Perfect Grip - Photos - GOLF.com

The right hand "lifeline" (shown in red at left) smothers the left thumb at address and throughout the swing. The word "smother" is chosen carefully -- it implies constant, deliberate pressure, not just a hand position.

The role of the right hand is more subtle, and advice on the right hand is much harder to find.

The smothering pressure of the right hand lifeline promotes a wide arc on your backswing, because it tends to push the club away from your body. It also tends to prevent your left arm from bending too much at the top of your swing (although some bending is OK). It does this by simultaneously a) bracing your left elbow, and b) encouraging your left wrist to hinge rather than allowing your left elbow to bend once resistance develops at the top of your backswing. Think of your right arm almost like a splint for your left elbow during the backswing. Finally, the constant smothering pressure of your right lifeline tends to keep your two hands melded and joined together, almost "handcuffed", throughout the swing. This promotes a "one piece" takewaway and downswing that is driven from your big muscles of your lower body, not from your hands.

Golf Swing Tip: Use a Proper Right Hand Grip to Improve Your Swing Like Adam Scott

The three distinct grip pressure points are:

1. In the the last three fingers that trap the club underneath the heel pad of your left hand;

2. The two middle finger of your right hand, whether interlocking, overlapping or a two-fisted grip;

3. Where your right palm overlaps and exerts downward pressure on your left thumb.

Something for the Weekend: Why grip pressure is vital - Tips: General - GOLFmagic

Your right hand provides support and pressure. We like to say the left side pulls and the right side pushes or applies the punch. Where the palm of your right hand joins your left thumb is a pressure point. Also where the index finger or your right hand joins the club (grip) is a pressure point. These two points help put pressure down into the golf ball.

The big issue here is that with good strikers of the ball, the pressure points are applied with a bent right wrist. With poor ball strikers the right arm and wrist straighten out too soon (before impact) and those pressure points are lost as the club head flips past their hands and starts coming up and scooping the ball. Downward pressure into the golf ball is lost.

My Golf Instructor

The last three fingers of the left hand should always be firmly wrapped around the butt-end of the golf club grip. The task that they perform is to ensure that the left hand is kept securely in place.

You should also notice a little light pressure on your left thumb. This should be noticeable as you place the lifeline of your right palm firmly upon it. This should also trigger an awareness of the pressure applied from your right index finger as it pushes against the shaft perfectly sealing your grip on the golf club.

Don’t Lose Your Grip by Golfing Guru | Sportales

Push your right thumb pad against your left thumb with moderate pressure (Homer Kelly’s #1 Pressure Point). This helps you cock your wrist correctly and keep the club on plane. Continue to maintain the arm connections and the #1 Pressure Point until after impact.

The #1 Pressure Point is a “Mega Swing Thought” that we discussed in UST 2 (The fewer the concerns of a swing, the simpler it gets). It has the following benefits:

  • It keeps the club on plane during the backswing (prevents the clubhead from going too much inside).
  • It keeps your right arm connected and your right elbow in front of you. Try flying or sliding your right elbow behind you while applying the pressure. It’s much harder, isn’t it?
  • The pressure also extends the left arm straight. It creates width for your swing that promotes power and consistency.
  • It promotes a flat left wrist at the top which is what you want (unless you are fighting a big hook).
  • It encourages more shoulder turn.
  • It gives you lag in your swing. Try getting into your impact position and then apply the pressure. The clubhead will want to lag behind your hands and the haft leans forward. This lag promotes more solid impact and longer distance. It will also come in handy when you want to it a knock down shot into the wind since it de-lofts the club.

Simplified Base Swing

Another problem that results from a light right-hand grip is that the right hand often comes off the club somewhere in the backswing. This causes the left hand to increase its pressure, creating a number of downswing errors.

Proper Grip Pressure | Golf Channel

In the golf grip, the pressure in the left hand (for right handers) should be firmest in the last two fingers. On this, there is plenty of agreement. The problems start when the same advice is given for the right hand.

Golf Grip Tip - The Correct Golf Grip Depends On The Pressure Points

What should the grip pressure be as you hold onto the golf club throughout the entire golf swing? Most have heard "Hold it like your holding a baby bird or a tube of toothpaste without a lid and you don't want to squeeze any out." Your body will interpret those visuals as hold it very loose in the fingers throughout the swing. The effect of loose fingers is separation of the left hand from the club (at the top) during the transition of the backswing to the downswing which causes an early release and a change in the clubface.

Do you wear out the heel pad and thumb areas of your glove? If so, that is evidence of the movement which cause the friction that produced the hole. Understanding the physics of the golf swing would lead a person to promote secure (effort on firm) fingers around the club throughout the entire swing! This will promote a much improved release and a clubface that remains square throughout the swing.

The overall goal for grip pressure is for your hands to remain in constant contact with the club; if there is movement of the club, it's a huge problem. Recovering from a moving club is almost impossible to recover from on a consistent basis.

As long as the club remains still, it's ok to change finger pressure. You wouldn't want to be squeezing the daylights out of a wedge when you're pitching from just off the green.

The Grip and Grip Pressure - Golfer's Guide

Pressure point number one, the base of the left thumb, where the lifeline of the right hand comes in and connects down with these two middle fingers, feeling that pressure so that there is a connection there. Now watch what happens. A lot of people will swing up and lose that connection and separate right in here between the right hand and the club. When that happens the first move down they snap back on to it and they lose a lot of their clubhead load or their clubhead lag. What I would like to see you do now is this pressure point you can hinge of that position, keep it connected up to the top, and certainly keep that pressure point as you are driving down through impact. So pressure point number one, at the base of the left thumb. Where the right hand connects in. Pressure point number two, the last three fingers on the left hand. This is the one people do pretty well.

Video Golf Tip | Three Grip Pressure Points


Monday, May 27, 2013

Swinging Lag: More on Pressure Point #2

Okay, so I'm hyper-focused on grip pressures lately, in the TGM sense. In the previous post, I went on at length about TGM's Pressure Points #1--where the right palm presses down on the base of the left thumb--and #3--the base knuckle of the right index finger--and how they're used to sense lag pressure, either actively or passively.

This post--like the last one--will not deal with pop golf instruction's treatments of grip pressure. Those descriptions of gripping to a certain point on a 1-to-10 scale, holding a baby bird, holding a baby's hand, holding a tube of toothpaste, etc. are not really helpful in describing WHERE you should feel pressure in the left and right hands. The whole 1-to-10 scale thing is really silly if you think about; how many times have you shaken hands with someone who feels like they're barely gripping your hand, while another person feels like they're about to break your hand. This proves that scales vary from person-to-person. And how many people hold baby birds? I'm going on out a limb (and agreeing with several reputable teachers such as Hank Haney and Shawn Clement) by saying that you probably should be gripping the club harder than you think. But the key is WHERE you put that pressure; it's not with the entire hand!

PP #2
PP #2

Pressure Point #2 Should Be Called Pinky Pressure #2

This time, I'm focusing mostly on TGM's Pressure Point #2 (PP #2)--the last three fingers of the left hand (for a right-handed player). Recall that PP #2 and PP #4 (pressure of the upper left arm pressing into the left pectoral muscle) are strongly associated with the swinging style as described in TGM; also recall that distinctions between the swinging and hitting style aren't black-and-white; there is a gradient between the two in which all golfers find themselves.

I was recently reading an article in Golf Digest that described a way to help golfers get out of greenside bunkers. The article advocated removing the left hand pinky from the grip completely, either by curling it under or letting it hang off the end of the grip. The purpose was to allow the left wrist to cup coming through, which is important for using the bounce of the sand wedge properly to escape bunkers. Golfers are taught to avoid cupping the wrist in the full swing; it's called a flip and it's a major fault. But in a bunker, the added loft is needed to avoid digging into the sand. On a side note, one would do the same cupping technique when trying to hit a flop shot.

So what does this have to do with PP #2? Well, it stands to reason that if removing the pinky from the grip is important for encouraging a flip in a bunker or when attempting a flop shot, the pinky must be important for stopping a flip in the full swing. The opposite condition of a flip is a flat left wrist (FLW) at impact--just what we need in the full swing. This brought me around to PP #2, which is described as the pressure felt in the last three fingers (pinky, ring, and middle) of the left hand.

Digging further, I found a few articles on the internet that delved deeper into PP #2. And wouldn't you know it: The pressure in these three fingers should NOT all be the same. The left hand pinky pressure should be greatest, followed by the other two fingers in decreasing amounts! This was a huge revelation, because I had always gripped with the same, non-bird-killing pressure in all of the left hand fingers, except the thumb.

By gripping tightest in the last two fingers of the left hand, your left wrist will stay very loose and allow a full release, while making it more difficult to clip the left wrist. Now it's easy to see how PP #2 and PP #4 work together so well. Also, I noticed that my wrist extended downward a little more at address, putting the club shaft at slightly more upright position at address. But maybe most important, this pinky pressure consciousness does--in fact--help create the FLW condition at impact and helps produce the swinging style lag.

Luckily, learning to use the bounce is as easy as removing the pinkie of your top hand from the grip. With this finger off the club, your grip pressure naturally lightens, and it's almost impossible for the hands to stay ahead of the clubhead at the bottom of the swing. I use this tip to teach the right feeling, but you can hit shots like this on the course, too.

BONUS: Open the face and address the ball off the heel. This might sound like Shank City, but remember, you're hovering the club. When the clubhead enters the sand, it will inch slightly closer to you, putting the center of the face under the ball. The shot will come out more predictably.

Jason Carbone: Hitting Soft Sand Shots: Golf Digest

With your top hand (left hand for right handers) you should be holding onto the club firmly with your pinky, ring, and middle fingers while the other 2 should be relaxed. In your bottom hand (right hand for right handers) you should be gripping the club tightly with your thumb and pointer finger while the other 3 fingers are just along for the ride. The 5 fingers that you are gripping the club firmly with are primarily responsible for releasing the club in a manner that will provide you with more power and consistency.

SilverHorn Golf Club of Texas: Grip Pressure

Properly placed hands work together as one facilitating unit. The left hand (or right hand for lefties) grips the club with pressure felt in the last three fingers and most heavily on the pinkie. This keeps the butt of the club securely attached to the hand.

Inside the Tour,Chapter Three, the Body's Motion

Too firm of a grip restricts arm and wrist movement in the swing. Most of the pressure should be in the pinkie and ring finger of the bottom hand [error: actually the top hand if the club is on the ground], and the index [error: actually the ring finger--the index finger is the first finger] and middle finger of the top hand [error: actually the bottom hand if the club is on the ground]. The remaining fingers are mainly used for balance and stability, and the thumbs should rest comfortably on top of the grip.

What is a Proper Golf Grip? (with pictures)

The left hand provides the primary connection for controlling the club. It is very common to grip too tightly with this hand. According to teacher Michael Hebron, the secret is to tighten only the last two or three fingers of your left hand—the pinky and ring fingers, and perhaps the middle finger. In doing so, you create a strong grip without locking the wrist muscles and interfering with the free movement of your wrists.

The Proper Wrist Action for a Golf Swing | Golfsmith

Engage your ring-finger and middle-fingertip pads with pressure around the grip for stability. The index finger has the least amount of pressure on the grip. The pinky fingertip pad maintains the most grip pressure throughout the swing.

San Diego Golf Instructor - Core-Breathing 4 Golf

The other reason this is an important fundamental of the golf grip is because it helps with developing the flat left wrist that every “flipper” of the club desires in their golf swings. If you grip the golf club with just your left pinky, you’ll see that it’s actually quite easy to get into a nice flat left wrist position at impact because the pinky leads the way.

Now, take your grip with just the middle two finger and see how the tendency is to get the wrist into a slightly cupped, scoopy position at impact because of the different muscles used in the forearm.

Now, go back to just using your pinky by itself and note how gripping the golf club more snuggly with just the pinky firmly “locks” the wrist in this slightly bowed position, thus making it much harder to flip the club through impact.

Stop Flipping the Golf Club with the Proper Use of Your Pinky in the Golf Grip - RotarySwing.com

Then, Jack Nicklaus comes along with Golf My Way (1974). He talks about grip pressure objectives also (pp. 70-73):

Left hand: Pressure with the last two fingers, pressing the shaft into the L palm.

Right hand: Pressure primarily with the middle two fingers.

Overall: Maintain constant pressure

Grip pressure myth


Wednesday, May 15, 2013

Hitting Lag: More on Pressure Points #1 and #3

Lag Pressure
Lag Pressure.

I've posted before on the subject of lag and on various ways that have been cited to acquire it. To review for the uninitiated, the word lag is used in the full golf swing to describe how the club head SHOULD lag or trail the hands into the ball. All professional golfers have this lag to some extent, and it's responsible for powerful, compressed, penetrating shots that are associated--at least in the case of irons and wedges--with divots well ahead of the ball. This should not be confused with lagging long putts close to the hole.

Lag isn't necessarily holding wrist angles, especially in the case of the left wrist (assuming a right-handed golfer). But in TGM circles, lag is strongly associated with feeling Pressure Point #3 (PP3), which is essentially located somewhere along the side of the first-finger base knuckle of the right hand (again, assuming a right-handed player). Pressure in this side area of that first right hand finger is applied--as a pushing force--to the shaft on the downswing along with a dorsiflexed right wrist, straight through impact and beyond. This pushing force is applied by the gradual straightening of the right arm through impact (called Power Accumulator #1 or PA #1 in TGM); the right wrist doesn't really do anything except stay bent back. This is also called lag pressure, and many golfers feel that keeping a "trigger finger" helps them to feel this. Doing so automatically flattens or even bows the lead left wrist and ensures that the hands lead the club head into the ball.

I have found it easier to focus on PP3 and the right wrist position rather than trying to produce a flattened or bowed left wrist, which may be a valid way for others to teach and learn this fundamental. I will not go deeply into the differences discussed in TGM between swingers and hitters in this post, but PP3 is more associated with the hitter style (though it can be felt more passively in the swinger style). There are also other Pressure Points and TGM concepts that I'm not really going to discuss in detail here; all you need to do is Google TGM or buy Homer Kelley's complex book and you'll have an endless supply of advanced golf theory to consume.

PP1 and PP3
PP1 and PP3

But there's an equally--if not more--important pressure point associated with the right side or hitting style (PA #1): Pressure Point #1 or PP1. The is where the lifeline of the right hand encloses the left thumb on top of the grip. The left thumb should NOT be visible to you when you apply this pressure point correctly (you should use a "short thumb"). And the kicker is, you should feel downward pressure applied to the base of the left thumb, which means the right hand may be rotated over to the left more than you may think or may have been told, even if you have a strong left hand grip. This helps secure the two hands together, helps prevent the club from moving around in the hands, and helps prevent independent movement. PP1 helps to produce lag pressure felt in PP3. You should feel PP1 through impact, as if the heel of the right hand is pushing the base of the left thumb through the ball (again, use a "short thumb" with your left hand). This pressure flattens or bows the left wrist through impact automatically, keeping the club head behind the hands where it must be. This assumes that your left wrist is kept very relaxed to allow the push force of the right hand heel to flatten or bow the left wrist.

Lag is also known by other synonyms, such forward shaft lean, delofting the club, hitting down on the ball, pinching the ball off the turf, trapping the ball against the turf, etc. Pinching, trapping, and hitting down are descriptions of feel, and many golfers get caught up the verbatim trap of trying to achieve these feels in reality. Forward shaft lean and delofting are the best synonyms of these when attempting to describe reality--what actually occurs when the hands lead the club head into impact.

The opposite of good lag into the ball is a cast or club head throwaway right from the top, followed by a flip at the bottom, where the right wrist flips forward early and the left wrist breaks down and dorsiflexes, the left-hand knuckles rising both skyward and targetward. Even a small amount of cupping through impact has a detrimental effect. This is a classic high-handicap, hacker error that adds loft to the club (e.g., turns a 7-iron into a 9-iron, depending on the degree of flip). In a sense, this mistake has the two wrists in antithetical positions at impact compared with their correct positions; in a flip, the right wrist straightens and the left wrist bends backwards in a conscious or unconscious attempt to lift the ball into the air, causing weak, uncompressed, high shots that don't fly very far and many other potential mishits like fat, thin, and sliced shots.

Since exploring and researching this topic more thoroughly, I wanted to post additional references to material on the internet that I've found helpful, especially since this seems to be a subject that isn't taught much or taught in a manner that's easy to understand. The mop drill demonstrated by many professionals goes a long way towards getting the amateur golfer familiar with the sensation of using PP1 and PP3, but I sometimes wonder if this tidbit isn't kept purposefully vague among golf teaching professionals much the way magicians are sworn never to reveal their secrets; yes, I think this fundamental of golf is that important to improving beyond the hacker stage, at least with respect to feel in the hands and arms.

Another drill that golfers may find helpful is the aiming point drill, where a point ahead of the ball becomes a target for the hands. In other words, the hands must get to that point before the club head, and where that point is will vary by the club length and the player (body type, swing speed, etc). With longer clubs the driver and woods, the aiming point moves closer to the ball or possibly even behind it.

I like Tom Watson's description of using PP3); he likes to keep everything loose on the backswing. But on the transition and downswing, he wants to feel that pressure in PP3 increase dramatically and feel that the right wrist dorsiflexes even more than it was at address. This down-cocks the wrist and produces tremendous lag without creating any tension at address or during the backswing; this creates more of a swinger style with some elements of a hitter style. It should be noted that some teachers want their students to create pressure at PP1 and PP3 right at address and carry that pressure all the way through; in other words, the grip pressure should be constant from address to finish. In this same vein, Mr. Watson also states that that a golfer should hit the ball hard with their right hand at the bottom, provided they start down from the ground up. As Mr. Watson says, "Hit it hard!" Also why Ben Hogan stated he wished he had three right hands!

You should still feel PP1 and PP3 when driving the ball. They key is to keep the ball well forward in your stance with the shaft leaning away from the target slightly at address. Even though we've been told to play the ball more back in the stance to hit a draw, using PP3 for your driver can cause you to hit down on the ball unintentionally, causing pop-ups that go nowhere. Keeping the ball more forward, especially if you don't sway off the ball, allows the club to release. In a sense (just as with the aiming point drill), you're allowing yourself time to let the right wrist straighten a bit more, square up the club face, and hit the ball more on the upswing.

And now, caution. Feeling PP1 and PP3 and pushing against the shaft with that right hand knuckle feels very powerful, but pushing too much with the right arm (without enough lower body's initiating movement) can also send the shaft outside too early, causing an over-the-top move (and thus a pull or slice). The way to counteract this potential error is to keep the butt-end of the club pointing down towards the ball for as long as possible in the downswing, while maintaining the feeling in PP1 and PP3. The end of the handle should first point out to the right of the target line (inside the ball) when coming down from the top, gradually reaching a point where it points towards the target, and then finally pointing behind the golfer's left hip when the fully rotated into the ball. If the end of the club points directly at the golfer during the downswing, that golfer is probably over the top.

Using PP3 can also be thought of as using a "trigger finger." The pressure in the right index finger can also be felt in the crook that wraps around the shaft, especially if that finger is well separated from the others. Using the finger this way increases swing awareness of not only where the clubhead is in relation to the hands (i.e., lagging or releasing) but also where the clubface is pointing at all points in the swing. During the release, the right arm and shaft should form a straight line pointing into the ground, and that trigger finger should be rotated over.

I vacillate between concentrating on PA#4/PP#4 (swinger style of pulling the club through) and PA#1/PP#3 (hitter style described in this post), but I sometimes believe that the swinger style (while still feeling PP#1 and PP#3) is more efficient and passive. For me, I need to make sure that I press that right hand knuckle into the right-side-top of the grip at address, which ironically also seats PP#1 better; then I'm free to swing using PP#4 and can forget about PP#3 and active hitting with the right hand. In other words, a solid connection with the right hand and the club is essential, regardless of the swing style. My tendency is to hold the club with no connection or a loose connection of the right hand pressure points. Now, keep in mind that you can vary the pressure with which you press this right hand knuckle into the shaft; experiment with different pressures--lighter pressures are most likely to yield right-to-left shot shapes, while tighter pressures are better suited for fades. Whatever PA/PP combination used, it's important to keep the end of the club handle pointing down-target for as long as possible to ensure an inside approach. Swingers may very well feel PP#3 but it should be passive and not active as it is for hitters.

How can this be fixed? Well, there needs to be an understanding that the clubhead will always follow whatever the other end of the club does. So, the grip actually should lead or direct the club towards the ball. Once the golf club reaches the "set" position at the top of the backswing (a right angle between the left hand and the shaft of the club) that position should stay the same until the hands and the grip of the club are about even with the golf ball. At that point the hands will begin to unhinge and release down into the golf ball.

Casting Recall: Stop the Power Loss

PP#1- Right heel pad of hand against left thumb

PP#2- Last three Fingers of left hand

PP#3- Right index finger against shaft

PP#4- Left arm against chest

Golfers use different combinations of these pressure points. A golfer who is referred to as a “swinger” because they’re left side is pulling the golf club primarily use pressure points #2 and #4. Golfers referred to as a “hitter” because they’re right side is pushing the club primarily use pressure points #1 and #3.

Positions, Pressure Points, And Power Accumulators | Matt DeJohn Golf

The problem most golfers have is that they have no concept of pressure points and lag pressure and they almost inevitably maximize their lag pressure in the startdown. And because you lose lag pressure immediately after you maximize it, the golfer has lost the lag pressure once they arrive to impact. And remember, once you start to lose the lag pressure, you cannot regain it in that swing.

What usually happens when the golfer loses that lag pressure at impact is that their hands stop or slow down greatly in the downswing and they wind up using their wrists (flipping) to move the clubhead towards the golf ball. One of the main things I try to emphasize in the FLW (flat left wrist) at impact is that in order to obtain it, the golfer should avoid trying to actually keep the left wrist flat at impact. Instead, use lag pressure properly and that will get your FLW at impact.

3Jack Golf Blog: Lag Pressure, Key Concept in the Golf Swing

Probably the biggest question I get in regards to TGM is about 'swingers' and 'hitters.' Before I go on explaining the difference between the two styles, I will note that according to physicist Dr. Aaron Zick, who was brought to the latest TGM Teaching Summit, there is no such thing as a 'pure hitter' or a 'pure swinger' on full golf swing shots. Instead, everybody does a little of both.

3Jack Golf Blog: Understanding the Basics of TGM -- Part III

During the past two years, my thinking has become more refined and I have moved beyond the limitations of TGM thinking, which believes that the swing styles of swinging (drag-loading) and hitting (drive-loading) are mutually exclusive swing styles. I now believe that it is perfectly acceptable to mix swinging elements with hitting elements in the same swing if a golfer can successfully manage to synergistically mix the two elements in a time-coordinated and synergistically synchronous manner.

Power mechanics of swinging

One of the most overlooked fundamentals of the golf swing is the point of pressure created by the club resting against and across the middle joint of the right-hand forefinger. This pressure point transforms that finger into the "trigger finger," meaning it plays a major role in the loading of the club on the backswing and the lagging of it on the downswing.

Where the grip falls across that finger is where we feel the lag of the club. To use this effectively, lay the handle diagonally across the middle joint of the trigger finger. During the swing, you want to feel the club's weight in that spot the entire time.

Breaking 80: Bobby Clampett: Golf Digest

You know that the Lag is felt during the downstroke as a steady pressure in the index finger of your right hand (aka Pressure Point #3 (PP#3)). Done properly the hands and the clubhead combine as Clubhead Lag feel that can be directed, or aimed at a target.

Consequently, the Aiming Point is a target on the delivery line where you fire the pressure in your index finger (PP#3) to. The Aiming Point is very rarely at the ball. Therefore you must not consider the ball as your target. Instead, the Aiming Point replaces the ball and becomes your new target.

The Aiming Point Concept from the Golfing Machine | Golf Lag Tips

2. BOTTOM HAND FOREFINGER PRESSURE

HERE’S AN IMPORTANT POINT: Nearly every bad shot in golf results from the shaft coming off the bottom hand forefinger before impact. When this occurs, it’s all but impossible to control the clubhead. As you address the ball, you should feel very little pressure on your bottom hand forefinger. However, as you start your swing, the weight of the club puts pressure onto your forefinger. This pressure must be sustained throughout the downswing, with the forefinger staying in front of the clubhead. To help maintain this pressure through impact, when taking your grip extend the forefinger down the shaft.

3. BENT BOTTOM HAND WRIST

AT IMPACT, THE FORWARD leaning shaft and clubhead exert force into the ball. When the bottom wrist is bent back, pressure is applied to the lead arm and shaft as the clubhead approaches impact. If the clubhead weight passes the hands prematurely, the bottom hand wrist straightens, slowing down the clubhead. To ingrain the correct feeling of the bent bottom hand wrist, sprinkle some grass on your left thumb and take your grip. Make some short pitching-length swings. If the right wrist stays bent, force is sustained during the downswing and the grass will remain in place.

For maximum distance here are four little known..but key points

When a ball is struck with "Lag" it explodes off the clubface! Without this "lag" the sound turns into one of mush, a soft Impact instead of a driving Impact.

So we have a Clubhead Lag Pressure Point (Pressure Point #3) which is the Right Forefinger and this is always directing the club to where, the inside back quadrant of the ball.

Golf Swing | The Secret of Golf

The right hand “V” will point straight up toward the chin, and the secret is accenting the forefinger position so it looks like a “trigger finger.” Going further, be sure the first joint segment of the finger is pressing into the side of the club in a manner that slightly puts the first knuckle on top of the handle as pictured here. The trigger finger will maintain side pressure on the handle from start all the way to impact.

Right Wrist Action for the Perfect Golf Swing | Herman Williams Golf Instruction

A trigger finger can help you better engage your golf swing. What’s a trigger finger? John Daly, for instance, as well as several other top players use some separation between their index finger and the rest of their grip as a “trigger” to help sustain proper grip pressure and assist in better hand rotation and in preventing the club from slipping too far into the palms of the hands. Give it a try and see what a trigger finger can do for your feel and overall swing.

Master Your Iron Play | GolfTipsMag.com

If you are holding the club with the last three fingers of your left hand and the middle two fingers of your right hand, and if your left thumb is cradled firmly in that little pocket of your right hand, with the part of the right hand below the thumb keeping a steady pressure, then you've got it.

You may have trouble keeping the pressure on with your right hand below the thumb. But believe me, this is the right way to hold the club. Master it and you are more than halfway home as a golfer.

The Swing is Simple - Arnold Palmer - SI Vault

Power is applied to the left hand, not the club itself, using the base of the right wristbone pressing against the top of the left thumb, to help the left hand move along its arc around the shoulder fulcrum.

The Wrong and Right Way to Apply Force

When your right palm exerts this slight pressure against the left thumb extending the grip away from your left shoulder, you will not need to have any tension in your left arm to help it remain straight and your left arm will have the same radius around your left shoulder from start up, through your back swing, down swing, and through impact. [This] pressure point has another function as well, it monitors the cocking and uncocking of the right elbow and sends this information to the motor cortex. It only feels this hinging motion and should never add or contribute to the actual cocking or uncocking of the right elbow.

TGM 101 - The GOLFING MACHINE

Again, the palm of the right hand presses hard against the thumb of the left.

Cure A Golf Slice - Harry Vardon


Thursday, December 6, 2012

Swinging Back to the Inside Early

There are numerous ways to swing a golf club and hit a straight ball (by straight I mean possibly with a slight fade or draw). All methods require squaring the club face relative to the path in some way (i.e., mostly perpendicular to the path with maybe very slight open or closed face positions for the shot shape desired); some of those methods are active and some are passive. Active methods, such as rolling the arms, turning the knuckles down, or squaring up the back of the left hand, all require careful timing and skill to pull off consistently. Passive methods, such as using a stronger grip or a club face that stays mostly square to the arc with heavy body rotation, require less precise timing and are probably more suited to the weekend mid- to high-handicap golfer.

We've all been told that we need to swing inside-out to avoid coming over the top (OTT or swinging outside-in). Few really great golfers swing outside-in, though there are examples of pro golfers who've used a slight OTT move to good effect, such as Sam Snead. Killing the OTT move--apart from the open club face--is one of the first steps a slicer (most amateur golfers) needs to take. But what about the arc on the other side of the ball? Does the club REALLY swing "out to right field"? Here's where you'll see the divergence between those who actively or passively square the club face.

When a player actively squares the club face, the arms cross over and cause the toe of the club to quickly over take the heel, irrespective of the body's turn. Often the club will chase down the line (or even out over the line) after impact for a time before coming back inside, and such an inside move isn't very pronounced. A good player on a good day can make this work. But even good players struggle with this move and often end up with duck hooks on days when the timing just isn't there. This is what happened to Ben Hogan early in his career.

When a player passively squares the club face by trying to keep it perpendicular to the swing arc all the way through, the arms don't cross over actively. Any movement of the wrists and forearms is entirely unconscious. As a natural consequence of body rotation serving as a primary squaring mechanism, the club head immediately tracks back to the inside, such that the swing shape is inside-outside-inside, following a natural, crescent-shaped arc that intersects the target line at after impact. Whereas an outside-in swing shape is steep, the inside-outside-inside swing arc is rounder, flatter, and more shallow. The small muscles of the arms are taken out of it and the golf swing is powered more by the lower body and larger muscles of the trunk. It's easier to maintain lag pressure and thus lag, as the club head never passes the hands until very late.

Swinging back to the inside early is the way that Ben Hogan played golf later in his career, and many would argue that there has never been a more consistent golfer once he made this change. Hogan adopted a fade ball flight that was consistent and reliable; he never had to worry anymore about his ball hooking directly off the course. Other great golfers, including Jack Nicklaus, played a fade as their go-to shot. Matt Kuchar swings this way and is one of the most consistent modern players. This method of swinging really lends itself well to a slight fade or straight ball flight, with minor adjustments (mostly ball position) needed to coax the draw. Tiger Woods is trying to develop a fade ball flight as his go-to shot; you'll often see him practicing for a shot by exaggerating coming back to the inside.

Swinging this way works best with the correct hip movements (clearing the hips and covering the ball), and a good swing thought is the good old belt buckle--keeping the butt end of the club pointing at it as you turn through.

Want to know if you're doing it? Film yourself swinging down the line. If your club approaches the ball from the inside and the hands and club disappear behind your body low and early after impact, you have an inside-outside-inside swing shape. Another characteristic of this swing shape is the maintenance of connection between the left and right upper arms against the chest throughout the swing--often called staying connected. All of these characteristics make for a more consistent golf swing because no emphasis is placed on the conscious control of the small muscles in the arms.

Of course, the shorter the club, the less pronounced this move is, because the swing plane is more vertical and thus the inside-out-inside move is not as obvious.

As I said earlier, our goal was to take the timing problem out of my swing, including my hands having to roll over at just the right instant to square the clubface. Now, once I shift to my left side to start the downswing, I can turn hard, and my body will bring the club around. That's because I've kept my left arm pinned against my chest. With this connection, turning my body squares the face without any hand action.

With the body leading like this, my arms track back to the inside quickly after impact. I used to have too much "chase" in my swing, with the clubhead swinging straight down the line or even out to the right. My new swing shape proves that my arms and body are working together, like concentric circles, with my arms moving in orbit around my body.

How To Make Your Swing Repeat: Matt Kuchar: Golf Digest

Charles Howell III is getting back to what works for him. Howell relied almost exclusively on a fade when he was one of the game’s hot young prospects. After developing some bad habits while trying to incorporate a draw into his arsenal, Howell is back to the reliable left-to-right ball flight.

The main objective in Howell’s new swing? To get the club swinging more to the left after impact so the ball can start down the target line.

The plane of Howell’s old downswing looked ideal on video shot down his target line, but his club traveled too far in-to-out through the ball because of his steep, downward angle of approach.

“Because Charles hits down on the ball steeply, we had to have him swing more to the left to make the ball go straight,” Smeltz said. “We needed the club to approach the ball slightly more from the outside for the club to be traveling down the target line through impact. We had to get the club in front of Charles’ hands during the downswing. That got the club exiting more on plane and not swinging so far out to the right.”

For Your Game: Charles Howell III

The club orbits the body at an angle called swing plane – like a circle or ellipse tilted on its side. That angle can range from 45-60 degrees depending on the club. What most golfers neglect is how the club must travel back inside after impact. Instead of allowing a natural release to the left, they force the hands and arms to release the club down the target line in an effort to hit the ball straight or add more speed. This leads to inconsistency. In fact, releasing the club down the target line moves the club off its natural plane. The result can produce tremendous hook spin or block pushes depending on the angle of the clubface.

Better Players Swing Left | Scratch Golf School


Sunday, November 11, 2012

Compression: Role of the Right Arm

Hang around online long enough and you'll discover a plethora of golf teachers with varied opinions on the role of the right arm in the golf swing. Some teach that the left arm should be dominant (players sometimes called "swingers" who pull with the left arm), some argue the right arm (players called "hitters"), and some both ("switters" or "swing-hitters"). Some say that both arms should be passive, neither pulling or pushing, and merely responding to gravity and body movement.

And you'll find examples of successful touring pros who use each one. In The Golfing Machine (TGM) parlance, the active straightening of the right arm (primarily driven by the right tricep) is described as using Power Accumulator (PA) #1 and is heavily associated with the "hitter" swing style.

Regardless of what is taught, used, or believed, there seems to be one universal truth, at least visually, with regard to the right arm in the full golf swing when we examine the swings of great players: The right arm folds in two places--the elbow and wrist--in the backswing, and the right arm gradually unfolds in the downswing, reaching it's fully extended, released position (right wrist and elbow straight) a foot or so past impact. The left wrist never breaks down or bends backwards (i.e., flips). The right arm straightening can be passive for swingers or active for hitters.

The first element of properly using PA #1 involves keeping the elbow and wrist of the right arm bent for as long as possible coming down. Ernie Els describes this as "keeping the box." The right elbow should still be slightly bent at impact, reaching a fully extended, released position only a foot or so past impact, with the right wrist still bent backwards (even just after impact). Doing both automatically extends the left arm fully and keeps the left wrist flat through impact. Pressure should be felt in the first phalanx or base knuckle of the right index finger from the top and through impact. In a sense, that phalanx or inside base knuckle of the right index finger can and should serve as a guide to the club face position throughout the swing. The right hand thumb and index finger should be completely loose around the club handle; you can even take them off! Only that phalanx or base knuckle is important.

If the right wrist straightens in a way that causes the left wrist to bend backward at impact, this creates a "flipping" motion and the club head will pass the hands (lag is lost and the effective loft of the club is increased). Instead of "flipping" or swatting at the ball with the right wrist (behaving as if it was merely a door closing along its vertical axis), the right wrist should only straighten WELL AFTER impact with the right palm rotated slightly downward through impact.

This reflects the TGM description of hitting down on the ball with the right palm and actively straightening the right elbow, feeling pressure in the base joint of the first finger of the right hand (Pressure Point #3) and pressure on top of the left thumb (Pressure Point #1) due to pushing on the left hand with the right. This creates a feeling of pushing down and out on the shaft with the right palm, and results in a flexed shaft due to the compression against the ground; a divot is taken well in front of the ball. The ball is often described as being powerfully "pinched" off the ground or "compressed against the ground."

Use this one swing thought: Aim to fully, dynamically straighten the right elbow a foot or so past the ball with your irons. Straighten it down, forward, and out. You can use this method to hit the driver; simply use less downward extension. Instead, extend so that the right forearm is more level with the ground coming into the ball. Straighten it out to the right slightly for a draw and out to the left slightly for a fade.

The best way to describe [Kenny Perry's] right arm on the downswing is that it is "pushing down and out." Pushing down allows the right arm to actively straighten while maintaining the bend in the right wrist. This feeling is no different than if you were to try to push something into the ground with your right arm.

Maintaining the bend in the right wrist is a fundamental you see in a good swing. It allows the clubshaft to return forward at impact, resulting in a clubhead that is descending and accelerating through the impact zone.

PGATOUR.COM - Instruction blog: Right arm the key to Perry's swing

"In essence, bending and straightening the Right Elbow will raise and lower the left arm and/or cock and uncock the left wrist without bending, flattening, or cocking the right wrist. Right elbow action either powers and/or controls all three elements of the Three Dimensional Impact, (downward, outward, and forward)." ~ Homer Kelley

www.chuckevansgolf.com

In a golf swing (whether one is a hitter or a swinger), the right wrist is always bent back and the right wrist never bends forward (palmar flexes) at any time point during the downswing - because it would cause the left wrist to bend forward (flip).

Whether one is a hitter or a swinger, the clubhead should never flip past the hands while the clubhead is moving through the pre-impact zone. The clubhead should always be lagging behind the hands during the entire downswing, which means that the right wrist is always bent back.

[A] hitter applies an active push-force at pressure point #3 by actively extending the right elbow during the downswing - as the right elbow actively straightens it applies an active push-force via the bent right wrist to pressure point #3.

PA#1 is only actively released in a hitter's swing action - when the right triceps muscle actively contracts with a large amount of isotonic force, thereby straightening the right arm in a straight line thrust action that thrusts the right forearm downplane and drives PP#1 [the left thumb]/PP#3 towards the ball (or towards a desired aiming point in the vicinity of the ball).

The release of PA#1 is due to a very active triceps muscle contraction that actively straightens the right elbow in a forceful thrust action that pushes the right forearm and bent right wrist towards their impact fix position.

How to Power the Golf Swing

Throw the club through the ball with your right hand. As Jack Nicklaus said, you can hit as hard as you want with the right hand as long as the lower body is leading.

Tom Watson: My power key never gets old: Golf Digest

That right hand does not stay as loose as it does on your backswing. You take it back loose, your hands are nice and flexible. But when you hit that ball, you’re adding power to it and you’re increasing your pressure all the way through impact.

Tom Watson Interview


Monday, July 30, 2012

TGM and Power Accumulators

Spend any time at all searching the Internet about the vagaries of the golf swing and you're likely to run into forum discussions about The Golfing Machine, a complex book of golf theory by Homer Kelley. TGM has gained somewhat of a cult status among golfers--professionals and amateurs alike. Great teaching pros have taken some of its teachings and "dumbed them down" for the rest of us.

Part of what makes TGM complex is a description of the physics involved in a golf swing. But here's something that you may find useful that isn't too hard to understand. TGM talks about Power Accumulators and there are four of them. PA#1 is the bending and straightening of the right arm. PA#2 is the cocking and uncocking of the left wrist. PA#3 is the rolling of the left forearm (Hogan called this supination). And finally (the one that really increased my power and consistency and made PA#3 release easier), PA#4--the angle between upper left arm and shoulder line that's strongly associated with the pressure felt between the upper left arm against the left pectoral muscle that begins in the backswing, increases during the downswing, and releases when the upper left arm is finally launched off of the chest, which also releases the angle of PA#4.

Release the Power Accumulators in the correct sequence and degree and you can deliver a nice, powerful, repeatable shot with good direction control. You probably already use some of them to one extent or another.

One that took me a while to understand was PA#4. Some golf instructors try teach this by telling you to "stay connected," and they recommend various drills that try to instill this feeling, such as hitting with a towel, head cover, or even a bit of one's shirt held under the left arm pit. I personally don't find those drills helpful, because I don't think they convey the transfer of energy (increasing pressure) that needs to occur between that left pectoral muscle and the left arm during the downsing. The golf swing is powered from the feet, into the legs, up through the rotating torso, out to the arms, and finally through the club and into the ball.

What's helpful to me (for PA#4) is to feel that my upper left arm pulls across my chest on the backswing, creating a pressure point (this pressure point is called Pressure Point #4 or PP#4 in TGM). That pressure between the upper left arm and chest should increase on the downswing, because the turning of the chest and shoulders (due to the pivot action of the upper body) is pulling the arm tight against the chest initially (and the arm pulls the club as a result), because the club and arm are lagging. This happens while the arms are dropping. This means that the correct sequence of motion in the kinetic chain is: left hip turns and eventually pulls the left shoulder which increases pressure in the upper left arm against the chest which helps pull the club into the ball.

It's important to note that the hips should still start the downswing and the arms must still drop while the back is turned; it's easy to focus too much on that chest-arm pressure point and then spin out with the shoulders--a sort of diving motion that will cause an outside-in swing path. This will cause fades, slices, and pulls, because the path will be across the ball. The hips must rotate first and create separation between the shoulders (keeping the back to the target initially). Then when the shoulders finally rotate, in-turn, the pressure can build in PA#4 and really power the left arm through the shot.

And keeping the head back behind the ball is important to keep the proper spine angle through impact (secondary axis tilt) to avoid spinning out and diving forward with the shoulders; the right shoulder should move down-plane towards the ball, not over-plane. It might be helpful, therefore, to think of the left chest muscle rotating forward and upward as it launches the arm. For most this won't be a problem, but it's something of which to be aware. If shots suddenly start slicing or pulling, make sure that the legs start the motion first.

Now, about PA#3. I've posted before about the flat left wrist and how to maintain that while supinating the left forearm, such that the wrists DO NOT flip at impact. And I've also posted about complete extension--having both arms extended immediately after impact. Properly using PA#4 allowed me to figure out the correct release of PA#3. Keeping the grip relaxed allows the left arm to NATURALLY supinate ever so slightly to the left when the left arm is propelled off of the chest (release of PA#4); this is why so many teachers have said that "rolling the forearms" is NOT a consciously controlled action. It also makes sense on why gripping tighter can slow PA#3 and aid in fading the ball, while relaxing the grip can facilitate drawing the ball.

Finally, an explosive, dynamic motion helps to maintain the lag when striving to use PA#4 and PP#4 to drive the swing. Swing faster! Some instructors say don't swing hard (with tension) but swing fast, while some use "hard" and "fast" interchangeably. You want to release PA#4 by having the left arm EXPLODE and SNAP off the chest dynamically. Everything can stay loose while this happens, regardless of whether you believe this means swinging "faster" or "harder." Swinging faster (releasing PA#4 quickly through the ball) creates more lag and more distance. Period. It's entirely possible to swing faster and still feel "in control."

It's important to note that PA#4 is associated with a swinger's style--pulling the club through using the left side, as opposed to the hitter's style--pushing the club through with PA#1 and PP#3.

Power accumulator #4 is loaded when the left arm is pulled across the chest wall during the backswing. At the end of the backswing, the left arm should be lying across the upper chest wall and there should be a sense of pressure at pressure point #4 - the point where the left upper arm lies tightly against the left upper pectoral area...

During the downswing, the left arm moves away from the upper torso and power accumulator #4 is regarded as being completely released when there is an approximately 90 degree angle between the straight left arm and the upper torso between the shoulder sockets - which usually happens by impact (actually at the end of the followthrough when both arms are fully straight).

How to Power the Golf Swing

This power accumulator 'loads' when the golfer takes the club back and that angle turns into a 45 degree angle. Then it 'releases' once the angle goes back to 90 degrees. A favorite of 'swingers' who often load this power accumulator and then just pivot their body thru and hold onto the power accumulator for as long as they can. It's often known as 'throwing/blasting the left arm off the chest.'

3Jack Golf Blog: Understanding the Basics of TGM -- Part V

When the upper torso decelerates, the left arm can freewheel away from the chest wall towards impact at a faster speed because there is no impedance to the freewheeling movement of the left arm away from the chest wall. One can think of the left arm being passively catapulted away from the chest wall, and the distance between the hands and the right shoulder should progressively increase during the mid-late downswing...

Note that the lower lumbar spine has moved towards the target (as a result of the pelvic shift-rotation movement) and that he has acquired a significant amount of secondary axis tilt as a result of the hip squaring action. The secondary axis tilt allows the right shoulder to move downplane when the shoulders start to rotate perpendicularly around the rightwards tilted spine...

A swinger powers the golf swing via a pivot-driven swing action that causes the left arm to be catapulted off the chest wall towards impact. The freewheeling left arm/hand pulls the clubshaft towards impact, and this pull-action is called drag-loading. The right arm does not supply any push-power in a swinger's swing action. If a golfer wants to apply right arm push-power in a drive-loading manner, then he must learn how to become a hitter...

A golfer should never attempt to actively roll the left hand into impact via an active hand-wrist rollover action. Some golf instructors incorrectly teach a swing methodology where they recommend that a golfer actively roll the hands over through the impact zone - and this active hand roll-over action is called a hand crossover release action...

If a golfer can get the left arm to swing freely and fast towards impact in the downswing, then he will hit the ball a long way. Power accumulator #4 is called the master power accumulator, and it supplies most of the swing power in a left arm swinger's action.

Downswing

I heard him say to my Dad, "The kid has a nice swing. If you don't mind me saying so let me give you one tip. "Tell your son to Swing Hard! Don't worry about direction so much now. Swing hard now and worry about direction later. It's very difficult to get clubhead speed later on once you've learned a slower swing."...The key to swinging hard is in the downswing, not the backswing! Your backswing should still be as slow as you're natural tempo allows...Swinging hard and feeling comfortable with it will take time, especially if you've been swinging easy for years.

Swing Harder For A Better Golf Game


Saturday, March 24, 2012

Els: Keep the Box!

Probably one of the best bits of golf swing advice I've ever seen or heard comes from the great touring professional Ernie Els; touring pros aren't usually the best golf teachers, but this small tip from Els has become one of my top swing thoughts.

I've referred to this before in other posts (sequenced passivity and golf's triangles), but it also ties closely into other posts and fundamentals that did not mention Els, including the right hip-right elbow relationship and arms falling to start the downswing (as Shawn Clement's "arm-club unit falling down the plane").

Simply stated it's this: the right elbow, right forearm, and right wrist (and thus the club) form a box shape (actually more of a rectangle with 2 90-degree angles) at the top of the swing. During transition, one simply allows this box shape to remain intact and fall down in front (right elbow coming close to the right hip while the shoulders REMAIN turned) and then release it past the ball. As Ernie so simply puts it, "Keep the box and give it a lash!"

I believe it's probably best to focus on the right arm only in the backswing, because doing this properly will keep the left arm straighter and help set the wrists earlier. And thinking of the box shape in the downswing is a given; maintaining it as long as possible gets 2 crucial levers working in the swing: the right elbow and right wrist straightening in the right sequence and at the right times. This adds tremendous, effortless power to the swing (for all shots…include bunkers and pitch shots).

This is Els' way of describing what TGM'ers call the use of Pressure Point #3: "Keeping the box" as Els describes will place pressure in the base knuckle of the first digit on the right hand from the start of the downswing until past impact. This is often referred to as "lag pressure," and it's maintained all the way down into the ball. As a matter of fact, one can think of the base knuckle or first phalanx of the right finger as analogous to the club face; it's often called the "trigger finger," though most of the finger should do NOTHING during the swing.

By using this "box" method, you will notice that the left and right wrists can cock up and down WHILE the right wrist remains hinged backwards, and it's this backwards hinged right wrist that creates a flat left wrist at impact, maintains lag pressure in PP #3, gets the hands leading the club head, compresses the ball, and creates a forward leaning shaft. A key is to start down or transition slowly; the greatest speed is added at the bottom, not the top.

In reality, Ernie could have called this "Avoid the cast!" instead of "Keep the box!" Casters apply an active pushing force, unhinging force, and/or uncocking force (either consciously or unconsciously) at the top (and thus have to flip the wrists at the bottom), while laggers (i.e., good players) form the angles at the top and then drop that arm-club "power package" intact from the top (the right wrist remains hinged backwards through impact). Thus, the angles formed in the right arm during the backswing are retained late into the downswing. Casting is often associated with an early shoulder rotation; the arm-club power package should ideally begin dropping in response to the lower body BEFORE the shoulders open up.

Many instructors will tell you that maintaining lag pressure is not something you can do actively, but that poses the question: Is consciously fighting the urge to cast considered an active attempt to maintain lag? One could argue that "keeping the box" as Els describes is a means of actively keeping the angles and lag pressure in PP #3. Martin Hall's take on this is to "keep the thumbs pointing up in the air as long as possible," which also implies an active effort to maintain lag. As with all things in golf, let your results be the arbitrator.

A good way to practice this move is using the Pump Drill (see videos below); Hogan doesn't refer to it as the Pump Drill, but you can see him demonstrating it in his video. Another drill advocated by Hogan and Brian Manzella is to simply remove the right thumb from the shaft and hit some balls (Sam Snead used to remove his right thumb and right index finger entirely to practice). There are also drills that advocate holding a wet mop like a club (or using a club with a towel on the end) and dragging it across the ground. An impact bag is also used to instill the correct feeling at impact.

My take on the Pump Drill is to completely remove the right hand thumb and index finger from the handle to accentuate the pressure feeling in the base phalanx of my right index finger. From the top of the backswing, use the left hip motion to cause the arm-club unit to pump up and down a few times. The end of a "pumping action" gets the hands over the ball with the club shaft still parallel to the ground. After one or two "pumps," let it go at the bottom.

What happens when lag is taken too far? Skull shots (not really thin shots) because the club bottoms out late and balls that fly off to the right because the club face doesn't close in time. Rejoice if you see these occasionally instead of weak fat or thin shots that come from casting and flipping.

It's very crucial to keep your head behind the ball (i.e., maintain a tilted spine angle); just get the feel that once you get over the right leg in the backswing that the head stays there while the lower body weight shifts to the left. Keeping the head back assists with shallowing out the swing and with hitting inside-out.

Even cooler, if you "shake hands" with your right hand towards the target, you can coax a draw or straight-ish ball flight (the toe of the club overtakes the heel), or you if you hold off the right hand somewhat (toe and heel come through more together) you can get a fade.

As Ben Hogan rotates his lower body towards the target, the "straight left arm + bent right arm" act as a single unitary structure and they are both passively pulled down towards waist level as a single unit. Homer Kelley refers to this unitary structure of the left arm and bent right arm as the power package assembly [6]. In other words, Ben Hogan does nothing actively with his hands/arms/club during the early downswing - he simply allows them to respond reactively/passively to the shift-rotational movement of the lower body, and he simply allows the entire power package assembly to be passively pulled down to waist level.

How to maximize wrist lag

[Drill for learning the feel of lag pressure.]

BM: "Grip the club normally. Take the right thumb off of the club and point it at the target. Hit it."

[Why does this work?]

Forum Member: "...when most of us begin to lose the lag, we compensate by feeling/adding pressure from the right thumb to try and stop the throwaway....without the right thumb on the club, we must store and hold the lag or be ready for the club to flop around coming into impact (especially if there is throwaway or if we lose the lag on PP#3)."

BM: "Helps Slicers too!

...but why???"

Forum Member: "Without the right thumb exerting pressure on the club, one can drag the sweetspot onplane via the right index finger, thus closing the clubface by impact."

Best Drill for maintaining lag

In the Golf swing there are 4 distinct pressure points (more on that in another article) but again, for simplicity stakes, we will focus on the easiest and more convenient to feel: the meaty part of your index (the "trigger finger") of your trailing hand where it touches the club.

Here is the trick: Are you able to perform a Golf stroke while feeling pressure in this index from start down to both arms straight (the end of the follow-through and before the finish)???

Even better: if you can feel this pressure not decreasing (unrelentless pressure), I bet my shirt you must be a 1 digit handicap as you must have Lag in your swing with all the good things that come with it!

A player who casts the club (club head throwaway) does exactly that: he feels a lot of pressure in the start of the downswing (by accelerating the club very hard and convulsively). Such a sudden accelartion thows the club away with no chance to catch it up before impact.

Needless to say, that player feels no pressure at all in the index finger when the club head arrives at the ball.

The correct way to do it is to push your cart evenly with no over-acceleration.

Golf Lag Tips » Focus on pressure points to feel Lag