Showing posts with label swing. Show all posts

Monday, May 27, 2013

Swinging Lag: More on Pressure Point #2

Okay, so I'm hyper-focused on grip pressures lately, in the TGM sense. In the previous post, I went on at length about TGM's Pressure Points #1--where the right palm presses down on the base of the left thumb--and #3--the base knuckle of the right index finger--and how they're used to sense lag pressure, either actively or passively.

This post--like the last one--will not deal with pop golf instruction's treatments of grip pressure. Those descriptions of gripping to a certain point on a 1-to-10 scale, holding a baby bird, holding a baby's hand, holding a tube of toothpaste, etc. are not really helpful in describing WHERE you should feel pressure in the left and right hands. The whole 1-to-10 scale thing is really silly if you think about; how many times have you shaken hands with someone who feels like they're barely gripping your hand, while another person feels like they're about to break your hand. This proves that scales vary from person-to-person. And how many people hold baby birds? I'm going on out a limb (and agreeing with several reputable teachers such as Hank Haney and Shawn Clement) by saying that you probably should be gripping the club harder than you think. But the key is WHERE you put that pressure; it's not with the entire hand!

PP #2
PP #2

Pressure Point #2 Should Be Called Pinky Pressure #2

This time, I'm focusing mostly on TGM's Pressure Point #2 (PP #2)--the last three fingers of the left hand (for a right-handed player). Recall that PP #2 and PP #4 (pressure of the upper left arm pressing into the left pectoral muscle) are strongly associated with the swinging style as described in TGM; also recall that distinctions between the swinging and hitting style aren't black-and-white; there is a gradient between the two in which all golfers find themselves.

I was recently reading an article in Golf Digest that described a way to help golfers get out of greenside bunkers. The article advocated removing the left hand pinky from the grip completely, either by curling it under or letting it hang off the end of the grip. The purpose was to allow the left wrist to cup coming through, which is important for using the bounce of the sand wedge properly to escape bunkers. Golfers are taught to avoid cupping the wrist in the full swing; it's called a flip and it's a major fault. But in a bunker, the added loft is needed to avoid digging into the sand. On a side note, one would do the same cupping technique when trying to hit a flop shot.

So what does this have to do with PP #2? Well, it stands to reason that if removing the pinky from the grip is important for encouraging a flip in a bunker or when attempting a flop shot, the pinky must be important for stopping a flip in the full swing. The opposite condition of a flip is a flat left wrist (FLW) at impact--just what we need in the full swing. This brought me around to PP #2, which is described as the pressure felt in the last three fingers (pinky, ring, and middle) of the left hand.

Digging further, I found a few articles on the internet that delved deeper into PP #2. And wouldn't you know it: The pressure in these three fingers should NOT all be the same. The left hand pinky pressure should be greatest, followed by the other two fingers in decreasing amounts! This was a huge revelation, because I had always gripped with the same, non-bird-killing pressure in all of the left hand fingers, except the thumb.

By gripping tightest in the last two fingers of the left hand, your left wrist will stay very loose and allow a full release, while making it more difficult to clip the left wrist. Now it's easy to see how PP #2 and PP #4 work together so well. Also, I noticed that my wrist extended downward a little more at address, putting the club shaft at slightly more upright position at address. But maybe most important, this pinky pressure consciousness does--in fact--help create the FLW condition at impact and helps produce the swinging style lag.

Luckily, learning to use the bounce is as easy as removing the pinkie of your top hand from the grip. With this finger off the club, your grip pressure naturally lightens, and it's almost impossible for the hands to stay ahead of the clubhead at the bottom of the swing. I use this tip to teach the right feeling, but you can hit shots like this on the course, too.

BONUS: Open the face and address the ball off the heel. This might sound like Shank City, but remember, you're hovering the club. When the clubhead enters the sand, it will inch slightly closer to you, putting the center of the face under the ball. The shot will come out more predictably.

Jason Carbone: Hitting Soft Sand Shots: Golf Digest

With your top hand (left hand for right handers) you should be holding onto the club firmly with your pinky, ring, and middle fingers while the other 2 should be relaxed. In your bottom hand (right hand for right handers) you should be gripping the club tightly with your thumb and pointer finger while the other 3 fingers are just along for the ride. The 5 fingers that you are gripping the club firmly with are primarily responsible for releasing the club in a manner that will provide you with more power and consistency.

SilverHorn Golf Club of Texas: Grip Pressure

Properly placed hands work together as one facilitating unit. The left hand (or right hand for lefties) grips the club with pressure felt in the last three fingers and most heavily on the pinkie. This keeps the butt of the club securely attached to the hand.

Inside the Tour,Chapter Three, the Body's Motion

Too firm of a grip restricts arm and wrist movement in the swing. Most of the pressure should be in the pinkie and ring finger of the bottom hand [error: actually the top hand if the club is on the ground], and the index [error: actually the ring finger--the index finger is the first finger] and middle finger of the top hand [error: actually the bottom hand if the club is on the ground]. The remaining fingers are mainly used for balance and stability, and the thumbs should rest comfortably on top of the grip.

What is a Proper Golf Grip? (with pictures)

The left hand provides the primary connection for controlling the club. It is very common to grip too tightly with this hand. According to teacher Michael Hebron, the secret is to tighten only the last two or three fingers of your left hand—the pinky and ring fingers, and perhaps the middle finger. In doing so, you create a strong grip without locking the wrist muscles and interfering with the free movement of your wrists.

The Proper Wrist Action for a Golf Swing | Golfsmith

Engage your ring-finger and middle-fingertip pads with pressure around the grip for stability. The index finger has the least amount of pressure on the grip. The pinky fingertip pad maintains the most grip pressure throughout the swing.

San Diego Golf Instructor - Core-Breathing 4 Golf

The other reason this is an important fundamental of the golf grip is because it helps with developing the flat left wrist that every “flipper” of the club desires in their golf swings. If you grip the golf club with just your left pinky, you’ll see that it’s actually quite easy to get into a nice flat left wrist position at impact because the pinky leads the way.

Now, take your grip with just the middle two finger and see how the tendency is to get the wrist into a slightly cupped, scoopy position at impact because of the different muscles used in the forearm.

Now, go back to just using your pinky by itself and note how gripping the golf club more snuggly with just the pinky firmly “locks” the wrist in this slightly bowed position, thus making it much harder to flip the club through impact.

Stop Flipping the Golf Club with the Proper Use of Your Pinky in the Golf Grip - RotarySwing.com

Then, Jack Nicklaus comes along with Golf My Way (1974). He talks about grip pressure objectives also (pp. 70-73):

Left hand: Pressure with the last two fingers, pressing the shaft into the L palm.

Right hand: Pressure primarily with the middle two fingers.

Overall: Maintain constant pressure

Grip pressure myth


Saturday, October 13, 2012

Keeping the Right Foot Planted

The right foot may be something about which you've never thought. It simply comes up on the toes during the downswing to accommodate the weight shift, right?

Well, studying the feet of some professional golfers during their downswings might just pay off. Look at golfers like Rory McIlroy, Kenny Perry, Ben Hogan, and Jason Dufner. As it turns out, some of the best ball strikers in history worked to keep the right foot planted for as long as possible during the downswing. In other words, the back foot may roll inward slightly towards the inside of the toes during impact, but the foot should only come up on the tip toes at the very end by being forced up by the finish. You should never TRY to come up on the toes through impact; if this is a habit you ingrained early, you'll be doing a good thing to try to reverse it. Why?

Set up like you're going to hit a ball and begin coming up on the toes of the right foot during the downswing (through impact). Notice what happens with the hips. They open up sooner. Keeping the right foot planted longer through impact keeps the hips from spinning open agressively too early and prevents the angle of the pelvis from improperly changing. The primary and secondary spine angles are retained during the turn-through.

It's important to couple this with the proper shoulder plane rotation. Done properly, the knees will finish very close together; otherwise, you will notice a larger gap between the knees at the finish.

MY RIGHT FOOT STAYS DOWN

This is more evident when I hit my irons, but I keep my right foot on the ground for a long time during the downswing. It helps my stability and lets me create more leverage to deliver a lot of energy into the ball. Plus, if you get up on the toes of your right foot too quickly, you can bet the club is not staying in front of you. Think about keeping your back heel grounded for as long as possible as you swing down. You'll be surprised how well you start striking the ball.

Golf Instruction: Jason Dufner: Duf's Moves To Hit It Solid: Golf Digest

One of the parts of the swing I like to see is when a golfer has a right foot that is flat at impact or close to it. Granted, with longer clubs this is less necessary and more difficult to accomplish, but if you can get somewhat close then that's pretty good.

3Jack Golf Blog: The Flat Right Foot

In the next sequence, it is clear to see that my right heel is still very low to the ground, but the entire foot has rolled up off the rope and in toward the left foot.

If you're a "hip spinner" as I discussed in the Hip Spinners video, doing this will create a sense of being "anchored" to the ground and provide a refreshing sense of stability at impact.

Role of the Right Foot in the Downswing - RotarySwing.com

The right foot is actually a reaction to a good swing. If you stay down, the foot will SLOWLY rotate without coming up too quickly. The other option is the foot comes up and out too quickly and you will most likely hit a slice or block.

The Right Foot on the Golf Swing


Sunday, April 8, 2012

Tension and THE Final Swing Thought

How many times have we heard the various descriptions of grip tension? Sam Snead said that one should grip the club "like you're holding a bird" and Bobby Eldridge says that one should hold the club "like you're holding a child's hand." These produce images of extremely relaxed arms. Hank Haney, on the other hand, seems to advocate a slightly firmer grip (but still relaxed), and many pros state that relaxed is better because our unconscious minds will automatically apply the right amount of tension during the swing.

Tension creeps into our swings and setups when we're not paying attention. Nothing good comes from tension. Tension in the hands at address can produce tension in the wrists, arms, and rest of the body, and vice versa. Tension in the arms can happen when one tries to consciously manipulate the arms through the impact zone, such as "rolling the forearms," "turning the knuckles down," pushing the arms "out towards right field," and so on. Grip tension can block the club face from closing and produce slices, pushes, and pulls. Arm tension (from grip tension) can pull the arms in towards the body, leading to chicken wings, tops, and skulled shots. Grip tension can hinder full wrist action, which can lead to fat shots and loss of distance.

A method of relaxing grip tension is the waggle, which seems to be used less and less these days.

Tension even creeps in during the putting setup. A relaxed grip in putting is very important for feeling the putter head.

My final swing thought (before I turn my shoulders, use my back to the target, and lift my arms in front of my chest and then over my right shoulder to the top of my backswing) is to consciously relax my grip and forearm tension. Putting: Same thing--I relax my grip. I do this because grip tension can increase without awareness; one must constantly monitor it. Ironically, relaxing the grip tension relaxes the arms and the rest of the body, leading to a more flowing, smoother swing. If golfers would do this then they could save themselves a few strokes per hole. It's that important.


A light grip pressure, with your arms relaxed at address and throughout the swing, allows you to release the club freely and with full extension. The result will be more distance with less effort. Johnny Bench and I guarantee it.

[From Lighten your grip: Golf Digest]

...practice more relaxation in your grip, stance, and swing. Check the tension level in your grip. The hand pressure on the club should be light. If it is too tight, your takeaway will tend to be jerky and too fast. If your are not sure of the amount of pressure, let your hands feel the difference by squeezing tightly and then releasing to a very light grip.

Notice that when you squeeze tightly, your forearms are tense. This generates tension throughout the body. You want just enough grip pressure so that you won' t lose the club during the swing. No white knuckle! What little pressure you do feel should be in the last three fingers of the let hand, and the third and fourth fingers of the right.

[From Golf Tips - Relaxation During the Swing]

First, try producing less pressure and tension in your grip. Gripping the club too tightly will cause your forearms and shoulders to become restricted, thus resulting in a shorter turn in the backswing. The grip pressure is similar to taking a banana, peeling it, and gripping the banana without putting any fingerprints on it. When done properly, you will feel more relaxed in your arms when gripping the club in your set up.

Secondly, at the top or completion of your backswing, eliminate tension in your arms by making them feel as if they are wet noodles. Staying relaxed at this point of the swing will help you sync your arms with your body efficiently.

[From Golf Tip: Relax The Arms For More Distance | Brad Hauer - Golf Lessons]

I would like you to believe for a moment that to play to your greatest potential, you must understand what your golf club is doing throughout the golf swing. Most of us cannot due to excessive grip pressure. By choking the golf club, you lose all sense of where the clubhead is and what it's doing.

I suggest that to play your best golf next season and reach your potential, you must concentrate on your grip pressure and when it changes. You can get incrementally better by working on mechanical problems with your swing, but you can get exceptionally better by learning to feel your clubhead.

[From Saturday, January 20, 2001 - COLUMN: GOLF: Relax grip and feel the club - Las Vegas View Neighborhood Newspapers]

Hold tight onto the club and the golfer has to use a great deal of effort and the ball often ends up being pulled, pushed, sliced or hooked – going two thirds of the required distance. Relax the grip maintaining directional control and the ball flies straight to the full distance of the club and swing used.

[From Loosen your grip to be in more control | GAINMORE Golf]

Keep your grip pressure light and constant throughout the stroke to avoid snatching or casting the putter, abrupt transitions in the stroke, or tempo fluctuations, as this promotes a smooth stroke, with good accuracy in the stroke path, and consistently solid contact.

[From Get a Grip on Putting: Keep the Pressure Light and Constant]


Saturday, March 3, 2012

Swing Sequencing and Passivity

I've learned that normal instincts and proper swing actions diverge dramatically. Golf is full of these contradictions (i.e., swing left to make the ball go right, hit down to make the ball go up, etc.). Understanding these tenets intellectually is easy; putting them into practice is tough.

The swing instinct of the beginning golfer is to use the hands and arms to hit the ball; that's what feels natural. The resulting swing sequence of that instinct is something well known to frustrated golfers: the upper body leads the downswing, club gets laid off or across the line, the shoulders spin out, the arms are thrown out and away from the body, posture is lost, club casting, coming over the top, the knuckles of the left hand point up, and the ball pulls, hooks, and slices, depending on the club face position at impact.

At some point, with enough effort, the beginning golfer begins to implement the fundamentals that all the great teachers espouse: upper body turn on backswing (lower body resists), arms stay in front of the body, lower body leads on downswing (shoulders and arms resist), hips bump and turn, the club comes from the inside (drops in the slot), lag is maintained (no casting), no flying elbows (chicken wings), full extension, good release, left hand knuckles turn down, square/closing club face, etc. The feeling is described as effortless, passive, and a good impact feels like the ball isn't even there. The ball flight is either straight or a controlled fade or draw in the target direction. Of course, it takes time to implement the elements of a good swing and then to learn the proper order or sequence of those events. At some point, they move from being separate thoughts and actions that may occur asynchronously to a free-flowing, coordinated, sequenced series of moves that result in a passive, effortless swing and great, consistent impact.

The golf swing has vertical movement and horizontal movement movement. The vertical movement comes from the arms lifting up and down in front of the body; the horizontal movement is provided by the turning of the body. The small muscles in the chest, shoulders, and arms ARE NOT INVOLVED in getting the club back to the ball. The golfer must surrender to the quite correct tenet that he is not controlling anything with the arms; he is merely setting up properly (so that the ball is in the way) and then assisting natural physical forces to propel an object; when you feel "out of control" with the arms and small muscles, you're starting to learn the right feeling, which runs counter to intuition to use the arms in order to hit the ball.

  • One piece takeaway and backswing, where the arms stay in front of the body in a triangular formation and the right knee keeps the bend established at address.
  • Completed backswing has the shoulders turned 90 degrees (back facing target) and loaded into inside of flexed right leg. The arms are extended away from but still in front of the chest in their triangle shape. The right elbow folds naturally and the wrists set naturally, creating a "box" shape at the top of the swing that one should try to maintain for as long as possible. The club is pointing at the target at the top (not laid off).
  • Transition has the arms simply dropping (triangle still in front of the body) while the back remains turned and the weight shifts to the left leg and the left hip immediately rotates backward. The shoulders haven't rotated yet, so an X Factor is created between the shoulders and hips.
  • Get the feeling that the arms get to the top and stay there while the lower body moves and the arms drop down from the top (maintaining the "box" shape); the arms, hands, and small muscles should be completely passive and make no effort to swing or steer the club!
  • Downswing: As the still folded right elbow nears the right hip (from the arm dropping action), the hips rotate fully toward the target. This gets the arms coming from the inside--they cannot be thrown over the top in this manner.

The result is that the ball is hit effortlessly and the arms don't really do anything consciously (they're passive), which is the opposite of what one tries to do when beginning golf. The body can appear to move very slowly but the club head is actually moving quite fast; this is how pros like Ernie Els and Fred Couples can hit the ball far but appear to be moving in slow motion. A good ball flight with good distance results. The finish is natural and balanced (one can easily lift the right leg and remain balanced over the left). In short, it feels good, correct, and easy. Swinging faster is simply a matter of turning the hips faster; swinging harder is out the window, because there's no muscle tension involved. The body is learning to assist gravity and physics to let the club do the work. But the body's gut instinct is to tense up and rip it, which will result--consistently--in looking for one's ball in the trees.

It is important that a golfer understand that Hogan implied in his book that the arms/clubshaft are passively pulled down to waist level as a result of the lower body movement, and that a golfer shouldn't have to actively pull the arms/clubshaft down to waist level as a totally separate/independent action. Ben Hogan stated that his arms/hands "get a free-ride" down to waist level when he shift-rotates his pelvis at the start of the downswing [4].

[From Downswing]

Most amateurs try to help the club toward the ball by pulling on it from the top of the swing. They are, in effect, trying to help gravity—one of the greatest forces in the world. Mother Nature doesn’t need your help. She’ll get it done—if you don’t pull on the club.

When you’re at the top of the backswing in good balance, you literally let (key word even if it’s small) your arms drop through space as you turn your hips left and get your weight onto your left heel at the completion of what’s a lateral turn.

[From Golf Tips - The Fire Drill]

Williams, focusing on the speed of [Bobby] Jones's swing, calculated that from the top of his backswing to the point of contact with his ball Jones's hands and arms were accelerating at a rate of just over thirty-four feet per second per second.

What makes that interesting is that if you were to extend your arm and drop a golf ball, its acceleration rate as it fell to Mother Earth would be just over thirty-two feet per second per second. See where I'm going with this? It means that in the beautiful golf swing that propelled a ball 260 yards with a hickory-shafted driver, the great Bobby Jones did only a little more than let his arms fall out of the sky.

Bobby Jones depended on gravity to build his golf swing.

[From Ruthless Golf: Those Amazing Relaxed Swings]

Transferring your weight to start your downswing is crucial to an "inside" delivery-the key to cracking 90. From the top, you should transfer your weight from the back leg to the front. Resist the temptation to start your upper body or the club first. It's like a throwing or kicking motion.

[From Breaking 100-90-80: A monthly guide to the scoring basics - golf tips | Golf Digest | Find Articles]

Saturday, February 25, 2012

Golf's Triangles

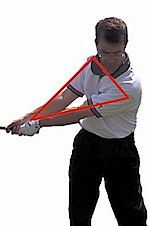
Another way to consider the motion of the arms in the golf swing is to think of the triangle formed by your arms at address. This swing thought can be used to help prevent getting laid off or across the line at the top, preserving the correct swing plane, and it can also aid extension back and through. Finally, it's absolutely critical for a proper takeaway.Takeaway Triangle

It's important to note that the triangle stays in front of the body or chest all the way through the swing, and it can even be used for short game shots. The sides of the triangle near the base (your upper arms) should stay connected to the sides of your chest.

Using this triangle swing thought keeps the elbows related to the hips, especially the right elbow to the right hip, and helps maintain the swing radius. It's important on the backswing to remember that the right leg stays bent to get the full benefit from the triangle.

Simply form the triangle at address, lift the triangle vertically on the backswing (as if it swings around your neck) by rotating the shoulders (the right elbow naturally folds as it rises); allow the triangle to lower on the downswing using hip rotation, and allow it to lift vertically on the through swing. The triangle stays in front of the body the entire time; the triangle does not become "horizontal" or more parallel to the ground until you reach the top (going back in the takeaway, it should feel vertical, with right arm above the left). A full 90-degree shoulder turn is essential to using the triangle correctly, with the right shoulder pulling the triangle into position at the top.

During the takeaway, the right arm should remain straight for as long as possible, and it will initially stay above the left arm, as mentioned above. This will help keep the club head outside the hands during the takeaway, which is key to avoiding an OTT downswing. When the right arm finally does fold up, the right elbow should be pointing down at the ground--not behind the golfer (both elbows should stay relatively close together--as close as possible to the distance they were at address). Separating the elbows at the top is a major flaw that can lead to the arms collapsing, and it's a sign that the arms are doing more than merely moving vertically.

The movement of the shoulders is key; the triangle in the takeaway moves in response to the right shoulder pulling back and up behind the golfer, while the left shoulder tilts down. The right palm faces down toward the target line during the takeaway, such that the club face angle matches the spine angle. The arms, wrists, and elbows do very little to get the club back, but the arms rise vertically to get the club up.

The raising and lowering of this triangle (along with wrist action) constitutes the upward and downward motion of the golf swing, while hip rotation (and associated shoulder rotation) constitutes the horizontal, circular motion of the swing. At no time should the arms pull the club back behind the body; the correct feeling is a lifting up-and-down in front of the body without much independent arm movement.

Martin Hall has criticized this "triangle thought" because the arms don't actually maintain perfect triangles throughout. Instead, he argues for keeping your arm extension. Don't let this deter you. As with anything in golf: If it helps you then USE IT! Yes, we're not talking perfect triangles (the elbows do bend) but you get the point.

The triangle concept perfectly illustrates the takeaway. The butt end of the club should point roughly at the belt buckle during the takeaway (before the arms begin rising). If you're used to quickly pulling the club inside with your hands then this will feel really weird and wrong--as if you're outside the target line. But you're not! You're keeping the club head OUTSIDE your hands until the correct moment in the backswing by maintaining this triangle and keeping the butt end of the club pointing at your belt buckle in the takeaway. You've heard that the pitch shot is actually an abbreviated full swing; I think the pitch shot is either the takeaway or just beyond it with a little bit of wrist action!

However, there is ANOTHER triangle worth mentioning: the so-called "eternal" or "magic" triangle, formed by the angle of the left arm, club shaft, and an imaginary line from the left shoulder to the club face. The longer this triangle is maintained, the greater the lag. However, the first triangle we discussed is really the key to the "eternal" triangle. Not surprisingly, this also is the "L shape" of the left arm to club and Ernie Els' "maintained box" shape (he focuses more on the angles of the right arm to the club as opposed to the left). Keeping these angles ensures the use of the joints as levers (as in physics), which produces maximum lag and energy transfer.

Here is a quick drill: Hold the club straight out in front of you and extend your arms out as far as they can. This should create a TRIANGLE between your chest and your hands. This triangle is the key to a consistent golf shot. We want to keep this triangle formed throught the entire swing.

[From Golf Swing Plane Tips: How To Develop The Perfect Golf Swing]

Take the triangle you form between your arms at the top of your swing and pump it up and down to waist high. Get the feeling that your right elbow grazes against your right hip. Don't jam it into your hip. Just make sure it connects in some way. Also, stand in front of a mirror and watch for the gap. When your right elbow grazes your right hip, you should see some space (daylight) between your forearms. If you see this, you are coming from the inside, and on your way to playing good golf.

[From Golf Tips - Lessons from the Golf Pros - The Magic Gap]

You can also imagine a triangle, formed on two sides by the shaft of the club and the left arm, with the third side an imaginary line from the club head to the point of the left shoulder. From the top this triangle must be tilted and brought down a ways without changing the length of the imaginary side.

This we call the "eternal triangle," because it must be retained as long as possible. As the speed of the golf club head increases, the imaginary side of the triangle lengthens, of course, and the arm-shaft angle starts to open up. But the triangle should be kept constant as long as possible.

[From Golf Downswing: Third Magic Move]

A one-piece takeaway also keeps your hands in front of you. Note that [Lucas Glover's] hands are still pretty much in front of his belt buckle, even though his wrists have begun to cock. (In case you're having trouble seeing it, the clubhead is just to the left of his elbow.)

Ruthless Golf: More Thoughts on Keeping Your Hands in Front of You

1. Grip Points to Belt Buckle...To ensure correct hand height, the butt of the club should point at your belt buckle at address.

2. Clubface Points at Ball...One useful checkpoint is to see that your clubface is pointing at the ball as you swing the club back (right). This will head off two Common errors: fanning the clubface open so it points at the sky, or holding it closed so it points down at the ground. Either mistake forces you to become handsy if you hope to return the club back to square at impact.

3. Wrist Cock Blends with Turn...When your wrists begin cocking up, they should blend with your turn to keep the club on plane. You can check this by stopping your backswing when the shaft is parallel to the ground.

Three 'Musts' for a Smooth Takeaway | Instruction Feature | PGA.com

When I ask amateurs to show me how they start back, most will move the club away with only their hands and arms. What I want to see is the hands and arms moving in sequence with the rotation of the upper torso. All three should move together as one unit until the left arm gets parallel to the ground--at that point the swing's momentum will keep the hands and arms on plane.

Sean Foley: Simple Swing Fixes: Golf Digest

A couple of things to notice in these photos: the shape of the triangle that she [Annika Sorenstam] keeps with her arms and chest, the way that the club head stays in the center of that triangle (in other words, no early wrist cock), and the way that her right arm stays above the left arm all the way to waist high.

The Takeaway: A Common Fault and Fix | Three Guys Golf

Notice how the upper part of my left arm is still attached to my chest, while the clubhead is outside my hands as the club has traveled about halfway back. My left wrist is still cupped, my right arm is above the left and my right knee is still flexed. These positions, though simple, are absolutely critical.

50 Best Swing Keys | GolfTipsMag.com

Compare any of the greats in history and pause the video on the DTL view when the shoulders have rotated roughly 45* you will notice all of them have the triangle at that point between their chest and arms regardless of lift of the arms or rotation only. If the left arm looks higher then the right arm at a 45* shoulder turn then likely that person has come away inside and very flat.

So it is more about arms and chest working away from the ball as a single unit not really the right elbow staying close to the body, if you look at a face on view you will see most golfers that right elbow when the shoulders get turned 45* is actually a pretty good distance from the body.

Right elbow is the key

A good way to take the club away from the ball as straight as possible without swinging the club overly outside or inside the target line is to focus on keeping the right forearm staying above the left during the takeaway. Even if you try to keep your right arm on top of the left on the backswing, it will automatically move under the left arm at the proper moment as you swing the club to the top. As your backswing continues toward its top, your right arm should start to fold at the end of the takeaway and move under your left.

Keep right forearm above the left

Simply put: The right arm should be on top of the left arm as you start the backswing, and then it should move under the left arm as you swing the club to the top.

Many amateurs fold and shorten the right arm too early as they snatch the club away. What you really want is a relatively straight right arm during the initial part of the backswing as this promotes width and good pace -- keys to hitting solid shots.

David Leadbetter: Move Your Right Arm The Right Way : Golf Digest

Most golfers ruin any chance of hitting consistent golf shots within the first 6 inches of the golf swing takeaway.

The first takeaway mistake that I see most often is for the golfer to hinge the right wrist early or bow the left wrist (often, both are done together). Simply hinging the right wrist 45 degrees will move the club about 3 feet without the body having to move an inch.

The other common golf swing takeaway mistake is pushing the golf club back predominantly with the left arm and shoulder.

This is typically coupled with early right elbow flexion (i.e., bending), which should not occur until the takeaway is completed. In other words, the right arm should remain completely straight until the club is past parallel to the ground.

Learn the Perfect Golf Swing Takeaway in 5 Minutes per Day - Online Golf Instruction

The right arms should stay “above” the left as you move the club away from the ball with the palm of your right hand pointing at the ball. This will keep the clubhead outside your hands and stop you from fanning the face open. When the club gets to parallel to the ground during the takeaway the clubhead should still be slightly outside your hands with the clubface parallel to the outside of your right arm.

Top 100 Teachers: Ask Brady Riggs Live! Golf Magazine Top 100 Teacher Will Fix Your Faults

Notice Nick Price’s right forearm and how it is comfortably above the left. This is all accomplished by pivoting the shoulders on a fairly steep plane. The higher the right shoulder, the higher the right forearm and so on…

In a correct pivot, the left shoulder’s first move is down and then slightly across. This is in direct contrast to what most golfers attempt to do with their shoulders, which is: a. turn them as much as they can and b. get the left shoulder behind the ball.

The Shoulder Pivot in the Golf Swing | Andrew Rice Golf