Tuesday, June 14, 2016

Tilted Parallelograms

The correct takeaway motion is really--in my opinion--a near total function of the rearward rotation of the right latissimus dorsi muscle, with zero arm lift initially and zero movements of the forearms, wrists, and elbows. By that I mean, once you've established a great setup (P1 position - see GASP), the simple, centered pivot movement of the ribcage (upper torso rotation or the "lat dowel" concept) will relocate the unchanged address configuration of the arms and club into a position (P2), where the club is both parallel to the target line and parallel to the ground, without any movements of the arms, wrists, hands, or elbows, and without any lifting from the shoulders before reaching P2. In all golf shots, including the putt, the right latissimus dorsi muscle can be thought of as the motion initiator from a static address position at P1; the right lat moves the club—not the arms.

The feel for me is that the club and arms move as an unchanged unit more around rather than up (up to P2), due to the immediate rearward and targetward rotation of the right lat muscle (the right shoulder moves back as the left shoulder moves across to a point just under the chin). The word “immediate” means that that the right rib cage turns “inside the feet,” with no sway of the right lat muscle towards the right leg. Because I use a relaxed neutral-to-strong left hand grip (heel of the left palm points at my right hip), the left hand remains initially cupped as it was in its address position, meaning that the angle formed by my left arm and club shaft (from my perspective looking down) at address does not straighten at all; if the angle did straighten, I would be flattening my left wrist and/or rolling my left forearm open--both unnecessary moves that require timed compensations to overcome on the downswing. The grip, arms, wrists, elbows, and shoulders are very relaxed and pliable, moving only in response to the initiating move of the right lat muscle rotating immediately back and towards the target.

Another important feel is that the right latissimus dorsi muscle’s rotation freely “slings” or tosses the arms and club through the P2 postion and up into the P4 position (top of backswing). Therefore, the P2 position can be thought of as a “pass through” position—not a point of definitive rest, and perhaps the “P” designation of golf positions would be better suited to mean “pass through” in lieu of “position,” as only P1 and P9 represent static moments in time.

During this move of the right lat muscle to the rear and towards the target, pay attention to the corresponding motion of the left shoulder. The left shoulder should not dip downward towards the left foot in the takeaway, which is advice that is often given to golfers (i.e., point the left shoulder at the ball going back). Some instructors even demonstrate this faulty move by placing a club across the shoulders and pointing the shaft directly at the ball going back. Often this motion is overdone, kinking the upper spine, and the golfer’s upper spine will tilt towards the target (instead of away from the target as it should); more pressure or “weight” will build into the left leg instead of the right (i.e., reverse weight shift or pivot). In reality, the right amount of “dip” is applied simply by the golfer’s primary spine angle or forward posture that’s set at address; it’s not necessary or beneficial to add more dip of the left shoulder going back in order to “steepen” the shoulders. The correct feel is that the left shoulder rotates across and over to the chin, due to the motion of the right lat rotating back. If you’re a “left shoulder dipper” then this motion will feel very flat—as I said in the beginning “more around and then up.” Remember this for short games shots too, such as chips, pitches, and greenside bunker blasts.

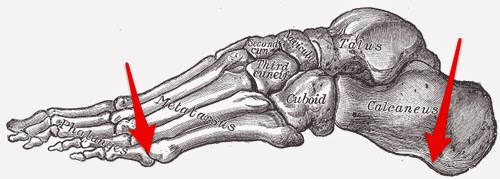
Looking down at P2 from the golfer's perspective, he will see the club's grip as roughly bisecting or lying across the instep of his right foot, with the left arm angled backward; this is an illusion of perspective, because the club shaft is really situated closer to the golfer's toeline from an observer's down-the-line view (i.e. the golfer's eyes are out towards the toes due to his inclined posture).

From this point onward, the right lat continues rotating backwards, towards the target, and now the arms and club's momentum from torso rotation move them very slightly and vertically up, where the hands will be over the right shoulder. The club should feel very light going back and up—almost weightless—as it’s being “flung” to the top, where it feels somewhat like it’s floating there momentarily. The right elbow bends and the wrists cock, creating a top of backswing position (P4), where the club shaft is now roughly parallel again to the target line and the ground. The key is that the arms and club are now in deeper positions than at P2, and that depth was created exclusively by torso rotation--not by pushing or pulling the arms horizontally across and around the body. The two lines formed by the shaft at P2, P4, and P6 (prior to impact) can be imagined as forming the top and bottom of a tilted parallelogram, when viewing a golfer from a down-the-line perspective. Without the depth created at the top (P4) as described, there is little room or hope for swinging the club back down from the inside.

On the downswing, while reversing the vertical drop of the arms and club coupled with torso rotation (moving the “lat dowel”), the shaft will again pass roughly back through the bottom of the parallelogram at P6, just before impact. Both hands make a fast, fairly vertical semicircle from above the right shoulder down to the right thigh, as the shoulders rotate back to parallel with the target line; outside-in swings occur when the hands move out (instead of down) from this deeper vertical position, before or as the shoulders turn. And again, the club should feel light. This motion of the arms and club to get to P6 should feel very vertical; the arms and club return from their deeper position, again, due to the revers
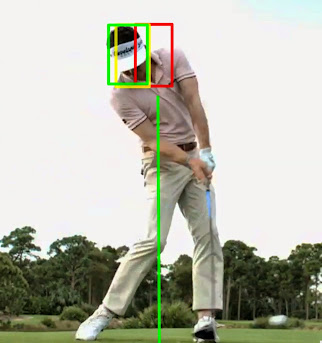
al of body rotation—not by moving the arms and club out at the ball, which would make the club feel heavier. There is no outward deployment of the club head towards the ball until the club has passed below P6, when physical forces—not the golfer's intention—will naturally deploy the club head outward from the fulcrum of the wrists. Observe the attached graphics of Rory McIlroy swinging a driver. At the top (P6), notice how far around his right lat muscle has rotated around behind him, towards the target. The red lines depict the top and bottom of the parallelogram, while the green lines represent the difference in depth (or tilt) between P2, P4, and P6 (just before impact). Notice how the club and arms drop more vertically down from the top rather than out towards the ball—the amount of depth is about 1.5 feet between P2 and P4. In reality, this is just another way to think of the classic swing plane. The torso is rotating forcefully, but the arms and club are dropping rather than swinging out, which is a golf swing illusion that causes many problems.

When Things Go Wrong

Performed as described, this is a very effective method of swinging the golf club and producing excellent, consistent contact and ball flights. But there are a few key places where things can go wrong, and you'll notice when contact consistently suffers and you get unpredictable ball flights:

  1. Monitor your grip positions—especially the left hand. Remember, the heel of the left palm should point at the right hip at address (palm on top), which is essentially a strong grip position. This helps prevent flipping the wrists at impact, which is often an unconscious compensation for an open club face position. The stronger grip allows you to lag the club and square the face, without any compensations. Keep your left hand grip relaxed and correctly pressured by the fingers. The last three finger tips of the left hand should be pulling the grip upward into the heel of the left palm. Keep the right hand grip fairly neutral (examine Rory McIlroy’s grip).
  2. At address (P1), look down at the angle formed by your left arm (with its strong left hand grip) and the club shaft. The angle is rougly 120 degrees or so. You must maintain that left arm-club shaft angle during your torso rotation to P2, before lifting to the top. This means the club shaft and hands will move well inside
  3. Be wary of the unconscious tendency to activate any of the arm, wrist, or hand muscles to move the club into the described "tilted parallelogram" positions. For example, noticing where the club and arms move as a result of the right lat moving first, one may unconsciously change focus and begin placing the arms and club into those positions, using the arm muscles (i.e., club shaft bisecting the right instep at P2). These positions are the ends and not the means. The cure is to again focus solely on moving the right lat (the "lat dowel") back and towards the target as the only initiating move, the momentum of which actually “slings” the club into position. The arms, elbows, wrists, grip, and shoulders should remain relaxed and pliable; they are followers—not initiators or assistors.
  4. Remember that the feel is more around with the arms and club (due to torso rotation) rather than up (shoulder tilt or arm lift). You may also fall into the trap of the right lat moving back but also forcefully up, which will send the left shoulder sharply down toward the left foot and elevate the arms and club more than necessary. This can cause a reverse pivot and place your upper swing center too far forward. Your maintained posture supplies all the "up" that's required. The correct feel is that the left shoulder moves across from your perspective—not down! When the pivot is conducted correctly, the upper swing center (the base of the neck) stays back where it should be.

However, his shoulder rotation can be considered to be relatively horizontal, and there is no dipping of the left shoulder down towards the ground. From a biomechanical perspective, his shoulders are rotating nearly perpendicularly around the axis of his mid-upper thoracic spine, and this natural upper torso rotary movement should occur naturally/automatically without any need for conscious thought. ~ Backswing

One last thought - avoid dipping your left shoulder as you initiate the backswing. You want to turn away from the ball with your left shoulder, not drop it! To avoid dipping, pull around with the right shoulder. The left will follow without excessive dipping. ~ Maintain a Proper Takeaway to Succeed

First, when turning your right shoulder back you must keep you right arm away from the direction of your right shoulder turn. What you should feel is the right arm should try to stay extended away from your body only allowing the wrist to set back behind your head. Second, simultaneously turn your right shoulder back behind your right ear on as level of a turn to the ground as possible. This way the shoulders should turn flat to what ever spin[e] angle you have at address (no dipping). By the way, your left shoulder is not pulled under your chin, it comes up to under your chin (level shoulders to spin[e] angle). ~ Make a Better Shoulder Turn

I found over the years having my students push straight back using their front shoulder, would wind their shoulders around their spine, BUT I have found some golfers push their front shoulder DOWN instead of around their spine. This can lead to problems. ~ The Takeaway Using the Front Shoulder

The shoulder turn moves the club inward, NOT back and up. So if the player just turned their shoulders, without any hand or arm movement, then the club would be inside but not back and up. These two movements MUST work together to achieve the proper sequence. The trailing forearm moves the club on Plane by "tracing" the Plane. The bending, and folding of the trailing elbow also raises and lowers the club and cocks and uncocks the target side wrist. Never raise the arms and club by lifting from the shoulders sockets! ~ The Golfing Machine

In the completed grip, the main pressure points are the last three fingers, with the forefinger and the palm pad adding assisting pressure. The three fingers pressed up, the pad presses down, and the shaft is locked in between. ~ What Would Hogan Do? - Grip

Many people lift the club too soon with their arms, while even more suck their arms behind their bodies and either come over the top, or lift the arms late and then drop them back behind the body and get stuck. ~ Throw it Over Your Right Shoulder

When you start your takeaway, the first thing you should think of is a one-piece move with your shoulders, arms and hands and club) moving together. There is no independent action with your hands wrists or even your elbows. For the first 2 feet or so, nothing should move independent of your upper body moving together. ~ Using Your Arms in the Takeaway

Once mastered this activation of the Latissimus will pull the right shoulder back and push the left shoulder forward creating the perfect initial takeaway position everytime. This will also set up the body allowing the right sequencing of the kinetic chain from shoulders to tru[n]k to hip motion for an efficient and strong backswing. ~ The Perfect Golfswing Takeaway

Wednesday, May 13, 2015

Adjust Your Path As Needed

The relationship of club head path to club face angle at impact determines the shape of your ball flight (i.e., left curve, right curve, or dead straight), while it's mostly club face angle at impact that determines your ball's starting direction. This is all based on the proven "new" ball flight laws (9 potential shapes) and D-Plane theory. Stated simply, the "old" ball flight laws taught that the starting direction of the ball flight was determined by the path, while the face pointed at where the ball flight would finish. The "new" laws state the opposite.

Problem: You usually hit a draw but today you're hitting fades and pull-hooks that are not terrible but are leaving you in the rough. You can't figure out how to get your draw back. You strengthen your grip, close your stance, feel like you're swinging right, rotate your left forearm, and nothing you try is really bringing your nice draw back. Should you be trying to adjust your club path or club face angle? For most golfers who have hit nice draws in the past, they should be trying to fix their path. It's likely that MOST golfers should be scrutinizing their path, especially if their ball is starting on the right line. Because the face and path have a relationship that's actually reasonably fixed with a good grip, adjusting the path will often adjust the face angle automatically, without doing anything different. This is why better players who often "lose" their draw start hitting pull-hooks; the face and path still have the same relationship, but the path is now outside-in. The entire club face-club path relationship shifted left.

No matter what the shape of your backswing, it's the first six to twelve (6-12) inches from the top of the downswing that programs what path the clubhead will take back to the ball. So it's the initial drop of the hands and handle that need your attention, though it's true there are many ways to influence how a particular path witll occur.

When the club head is still above the hands during the transition and downswing, the butt end of the handle is automatically pointing at the path the club head will take into the ball at impact. The club head will always follow where the end of the handle is pointing at this point during the downswing. Try this drill: Go to the top of your backswing and then start down but stop after about 6-12 inches; your hands should be somewhere vertically between your sternum and your waist. Where is the butt end of the club pointing? Chances are it's pointing at the target line or even left of it already. This means you're already over-the-top and swinging outside-in. This may be what you want if you're a skilled player and trying to hit a fade, but that's not the case for most of us. If the butt end of the handle is pointing out to the right, you can probably expect one of the following ball flights: 1) push; 2) push-draw; 3) hook; 4) push-slice. Which of these you see depends entirely on the face angle relative to the amount of inside-out swing path you're using at impact. Could you see a pull-hook with an inside-out swing? The new ball flight laws say yes, but this is a highly improbable occurence, as most golfers--even beginners--would not have the impulse to swing outside 45 degrees with a club face closed the other way (this would make me feel as if I was trying to hit the golf ball with toe edge of the club).

How do you ensure you have an inside path back to the ball? First, ensure you make a good, compact, connected backswing, where you keep both elbows close together--the same distance between the elbows that you started with at address. This may not be a problem for you, but I personally fight a flying right elbow. The right elbow must be able to drop back in front of the body unhindered by crashing into the right side, and keeping good external rotation in the right humerus is crucial. Next, keep your attention on where the butt end of the club handle is pointing during the first 6-12 inches of the downswing (i.e., while the hands and handle are dropping); you must keep it pointing out to the right or towards the left-rear quadrant of the golf ball during this period of the downswing. The only way to do this, you'll find, is to keep your back facing the target just a touch longer during this period, so thinking of where the handle end is pointing helps you automate this move. This keeps you from opening your shoulders too soon, which is a major cause of swinging outside-in.

There are numerous other swing thoughts and feels you can use to achieve an inside-out delivery. I've already alluded to one of them: Keep your back closed while your hands begin to drop. You can also focus on the club head end, ensuring it falls behind you somewhat before arcing down towards the ball.

Monday, April 27, 2015

The Waggle - You Might Need It

Watson Waggle
Watson Waggle

For the longest time, I avoided really waggling the club. Very few professional touring golfers of the modern era do it, with the notable exception of Jason Dufner and a few others. So I never saw much use in it. I was wrong--at least for me. Virtually every sport that uses an implement to hit a ball, such as baseball and tennis, has some sort of waggle in preparation to perform a hitting action. Basketball players dribble the ball at the freethrow line as their waggle. Billiards players "waggle" the cue back-and-forth several times before taking their shots.

A waggle serves several functions, and I have seen it improve my playing firsthand. First, waggling prevents you from starting the swing from a tense, static position; by waggling, you can work tension out of your fingers, arms, and wrists that might have caused you to snatch the club up into an early off-plane condition (had you started from a static address position). Second, it allows you to essentially take several quick "practice swings" (or really "practice takeaways") in succession, so that you can be assured of at least starting the takeaway on-plane, which apart from the setup is the next most important part of the swing. Third, it allows you to practice and ingrain how the club head will arc back to the ball (usually down and from the inside in equal parts, unless you're trying for a fade). Fourth, the waggle helps you establish rhythm and tempo for the shot you're about to hit; the rhythm and tempo of your full swing should match that of your waggle.

My typical waggle procedure: I perform 1/4th of the swing arc several times (essentially a "takeaway" followed by a simulated "impact") using a loose wrist motion, relaxed fingers, and very little arm or shoulder motion (my right elbow bends slightly, left arm moves back slightly, and my left forearm rotates slightly). I watch the arcing of the club head to ensure the club head is tracking back freely and smoothly, up and inside at the same rate and down and outside at the same rate. My waggle ends when the shaft is on my toe line and parallel to the target line, though it might end earlier if I'm, for example, performing a chipping waggle. If the club head seems to "jerk upward" or unintentionally along the incorrect path during the waggle, I loosen the grip and wrists until it arcs smoothly as described above and I can feel the weight of the club head in my fingers.

While waggling in this manner, I observe that the club head is smoothly arcing upward and inward (especially if my intention is to hit a draw), tracing the path I want the club head to travel in the swing, but traveling no further inward than my toe line. At the same time, I ensure that I'm not opening the club face; the leading edge of the club remains parallel to my "spine angle" and remains perpendicular to the swing arc. As the club head is tracking back to the ball to start the next waggle, I then observe the "return arc" or how the club head is approaching the ball from the inside (or perhaps slightly from the outside for a fade); it should track back on the same arc it took when first moving away from the ball. All the while, I may even slightly move my feet, which Tom Watson recommends as a part of his waggle.

The waggle is not only useful for full swings but also chipping, pitching, and bunker shots--especially bunker shots. You'll notice that a lot of touring pros who don't waggle in their full swings make several waggles in greenside bunkers. For chipping, your waggle shouldn't involve any wrist movements; instead, start with straight arms and a flat left wrist; use your body rotation to make the club head arc back to the inside and then through, arcing to the left, all while keeping your left wrist flat.

Naysayers. Now, as you might have guessed, there are the usual bunch of detractors out there when it comes to the waggle in golf. Virtually anything that's considered "fundamental" in golf will have some authority advising you not to do it, and that's true for everything from grip to posture to swing planes to anything really. This is one thing that frustrates amateur golfers so much: For every commonly accepted golfing tenet, there will be the inevitable batch of instructors who say that particular tenet is crap, which causes total confusion in the amateur golfing community, especially in this internet age where a simple Google search is all you need to totally confuse and frustrate yourself. So my advice to you with respect to waggling is the same for any aspect of the golf swing that is argued, both pro and con: Try it out for yourself. It helps me. If it doesn't help you then avoid it. But make sure you give it a fair chance, which is something I never did until recently. I didn't because today's touring pros--with a few exceptions--mostly don't waggle, but I realized I'm not a pro and can benefit from the "swing lube" provided by the waggle. Ben Hogan devoted a significant portion of his famous Five Lessons book to the waggle; that should tell you something.

I begin by gripping lightly. I try to feel the weight of the clubhead with my waggle, which keeps me from squeezing the grip. I square the club to the ball, then pick it up and waggle it back and forth twice to keep my hands tension-free, swinging the clubhead back just outside my right foot and returning it to the ball smoothly.

Tom Watson: Why You Should Waggle

Any beginning golfer not being introduced to the waggle is not a good thing. Rather it is a terrible thing that not a single one of my friend’s instructors apparently see the need for a beginner to address the pressure of beginning a golf swing (full, half, chip, lob, pitch, etc.) from a dead stop. That borders on professional malpractice!

The Forgotten Waggle

The waggle sets the stage for the swing path and plane. Let’s say you need to hit a draw. Waggle the club on a slightly inside path to set up the inside-out motion you will need to produce the shot. Likewise, you might waggle on a slightly outside path before attempting to fade. Remember, make each waggle an individual action. Tailor your waggle for the shot you are playing.

The Golf Waggle

So you waggle the golf club to loosen your arms, to pace your swing and to practice swinging the golf club on the correct plane. When you waggle the club it’s mostly with your hands, just a little bit of rotation with your arms but your wrists are cocking up and your arms are rotating just a little. You waggle the golf club right back along the plane of the swing.

Hank Haney - Waggle Before You Swing

The waggle is the movements of the club head just prior to making a swing. Sometimes it’s not one waggle but two, enough to allow you to feel the shot. The waggle is accomplishing several different things. Aside from just feeling the path you are going to take the club back on; you are making adjustments to your grip pressure, re-gripping with fingers from your left and right hand. This will let you to get more comfortable making sure your hands are strong and in control. Make sure you are paying attention to the weight of the sweet spot on the club face. That’s where you want to hit the ball.

The Waggle Dance - A Good Start To Your Golf Swing

As Bill McKinney explains in the video the waggle does 5 important things for your golf swing. First, it rehearses you[r] swing path. By moving the club along the proper path you are reminding yourself seconds before you swing where the right path is.

Next, it reminds your wrists how to cock at the top of the swing. A good waggle also reminds your wrists how to release into impact.

The waggle also helps you feel the right amount of tension in your arms and wrists, remember your arms and wrists should be loose and your grip just tight enough to hang onto the club. If you have too much tension you’ll quickly realize it when you waggle and be able to correct it before it ruins a shot.

Lastly, a good waggle gives you some rhythm, and keeps you from stiffening while standing over the ball. As Bill McKinney explains in the video, the rhythm aspect to the waggle is very similar to a baseball player rhythmically moving the bat before each swing. Starting a swing from a stagnant position nearly always results in a jerking motion, it’s just how our muscles work, but if we are already moving we can be incredibly precise and smooth.

golf waggle

Under pressure, the tendency is to freeze over the ball and put a death grip on the club. To combat this, keep some motion in your fingers and feet (right inset). Waggle the club back and forth. If you lock up, your nerves will get you.

Butch Harmon: Best Tips For Driving

Harbinger of the movement of the club head. The waggle reveals how you are ultimately going to deliver the club head. Therefore, the backward motion of the waggle should be up and inward. It should also feel natural; you shouldn't fill like you are fighting the club. If you are straying up and out or up and away, then you've likely got a poor (weak) grip on the club. I like to feel that my grip is slightly on top of the club.

Ruminations on the Golf Waggle


Thursday, April 2, 2015

Toe-to-Heel Weight Distribution

Proper weight distribution
Proper Weight Distribution

Weight distribution in the address stance involves not only inter-foot distribution (i.e., weight distributed between the right and left foot) but also intra-foot distribution (i.e., vertical weight distribution within each foot); this post will discuss how the weight should settle within each foot vertically, from heel to toe, to create a balanced, stable stance during the setup capable of eliminating many potential downstream errors. Jack Nicklaus is correct: Most golf swing errors (90% or more) occur during the setup (i.e., GASP - grip; alignment/aim; stance/setup; posture/position); golfers should spend more time on GASP and takeaway than they spend on anything else because all that follows is a consequence of a good setup.

A quick Google search illustrates the most common bit of advice from various golf authorities regarding this subject: Most seem to advise the student to position more of their weight in the balls of the feet. For the anatomically challenged, the ball is the fleshy, firm part on the bottom of each foot located below the toes and just above the arch. The bottom of a normal foot contacts the ground primarily in three general areas: the heel; the toes, and the ball; the inside arch, in a normal, standing anatomy, is raised above the ground between the heel and ball of the foot, with the toe pads lightly touching the ground. (Actually the outsole of the foot also contacts the ground, but you should NOT feel that--especially in your golf setup.)

The theory behind the advocacy for positioning weight in the balls of the feet is always explained in terms of other sports; baseball, tennis, and basketball require ready positions that call for more weight situated in the balls of the feet to facilitate reactionary, springlike movement forwards, backwards, or to the sides. The obvious problem, of course, is that golf doesn't require any such sudden "reactions" from its "ready" position, so the reasoning is weak.

Then, of course, are the problems that can arise when skewing weight into the balls of the feet (and thus engaging the toes). As your weight shifts more towards your toes and away from your heels, the toes will begin absorbing body weight and you will notice that your upper body and arms tip excessively toward the ball, creating an unbalanced stance, and so the hosel of your club head will inch ever closer to the ball, introducing an increased risk of shanking. The address shaft angle will steepen, and you are more prone to be steep coming back down. If you go too far, you may unconsciously attempt to regain balance by shifting towards the heels during the downswing, which can move the club head across the line, cause early extension (loss of posture), and an increased chance of hitting pulls and slices. You can also tip further forward if you lose your balance; again, you'll see shanks and fat shots. None other than golf great Tom Watson advocates for this "athletic setup" with weight in the balls of the feet, but I wonder if he doesn't just mean "weight away from the heels." Hank Haney also states emphatically that more weight shoiuld be in the balls of the feet, not the heels. Jim Flick, the coach who helped Nicklaus in his later years, advocated for weight in the balls of feet, while his famous student, Jack, did not (see below). I had a recent local golf lesson from a PGA teaching professional who actually told me to shift more weight into my toes without any explanation!

There are a few who seem to advocate shifting more weight into the heels and with seemingly little in the balls of the feet, but this can cause the opposite problems as described with the "balls of the feet" crowd: Hooks, pushes, toe strikes, thin shots, and an unconscious downswing move that shifts weight towards the toes in an attempt to regain balance, or if unsuccesful, falling backwards. One particular "brand" of instruction in this cohort advocates "balancing on the ankles," though it's possible they actually mean being balanced between the heels and balls of the feet; it's hard to know because they never describe what "ankle balance" is. Too much weight in the heels produces an extremely flat shaft angle and a "sit down" look in the golfer at address, with a very erect posture.

The next largest (and most prestigious) group of golf gurus and professionals unambiguously advises amateur golfers to balance their weight evenly between the heel and ball of each foot. Shawn Clement uniquely describes such weight distribution by asking the student to imagine that the arch of each foot is a "suction cup" gripping the ground. And since we've already established that a healthy arch doesn't really touch the ground, Shawn is actually describing an equal distribution of weight between the heel and ball of each foot. None other than the great Jack Nicklaus advises golfers to distribute their weight this way--evenly between the ball and heel--in his great book, Golf My Way. When utilizing such a stance, you will easily be able to raise your toes very slightly off of the floor of your shoes and leave them that way throughout your swing, because the toes should have no weight on them. Other notable proponents of this advice include Ben Hogan, Jim McClean, Sean Foley, and Nick Bradley.

Geta
Japanese Geta Sandles

I believe this last group--Nicklaus's group--has it right: The best way to address the ball is to vertically distribute your weight in each foot evenly between the ball and heel. To find this position if you have address balance problems, you will need to shift away from your tendency; if you tend to concentrate weight in the balls of your feet (probably most golfers because of what traditional golf instruction has preached for years), you will need to rock back away from your toes at address until you feel your heels engage and your toes disengage. You should imagine you're wearing traditional Japanese Geta wooden sandles. Some of these sandles have raised wooden extensions that are roughly located at the ball and heel of each foot; they approximate how you should feel--both the heel and ball of the foot carrying an equal amount of weight. If you've been a toe-leaner, you're going to feel way back on your heels; and if you've been a heel-leaner (less likely and less problematic), you'll feel the ball of your foot engage more.

Other things you may notice when redistributing your address weight in this manner include a taller feeling posture with arms that hang freer (you've created more space for your arms), lower hands that feel more inside your eye line, and a flatter club shaft while at address. You will need to definitely unlock and protrude your glutes with a straight back to remain balanced. Your toes will feel ever so slightly raised off the floor of your shoes. Your quads will disengage and your glutes will engage more. It's easier to produce greater downswing speed by twisting the lower body (knees and hips) forward (swinging more "from the ground-up") when starting down from this balanced heel-to-ball weight distribution.

A drill for ensuring you achieve this position (or at least verifying that you're setup correctly) is to get into your address posture and then hang an iron from under one of your armpits using two fingers, with the club head hanging down. The shaft should hang straight down and pass through your knees and point at the ball of your foot (your armpits are over the balls of your feet). At the same time, you can utilize this drill to ensure your feet are shoulder-width apart (as they should be at a minimum for all fall swings, regardless of club length); in this case, the club shaft will hang down inside the heel. If you're doing video analysis, you can use vertical lines to check these positions as well.

The only times you should favor the heels or toes at address is when you face uneven lies. In the case where the ball is below your feet, shift back into your heels by bending your knees more and try to stay that way through impact. When the ball is above your feet, shift into your toes by straightening your knees more and maintain that feel through impact. You'll hit better shots from those trouble lies when remembering to make these adjustments.

Finally, this method of weight distribution isn't only helpful in the full swing. You can use it to good effect in the short game (chips and pitches) and putting, as well. Try putting with weight concentrated towards your toes in your stance; you will notice that it's very easy to move the lower body unintentionally, while it's easy to keep the lower body stable with the weight balanced between the heels and balls of the feet.

Most traditional golf instruction tells us that your weight should be over the balls of your feet. You’ll read this in books and magazines, and hear it from teachers and TV golf pundits all the time. Not only is this instruction dead wrong, you’ll lose power and consistency this way, but it’s also potentially harmful to your body.

Golf Swing 102c. Setup: The Perfect Golf Weight Distribution and Balance

Your weight should be 50-50 on your left and right legs and between the balls of your feet (those cushioned pads just below your toes) and your heels. I'm surprised how many people think their weight should be supported by their toes. Starting with your weight too far forward is one of the worst mistakes you can make. It throws off all of the critical angles—spine, legs, hips, shoulders and head. That creates a domino effect, resulting in a weak swing and fat shots.

Jim McLean: Find Your Balance

Your weight should be distributed between the balls and heels of your feet and equally distributed between the two. You should be able to tap your heels and wiggle your toes. At this point you have counter balanced your weight. You should be able to draw a vertical line from the back of your shoulders through your knees to the balls of your feet. Now you are in balance.

Set Up for Success

Good footwork, too often overlooked, promotes balance, power, and consistency. Good footwork starts with balance at address. From the beginning of the swing, the weight moves from the middle of the feet back to the heels. When you finish the swing, your weight will finish on your front foot heel. The weight should NEVER be on your toes.

Learn to Squash the Ball at Impact

When hitting shots, you want to make sure that your weight is centered on your arch. Not the balls or heel of your feet. If your weight is on the balls of your feet (Because you're too far from the ball) as you address the ball, your hips will be prohibited. The result is that you'll straighten yourself up in your downswing.

How good is your balance??

The ball tends to be lined up off the heel [when the weight is on your toes] and can lead to pulls and hosel rockets. To set up properly you want to ensure you have the weight in the middle of your feet. I often like to bounce slightly up and down to ensure I have achieved this position. As I go through my swing I am cognizant of trying to keep my weight over my feet and not let it sneak out over my toes or lean back on my heels at impact.

Set up for Success

While developing a sound foundation in your golf swing, focus on where your weight distribution is located. Ideally, you would like the weight evenly distributed between the balls of the feet and heels at address. If you reach too far to get to the ball, your weight will go too much on the toes. If you remain upright and bend your knees with too much flex, your weight has a tendency to go back on the heels.

Golfers need to feel it in the feet

A golfer should settle into the arches of the feet and allow them to compress. This will activate the feelings in the ball and heel of the feet. They will really come alive! This notion that a golfer sets up or balances on the balls of the feet is nonsense! Sure, there is weight on the balls of the feet, but it is a result of compressing the arches. Tiger has this mastered this in recent months. Prior to that he was back on his heels. This one, simple adjustment has paid huge dividends for Woods.

Tiger Woods Golf Swing with Sean Foley

So I just gave it a try, basically going for the feeling that my armpits were over the balls of my feet, and it instantly felt better - more balanced, more relaxed. Then a number of things started falling into place: I actually felt torque between my upper and lower body; I stopped swaying; my tendency to "lift up" at impact disappeared (which I realize now was what my body had to do to keep from falling over forward because of how far I was bent over); and I stopped yanking the club way inside on the backswing and lifting it to the top, which I've always done.

Eureka!!! The setup change that has me BOMBING it - Golf Rewound

Optimally, a golfer's weight should be evenly distributed between the heels of the feet and the balls of the feet, and he should be able to lift up the back of his heels slightly (or lift up his toes) without becoming unbalanced if his body weight is evenly distributed over the feet.

Address setup

What happens when weight distribution is off? The first thing you may experience is a swing that feels out of sync or off balanced. More specifically, if your weight is too focused over your toes, you will lose the whip power of rotation in your swing. You are instead using the "shot put" method with your body. This creates a dramatic loss of power.

Fix Your Golf Swing: Solution 1: Correct Weight Distribution

In ‘five lessons’ he says “Your weight should be a bit more on the heels than on the balls of the your feet, so that, if you wanted to, you would be able to lift your toes inside your shoes.” When you look at him setup from down the line it appears as though that’s where he has his weight distributed. It certainly doesn’t look like it’s on the balls of his feet.

Ben Hogan Feet Placement And Positioning

Friday, March 27, 2015

Become an Angled Pile Driver

Roman Pile Driver
Roman Pile Driver

Shift your weight. You're supposed to do that--first into your right foot on the backswing and then into your left foot on the downswing. Instructors explain this to new golfers who then typically proceed to sway their hips in an effort to transfer the weight. But that's not how it actually should occur; the hips shouldn't move at all to the right on the backswing and only fractionally to the left on the downswing. Instructors would be better served by telling their students to leverage the ground by pressing their weight into the earth going back and coming down, as they turn. That's a better description that results in a lot less lateral movement.

I'm a huge proponent of "swing centers." You have two. The first--the lower--is in the middle of your pelvis, a few inches below your navel. The second--the upper--is your sternum. You need to understand how these two centers should align in the golf swing at address (creating your "secondary spine angle" or "Reverse K"); at the top (upper center is over the right instep, pressing nearly straight down on the right leg, while the lower center remains in place); and finally their orientation coming down.

It's the transition--starting down--where the upper center switches it's "pressing" focus. It might seem strange, but the key to "shifting weight" properly doesn't just rely on your lower body; your torso has a large role, because the torso, along with the arms and club, represents a lot of weight; the legs simply serve as posts over which the torso weight is concentrated (makes sense if you think about it, because both legs are the same weight and collateral). The upper swing center should stay behind the lower, creating an angled midbody line that points inside the left foot at the top and coming down; this angle may even shallow somewhat in the downswing, meaning the lower swing center moves towards the target while the upper center moves little or not at all (this varies among players).

I like to think that I become an "angled pile driver" in the downswing. (Not to be confused with the wrestling variety, I'm talking about a mechanical pile driver, much like the angled one pictured above used in ancient Rome.) To start down, with my back still turned to the target, I feel that my upper swing center begins pushing into my left leg as my arms drop, causing my left foot to press into the ground; the tilt of the torso means the upper swing center is pushing into the left leg at an angle. My upper swing center acts as the "driver" and the left leg acts as the "angled pile." This is from where that "press a sponge" with the left foot image comes; I think the only real problem with that simple sponge image is that the student might believe it means to press straight down, which could cause too much lateral movement and get the upper center too vertical or the torso too much "on top of the ball" or even over the left leg (i.e., lunging).

In the attached images of Brendon Todd at the top of his backswing and start of his downswing (below from Golf Digest), the yellow circle illustrates the upper swing center and the red circle illustrates the lower center. The orange line indicates the torso tilt or secondary axis tilt created by the correct orientation between these two centers. The green arrow shows how the upper swing center is directing pressure into the feet--either the right foot at the top of the backswing or the left foot during transition and downswing. In the case of the left foot, you can see that the pressure is moving into the left leg at an angle, whereas it was much more on top of the right foot at the end of the backswing.

Green arrow shows "weight shift"
Follow the Green Arrow

When you press into the ground at an angle with your left foot, you're learning to leverage against the ground for power. Otherwise, you're just "firing a cannon from a canoe" by swaying left and spinning your hips. The correct move, however, is what causes a simple, centralilzed "weight shift" and hitting from the ground-up, which is one of those near universally espoused tenants of golf (in golf instruction, there's always some outlier who will disagree with something). This is from where hitting into a firm left side and bump the left hip advice come. This creates that appearance or feel of "squatting" that's so often described in great swings, where the upper center dips slightly (see Todd's head dipping down, as he pressures the ground using his chest to push into the left leg and foot). You're setting the stage to sequence the downswing properly when you make this your first move before starting down.

Pressing into the ground doesn't mean introducing tension. Be careful that you do not straighten the left leg early, extend early, or grip the club tighter. Another feel is that you're sliding into home base with your left leg. Your left leg should be generously bent when you pressure your left foot (it may feel like it flexes a bit more), and your left leg should gradually straigten out towards the finish. Ensure that you have a generous lateral bend as you rotate forward to prevent losing your incline to the ground (i.e., early extension); the chest is both pushing down on the inside of the left leg and covering it. Don't grip the club harder just because you're pressuring the ground or you may end up slicing.

Shawn Clement speaks about pressuring the ground in one of his videos on downswing weight shift ("Best Downswing Weight Shift"). He talks about the "weight shift" being "about an inch long" and that it "happens from behind you." This is another way to describe pressuring the ground. It's an apt description, as it removes the perception that the hips sway around to shift weight; instead, Shawn states that rotation causes the weight to move. Shawn describes and demonstrates the weight falling back into the left leg, with the torso still tilted away from the target. And when he does it, he looks just like an angled pile driver--his tilted torso pushes down into his left leg while his back is still turned. About midway through the second video on the transition, Shawn talks about the "squat," where the torso is pushing down into his left leg for leverage.

If you do this properly you should notice a more piercing ball flight and more distance, because the move leads to more lag and compression. If you've been hitting pulls of any flavor, you may notice more pushes, as your path is being moved more in-to-out.

So in review: From the top and before unwinding, feel like you're pressing your left foot into the ground, while your chest and shoulders stay back. Your head and chest may drop a little as you load into your left leg with your torso still angled away from the target. You'll be an angled pile driver.

The body should feel as though it's driving down and into your left leg as you rotate toward the target. A great way for you to ingrain this proper feel is to drive your right knee toward the target as you swing. This will help you move weight both toward the target and into the ground. The more effectively you do this, the easier it is to rotate the body and also to make a full extension of the arms through impact.

Ground Up vs. Top Down

An image I use with my students is to imagine a sponge filled with water underneath the left foot. Begin the downswing by squeezing the water out of the sponge.

Better Downswing Sequence In The Golf Swing

As you start down, you need to feel your weight going straight through your left foot and into the ground. In essence, you're using the ground as the resistance needed to generate power...

...But as you change direction and swing down, the pressure should increase dramatically -- in other words, squash the sponge!

David Leadbetter:Squash The Sponge

Maximum power is achieved, when hitting the ball, as your weight is hitting your front foot...

...Another common problem that occurs when your weight is not transferred to the front foot prior to impact is allowing the clubface to get ahead of your hands at impact. If this happens, you will be adding loft to the club and losing distance.

Arizona Golfer News


Saturday, February 28, 2015

Side Bend in the Golf Swing

Keegan Bradley
Bradley's Lateral Bend
Right Lateral Bending

The transition--back still facing the target--begins when the spine bends laterally to the right, blended simultaneously with a rotational pivot around the left side (i.e., "bend-rotate"). This assumes and demands that the preceding thoracic spine position was a lateral bend to the left at the top of the backswing, left shoulder pointing down; if you stand up on the backswing (left shoulder too high), lateral right bending will send the left shoulder too high during the downswing.
Kelvin Miyahara calls this "engaging the spine engine," meaning that it forces the facets of the vertebra to behave like gears to drive the swing and keeps the lower back in a state of safer lordosis. He states that this lateral bending move must occur BEFORE starting down, but in reality I look at it as if simultaneous bending and rotating ARE "starting down."

Fundamental Automation

With proper right lateral bending, you will notice a few "fundamentals" that occur automatically. The left hip bumps both towards the target and back to the original tush line (while the back is still turned away from target), and the weight shifts into the left leg. This left hip tush-line-return move blends immediately with a left side rotation (i.e., "clearing the left side"). An analogy to the left hip rotating back and around is that the right foot rolls inward and right knee moves somewhat linearly towards the left knee (also analogous to the right hip "dropping"--more on this later). This left hip tush-line-return-and-rotate move is crucial to create space for the right lateral bend; otherwise, the arms will crash into the body if you merely bend laterally to the right WHILE sending the right side out towards the ball. Also, you will notice that the arms drop down automatically when right lateral bending without the loss of wrist angles, and the right elbow drops in close and in front of the right hip (the lateral bending forms a "pocket" or "catcher's mitt" in front of the right hip to receive the right elbow). The right shoulder will also drop very close to the right hip--again the back still slightly facing the target--and the club shaft will automatically shallow or flatten. The secondary spine angle will also increase (upper swing center leaning away from target more than at address); you will feel your head staying way back at impact. You will notice that the right elbow still has a generous bend in it at impact. Your hands are easily well ahead of the ball before the club head reaches it; the right elbow can easily lead the right hand (externally rotated humerus), because it was able to fall unhindered back into the "pocket" (i.e., front of right hip) created by the side bending. The tip of tail bone will actually move first towards the target and then away from the target, and lateral hip sliding is kept to a minimum (i.e., the left hip stays "inside" the left foot). All of these things happen somewhat automatically as a result of the correct bending-rotating motion.

Body-driven Motion

A note about the arms, wrists, and hands: They should not be doing anything until near impact; the motion of lateral bending and rotating, as described above, provides all the impetus needed to get the arms and club to automatically start down and reach a position at or near pre-impact. This totally supports Joe Dante's assertion in his famous Four Magic Moves book that the arms don't do anything until near impact.

Bending-rotating is what Monte Scheinblum refers to as "bump, dump, and turn," although I don't believe the arms "dump" into the body as he explains; the right lateral bend--properly performed--makes room for the arms and club to swing down in front of the body unhindered. Be aware of a tendency to stand up when doing this; correct lateral bending is a form of "covering" the ball. If you "stand up" it means you didn't really bend laterally; you likely rotated your right side out to the ball.

Elbows Close and Iron Man

As rotation around the left leg begins, the left shoulder should feel like it separates from the chin and realigns with the left leg (as in the Reverse K address position), moving around before moving up. Pretend there's a light shining from the middle of your chest (think of Iron Man) and that light should rotate to shine down towards the ball at the same angle established at address, and then begin angling up in front of the left foot, as the chest rotates through impact ("return cover angle" or primary spine angle); this is called "covering the ball" with your chest. The covering "chest light" should lead the arms and club back to the ball. The right elbow should swing down past the right hip unhindered (i.e., no crashing into the rib cage); the right arm feels as if it straightens towards the target underneath the left shoulder and is totally unhibited by the right side (it may lightly brush but should not crash into the right side). This is encouraged by keeping your elbows close together back and through.

Proper Finish

At the finish, you should feel very balanced and fully on the left leg, the pelvis will be forward of the upper torso, the left hip will feel high and jutted away from the target line, the upper torso will be leaning towards the target line slightly (i.e., head on a pillow), and the right shoulder will be rotated toward the target and touching the chin. These are all signs that posture has been maintained; otherwise, expect fat, thin, and weak, pulled shots.

Drills

You've likely seen the drill where the pro advises golfers to place their left hand on top of their driver, with the driver shaft vertical and the club head sitting on the ground, and practice swinging their right arm under their left arm. I believe this drill is trying to get you to feel right lateral bend. You can also do the windmill drill: Stretch your arms out so that they're horizontal to the ground and take your address posture; rotate back and through so that each hand points down at the ball.

Other Thoughts

Another way to encourage right lateral bending is to feel like your right hip drops down towards the ball during your downswing, which automatically gets your right shoulder to drop, thus initiating a right lateral bend. However, you must remember that it all begins with a left hip bump towards the target (back still turned) and a right elbow that drops unhindered back in front of the right hip.
Side-Bend and Rotate (Notes from 5, 12, 24 November 2014 and 12 January 2015)
Lateral bend, although it seems simple, is really quite complicated. Simplistically, it is just a side bending like the picture above. But add in that this must be done at a while you're at the top of your backswing with shoulders turned, while in the absence of downswing shoulder rotation (if for a brief moment), while your spine is being bent to the right, your shoulder is pulled down behind you while increasing lumbar lordosis (explained later) and while the rotator cuff muscles are externally rotating the arm. Now this seems very complicated.So when does lateral bending occur? It should start during transition. 

Spine Engine Swing: Lateral Bend 
The key is in varying the amount of lumbar lordosis during the swing. Also we are combining the lateral bend with the lumbar lordosis to set the spine gears in place. Any disconnecting of the gears at any point prior to contact will produce an adverse swing reaction (most likely, a hip or shoulder stall) that will cause other problems to occur such as casting, flipping, lunging, jumping, etc. 

Second Magical Key to the Spine Engine: Lumbar Lordosis

Saturday, April 19, 2014

The "Nicklaus" Head Swivel

I recently watched another great video by Shawn Clement on head position and lag and tried something he mentioned, and this alone has made a huge impact on my game from the first try. It directly relates to that universal golf fundamental: Stay behind the ball or keep your head behind the ball.
When you address the ball in your standard manner, turn your head 20-deg to the right and then tilt the right side of your head 20-deg down. Just your head…not your torso, so perform it as a "1-2" move after address. Your left cheek should be behind the ball, and your right ear pointed down to the ground, as if you were trying to drain water out of it. The head is both behind the ball and tilted to the right; if you've been on top of the ball, this will completely change your perspective of the golf swing…and for the better.
Bradley
Bradley's Head Movement
Why does this make a difference for me? First, the turn to the right (move 1) presets the head in a good position to allow a full, relaxed torso turn without any upper-body sway (i.e., the head is not blocking the left shoulder). This alone helps prevent a reverse pivot, because the head is not blocking the left shoulder. Second, the downward tilt (move 2) presets good secondary axis tilt away from the target, necessary to hit inside-out and to retain lots of lag for effortless power; you can't maintain tilt away from the target if your head is level or leaning left.

In addition, I monitor the following points: The 20-20 head swivel applies to the neck and head ONLY; be careful that you're not turning and tilting your torso more than the standard setup position, which can cause fat shots and shanks (remember, it's a "1-2" head movement only after standard address). The club head is lightly touching the ground behind the ball--almost hovering. I also let the club head lag my hands on the takeaway, keeping the club head outside my hands and ensuring my wrists are relaxed, so that I can sense a loaded club at the top and better retain lag coming down. Keep the club face pointing at the ball during the takeaway. Grip: Use a somewhat strong left hand grip and a neutral to weak right hand grip for most shots (alterations can be used to shape shots). I now understand Clement's analogy of "hammering into a door frame" and why one's head must be behind the ball (Would you hammer into a door frame with your head in front of it? Of course not; you wouldn't be able to see it or get any leverage). Though the 20-20 head swivel hinders the tendency of the upper-body to sway to the right on the backswing, the hips can still sway to the right, so be aware of this--all that's necessary is a rotation of the torso; no additional rightward shifting is necessary. I believe there are only a few universal requirements for a good golf swing, such as a FLW and forward shaft lean, and I also believe that staying behind the ball through impact is one of them.
If you dig deeper, you'll discover that Jack Nicklaus--arguably the greatest golfer of all time until Tiger gets his crap together--did this very thing as his swing trigger. And then you'll find out that he got it from Sam Snead. And then you'll see that Bobby Jones did it too. So there's something to it. It may look weird in the modern golfing era, but it has really helped my swing.

You'll also see that all modern pro golfers get behind the ball through impact; most simply don't preset it the way Nicklaus and Snead did at address or as a swing trigger--they achieve the correct head position while in motion, which contributes to the illusion that they stay on top of the ball because of their address positions. Examine the image of Keegan Bradley above. The vertical green line represents the back of the golf ball at address. The colored boxes mark his head positions throughout the swing: red is at address, yellow is at the top, and the green box is at impact. His head position at address is level and right on top of the ball, but by impact his head is well behind the ball's position and tilted right. The modern way to achieve Nicklaus' head position is to move into it during the swing; amateurs like me are better off presetting it address and leaving it there, as the former requires greater timing.

Another reason that this probably makes a difference for me is that I'm right-handed but left eye-dominant, which is not typical. Thus, I'm getting my left eye right on back of the ball.
You have to swing the club. To do that, your body must be in position, beginning with your head, which needs to start behind the ball and stay there all the way through impact.

Jack Nicklaus: My Lifetime Principles For Great Golf
First, it is a positive move, like the forward press of the hands, from which to start the backswing. Second, turning the head to the right makes it possible to take a longer, freer turn with the whole body than would be possible if the head were held straight to the front. Third, and most important, it is a method by which we help brace ourselves against swaying to the left on the downswing and moving our body out ahead of the ball at impact—a sure way to ruin a golf swing.
Give Every Shot A Cockeyed Look - 02.17.64 - Jack Nicklaus 
[Sam] Snead suggests that if we tilt our head slightly in the direction of our backswing, it will relieve a lot of the tension in the back and left side that keep us from making a full turn. 
Snead Says, "Tilt Your Head To Help Relieve Tension During Your Backswing" 
Jack Nicklaus was famous for turning his chin to the right before he took the club back. He moved his chin (head) to the right so that he [could] turn freely during the backswing.
Also, tilt your head slightly to the right at address. Because your spine should be tilted to the right at address, your head should be tilted as well. 
The Head Movement during the Golf Swing 
Most people's dominant eye is on the same side as their dominant arm, leg, etc. However, despite being right handed, I am left eye dominant. So is Jack Nicklaus. 
3Jack Golf Blog: The Dominant Eye and Golf 
Joe Dante, one of America’s best known teaching professionals, from his book Four Magic Moves To Winning Golf. “Keep the head still.” This impossible advice has been given in one form or another for about as long as there has been any literature on golf: “Keep your head down.” Keep your head still.” Keep your head fixed.” “Keep your eye on the ball.” “Don’t lift your head.” “Don’t look up.” You’ve heard these directions a thousand times. If they would only say, “Keep your head back,” they would be much closer to being right. 
Expert Advice - Head Movement 
The best way to stay behind the ball is to start with your head positioned behind the ball in your set-up. As you swing, keep your head from moving in front of the ball. You’ll turn through the ball correctly, resisting any tendency to lunge forward in the downswing, which can cause poor contact and any number bad shots. 
It’s vital, however, that we make sure our weight moves to our front foot to begin the downswing. In an effort to stay behind the ball, many inexperienced golfers hang back on their back foot during the downswing, the dreaded reverse pivot. The result is usually a weak push or slice.
Golf Tips; Stay Behind the Ball 
Staying behind the ball doesn’t mean limiting your rotation or your weight shift toward your forward side. Rather, staying behind the ball means keeping your spine tilted away from the ball at impact and bracing against a strong left side. 

Slice Killers! | GolfTipsMag.com
The most difficult thing for the average golfer to do, in my opinion, is to stay behind the ball. He has a tendency to move ahead of the ball with the body, and in doing so he develops an outside-in swing which causes such familiar troubles as slicing, shanking, and topping. This is particularly true on the drive, which so many players try to hit with too much power. 
Staying Behind The Ball 
The point is…you need to have tilt behind the ball at address and tilt behind the ball at impact with your weight moving toward your front side…and you need to find a feel that gets you there. 
Tilt behind the ball at impact 
If you start with your head directly over the top of your belt buckle then you must move your head over to your right shoe on the backswing. If you start with your head more toward your right shoe than your belt buckle, you won't need to move as much. 
Golf Instruction: Keep Your Head Still 
In Harvey Penick's, The Little Red Book, published in 1992, page 75 is entitled "Stay Behind the Ball" "All great golfers move their head slightly backward before and during impact, but never forward. A golfer must stay behind the ball. I mean set up with your head behind the ball and keep your head behind the ball. If you move your head forward during your downswing or through impact, you will hit a wee, ugly shot, probably a pulled slice." 
Keep Your Head Back and Behind the Ball Through Impact! Six Top Golf Pros Agree 
During the transition, his head naturally moves forward with the weight shift to the left side and his head gets further out in front of the ball by the time he arrives at impact. This forces him to release the club early just to make contact. 
How to Keep Your Head Behind the Ball in the Golf Swing 
Here's an easy way to help keep your head back and have an aggressive release. Simply focus your eyes on the back inside quadrant of the ball at address and remain focused on that spot on the ball until after impact. Doing that will guarantee that you keep your head behind the ball. 
Big Play: Ted Potter Jr homemade swing 
If you want to increase your clubhead speed while reducing tension, learn to lag―swinging the clubhead away from the ball last. Begin the backswing by rotating the upper body, while keeping the hands and arms passive. If the arms are truly relaxed, they’ll only move as a result of the torso turn. The clubhead holds its address position until everything else is in motion; once it moves, it “lags” behind the body. 
Lag Behind to Get Ahead