My previous two posts have been on the TGM concepts of grip pressure points. This is the last post of the grip pressure points series. I first talked about PP #1 and PP #3 often associated with the hitter style, and then I posted on PP #2, often used along with PP #4, in the swinger style.
 |
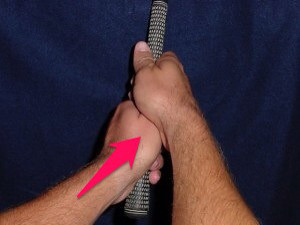
| PP #2 |
The references in the first post of this series alluded to the fact that there is no clear demarkation between a so-called hitter or swinger. In fact, most players have some elements of all of them to one degree or another. The pressure points are primarily about feel, but I now believe that awareness of them will help make a proper grip. Pop golf instruction often teaches grip fundamentals but leaves out the important points of where you should feel pressure in the grip, and it often confuses students with meaningless analogies about grip pressure.
 |
| Proper use of PP #1 |
After experimenting with this for a few weeks now, I feel I have found the correct pressure points for my focus. First, awareness of PP #2--specifically the pinky and ring fingers of the left hand--is crucial. When I take my grip, I want to feel those two fingers gripping a touch tighter than the middle finger, and I want no pressure exerted by my left thumb and index finger.
Next (and I think most important), you must feel PP #1! This is one that I absolutely was not using before. As a matter of fact, my two hands would often disconnect from each other at various points in the swing, even though I was covering my left thumb with my right palm. It's not merely enough--at least for me--to hide the left thumb in the lifeline of the right palm; it's an absolute necessity for me to apply pressure to the base of the left thumb using the crease in the base of my right palm! And it's important to keep it that way from setup to followthrough! This right hand palmer crease forms a semi-oval clamp that attaches firmly to the base of the left thumb.
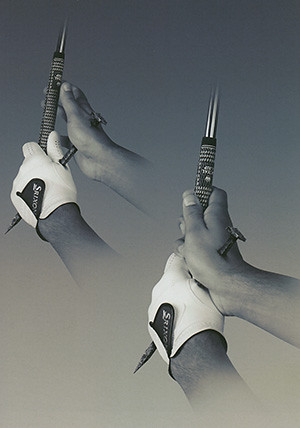 |
| Nail illustration of PP #1 |
I'm not certain yet why PP #1 is so effective at increasing the quality of my contact (other than it unifies my hands so well), but I can post references below to what others say on the matter. And it's interesting that this is one part of the grip that is often glossed over or not mentioned at all.
As to PP #3, I believe it's better to sense it passively; I personally don't want to actively push with it. I do, however, think that PP #4 is a great power generator to use along with PP #1 and PP #2. So, yes...I've mixed a bit of hitter with both swinger qualities. Sue me.
He [Ernie Els] then wraps the right palm over the left thumb so that the lifeline palmar crease ("cup" of the right palm) rests over the right side of the left thumb and slightly over the top of the left thumb. This will cause part of the right thenar eminence to lie on top of the left thumb. Placing the right hand firmly over the left hand in this manner helps to interlink the hands, so that they can better function as a close-knit unit. Also, note that the right 3rd and 4th fingers are used to firmly grasp the club's grip, and that the grip is in the fingers and not the palm of the right hand.
You will find that the palm of the right comes up and faces directly to the left, and that the center of the base of the right hand fits snugly over the big knuckle at the base of the left thumb.
Golf Grip Part 4: Placing The Fingers
Grip check #2: Turn your hands to the right and check the underside of your grip. The lifeline on your right palm should fit snugly over your left thumb, again with downward pressure. If there's space between them, your swing will suffer.
How to check for a perfect grip - How to Check for a Perfect Grip - Photos - GOLF.com
The right hand "lifeline" (shown in red at left) smothers the left thumb at address and throughout the swing. The word "smother" is chosen carefully -- it implies constant, deliberate pressure, not just a hand position.
The role of the right hand is more subtle, and advice on the right hand is much harder to find.
The smothering pressure of the right hand lifeline promotes a wide arc on your backswing, because it tends to push the club away from your body. It also tends to prevent your left arm from bending too much at the top of your swing (although some bending is OK). It does this by simultaneously a) bracing your left elbow, and b) encouraging your left wrist to hinge rather than allowing your left elbow to bend once resistance develops at the top of your backswing. Think of your right arm almost like a splint for your left elbow during the backswing. Finally, the constant smothering pressure of your right lifeline tends to keep your two hands melded and joined together, almost "handcuffed", throughout the swing. This promotes a "one piece" takewaway and downswing that is driven from your big muscles of your lower body, not from your hands.
Golf Swing Tip: Use a Proper Right Hand Grip to Improve Your Swing Like Adam Scott
The three distinct grip pressure points are:
1. In the the last three fingers that trap the club underneath the heel pad of your left hand;
2. The two middle finger of your right hand, whether interlocking, overlapping or a two-fisted grip;
3. Where your right palm overlaps and exerts downward pressure on your left thumb.
Something for the Weekend: Why grip pressure is vital - Tips: General - GOLFmagic
Your right hand provides support and pressure. We like to say the left side pulls and the right side pushes or applies the punch. Where the palm of your right hand joins your left thumb is a pressure point. Also where the index finger or your right hand joins the club (grip) is a pressure point. These two points help put pressure down into the golf ball.
The big issue here is that with good strikers of the ball, the pressure points are applied with a bent right wrist. With poor ball strikers the right arm and wrist straighten out too soon (before impact) and those pressure points are lost as the club head flips past their hands and starts coming up and scooping the ball. Downward pressure into the golf ball is lost.
The last three fingers of the left hand should always be firmly wrapped around the butt-end of the golf club grip. The task that they perform is to ensure that the left hand is kept securely in place.
You should also notice a little light pressure on your left thumb. This should be noticeable as you place the lifeline of your right palm firmly upon it. This should also trigger an awareness of the pressure applied from your right index finger as it pushes against the shaft perfectly sealing your grip on the golf club.
Don’t Lose Your Grip by Golfing Guru | Sportales
Push your right thumb pad against your left thumb with moderate pressure (Homer Kelly’s #1 Pressure Point). This helps you cock your wrist correctly and keep the club on plane. Continue to maintain the arm connections and the #1 Pressure Point until after impact.
The #1 Pressure Point is a “Mega Swing Thought” that we discussed in UST 2 (The fewer the concerns of a swing, the simpler it gets). It has the following benefits:
- It keeps the club on plane during the backswing (prevents the clubhead from going too much inside).
- It keeps your right arm connected and your right elbow in front of you. Try flying or sliding your right elbow behind you while applying the pressure. It’s much harder, isn’t it?
- The pressure also extends the left arm straight. It creates width for your swing that promotes power and consistency.
- It promotes a flat left wrist at the top which is what you want (unless you are fighting a big hook).
- It encourages more shoulder turn.
- It gives you lag in your swing. Try getting into your impact position and then apply the pressure. The clubhead will want to lag behind your hands and the haft leans forward. This lag promotes more solid impact and longer distance. It will also come in handy when you want to it a knock down shot into the wind since it de-lofts the club.
Another problem that results from a light right-hand grip is that the right hand often comes off the club somewhere in the backswing. This causes the left hand to increase its pressure, creating a number of downswing errors.
Proper Grip Pressure | Golf Channel
In the golf grip, the pressure in the left hand (for right handers) should be firmest in the last two fingers. On this, there is plenty of agreement. The problems start when the same advice is given for the right hand.
Golf Grip Tip - The Correct Golf Grip Depends On The Pressure Points
What should the grip pressure be as you hold onto the golf club throughout the entire golf swing? Most have heard "Hold it like your holding a baby bird or a tube of toothpaste without a lid and you don't want to squeeze any out." Your body will interpret those visuals as hold it very loose in the fingers throughout the swing. The effect of loose fingers is separation of the left hand from the club (at the top) during the transition of the backswing to the downswing which causes an early release and a change in the clubface.
Do you wear out the heel pad and thumb areas of your glove? If so, that is evidence of the movement which cause the friction that produced the hole. Understanding the physics of the golf swing would lead a person to promote secure (effort on firm) fingers around the club throughout the entire swing! This will promote a much improved release and a clubface that remains square throughout the swing.
The overall goal for grip pressure is for your hands to remain in constant contact with the club; if there is movement of the club, it's a huge problem. Recovering from a moving club is almost impossible to recover from on a consistent basis.
As long as the club remains still, it's ok to change finger pressure. You wouldn't want to be squeezing the daylights out of a wedge when you're pitching from just off the green.
The Grip and Grip Pressure - Golfer's Guide
Pressure point number one, the base of the left thumb, where the lifeline of the right hand comes in and connects down with these two middle fingers, feeling that pressure so that there is a connection there. Now watch what happens. A lot of people will swing up and lose that connection and separate right in here between the right hand and the club. When that happens the first move down they snap back on to it and they lose a lot of their clubhead load or their clubhead lag. What I would like to see you do now is this pressure point you can hinge of that position, keep it connected up to the top, and certainly keep that pressure point as you are driving down through impact. So pressure point number one, at the base of the left thumb. Where the right hand connects in. Pressure point number two, the last three fingers on the left hand. This is the one people do pretty well.
Video Golf Tip | Three Grip Pressure Points
This helpful blog deserves many positive comments! The connection between the left thumb and and the right hand lifeline is vital. When I was a kid, I played with Peggy Harmon, who later became US women's junior amateur champ. She told me, "the (right) thumb lives here," meaning under the lifeline of the right hand. It took me decades to properly learn this lesson. Thanks for all your excellent quotes reinforcing this point.
ReplyDeleteThis is a great post. I once had a scratch player tell me to be firm with the right thumb on top of the left thumb. I never really gave it much attention. I am paying attention now.
ReplyDelete