Friday, February 22, 2013

Avoiding the Inside Takeaway

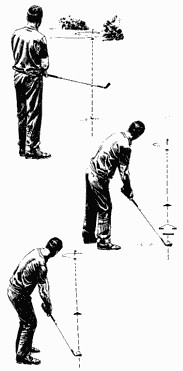
Yes, we amateur golfers hear over and over again that we should swing inside-out and not over-the-top (OTT). In an unconscious effort to achieve this, we often roll the wrists and bring the hands and club inside too quickly, often well below the waist, during the takeaway. This often leads to the very thing we're trying to avoid--an OTT move that is unconsciously utilized to get the club back on line and hit the ball. The result is often pulls and pull-hooks for better players who can close the club face well; for others who can't, it produces a slice. Another symptom of this condition is a very narrow swing arc going back, with the right elbow bending too early and getting too close to the right side. The right elbow will drop into the right side coming down; it's no help to you there early.

Pulling club inside
Incorrect: club too inside

One should always ensure that the clubhead stays outside of the hands for as long as possible, when viewing the takeaway down the line. In other words, the clubhead should only move inside somewhere in the upper trunk area--around the right shoulder. If it moves inside at waist level or even below, the club is being jerked inside by the hands and/or the right elbow is bending too early. The right elbow should ONLY FULLY bend late in the backswing. The hands stay in front of the body and only move inside due to the correct shoulder rotation. Actually, the correct shoulder turn in the takeaway and backswing SHOULD prevent you from doing this, provided you're not using the small muscles in your arms and hands to move the club.

Watch slow motion video of professional golfers (down-the-line view) and pay attention to the takeaway; specifically, look at their hands in relation to the club face, and pay attention to the bending action of their right elbow. You'll see that the right elbow bends late (and only reaches a full bend REALLY late in the backswing), and you'll notice that the clubhead stays outside of their hands (when viewed down the line) for a long time. The club head only comes inside (passes their mid-body line) somewhere around their right shoulder, not down near the waist like us inside-early schmucks. Their hands remain in front until waist high or even slightly above the waist; in other words, it's as if the hands move backwards in a straight line during the takeaway. And when the club head does finally move inside, it's due only to the motion of the shoulders turning; the arms and hands have nothing to do with it!

If you're guilty of this huge golfing transgression, you will feel like you're taking the club OUTSIDE the line when you first start doing the correct motion. But you're not going outside as long as you move everything--shoulders, arms, and hands--back together. You're on your way to achieving WIDTH in your backswing, which will help in numerous ways.

Club correct
Correct: Club outside hands

Coming down, the right elbow will drop in close to the right side around the right hip, as you fire through. In essence, the swing is going from wide to narrow to wide again in the through swing. In other words, the swing flattens some coming down, and if you traced the club head all the way through, you would see that the club head actually loops up and then under a bit, giving your swing an inside-out path naturally. The OTT swing has the opposite loop: up and over.

Another key point: When you move the arms and club back in this way with the club head staying outside your hands, you'll be prone to swaying your hips to the right, especially if that's already one of your problems. To counter this, imagine that your right hip moves straight back and towards the target in the takeaway to counter the weight of the club head staying outside the hands. In a sense, you want to think of them moving in opposite directions. Sounds silly, I know, but if you look at DTL video of pro swings, you'll notice that their right hip moves backwards slightly during the takeaway. This will get you swinging the club back on the right plane without your swing center moving off the ball.

With any "fundamental" in golf there come the gotchas. For this aspect of the takeaway, remember that the arms and hands should simply move up during the takeaway in relations to the chest, while the club head stays outside the hands! In reality, the hands also move inside (inside or back, and up simultaneously), but the inside part of the equation happens only because the shoulders are turning. The hands and arms should not roll the club open, pull the club inside, nor should they move out away from you; if your hands move out away from your body and not inside and up during the takeaway, you're setting up for an OTT swing even if the club head stays outside the hands.

This is an especially good thought for the open-clubface-at-impact slicer. Most of these slicers create their open clubface because they roll the club wide-open during the first three feet of the swing. As a result, the club usually gets way behind them at the top, and from that position, it is very difficult to square it up. There must be some wild, compensating move made coming down. If you think "hands inside, club head outside", this will keep your clubface square at waist high, and will also help put you in the proper shape at the top of your swing. It will definitely prevent that clockwise, rolling-open action of your forearms and club, which has led to many disastrous shots over the years. So remember, "your hands are in, the club head is out...as a result, you will be square throughout".

Golf Tips - Hands Inside the Club Head During The Swing

Take the club straight back low to the ground and allow the turning of your shoulder to bring the club inside on the back swing. Do not pull the club to the inside with your hands and wrists but also guard against reaching too far back. Reaching will cause you to sway off the ball. Prevent reaching by keeping your weight on the inside of your right foot.

golf long drive take away and back swing

Another great practice drill requires the use of two alignment clubs. First, place a club above the ball, parallel to the target line. Then place a second club eight to 10 inches inside this line. You’ll notice the two clubs form a path, which should be your track on which to swing the club. At first, it will probably feel like the club is moving to the outside of the target line, but after a number of repetitions, the proper swing path will begin to feel normal. Practicing this drill will help keep your shoulders, hips and feet in alignment, and promote a more on-plane backswing.

Staying On-Plane | GolfTipsMag.com

My point in that article, and in this tip, is, if you will make a conscious effort to take the club back straight for as long as possible, you'll give yourself the optimum chance for a powerful, square-faced return of the clubface to the ball.

Instruction Tip #39 - The Takeaway

The most influential component of swing arc is the position of the right arm throughout the backswing. A player with a narrow swing arc tends to fold the right arm too early or keep it unnaturally pinned to the right side all the way to the top. Both flaws pull the club in too close to the body. The player with this flaw will feel the need to free the club by throwing it way over the top and away from the body.

Stop Coming Over The Top | GolfTipsMag.com

The best way to fix an inside golf swing takeaway is to work on your wrists and the role they play. The first initial movement should be the hinging of the wrists vertically instead of horizontally. You need to ensure your left wrist does not flatten out too early which pulls the golf club on the inside. Next you need to move the golf club across your chest as you hinge your golf club vertically.

How Your Golf Swing Takeaway Is Destroying Your Golf & How To Fix It In Just 5 Minutes

What is the one flaw in the golf swing that leads to inconsistent golf shots time and time again? If you hook, slice, hit fat or thin shots and can’t figure out the cause, you may be bringing the golf club back too far to the inside. If you want to master the takeaway, then you must keep the golf club outside of your hands in the backswing. In this article, we are you to cover a few simple golf tips that you can use to stop taking the club back too far to the inside.

Stop Taking the Club Back to the Inside: Fix Your Takeaway Today!

To determine if your hands and clubhead are properly positioned, assume your normal golf stance with a full-length mirror to your right (left, if you’re left-handed). Watch your takeaway and note where the shaft points when your hands have reached the right pocket. If it points in front of you, good – the clubhead is outside your hands. If it’s already parallel to the target line or pointing behind you, your takeaway is too far inside.

A simple way to instill a “clubhead outside the hands” takeaway is to keep the butt of the club pointing at the right hip as it passes by. If the butt points left of this spot, you’ve got too much wrist action and/or an inside path.

Be mindful of the rotation of your forearms on the takeaway. If you pull the club straight back without the arms and hands rolling naturally, the clubface will become closed. Check the toe’s position at the parallel point as described above; if it points well in front of you, it’s closed.

Think “Clubhead Outside the Hands” for Solid Takeaway

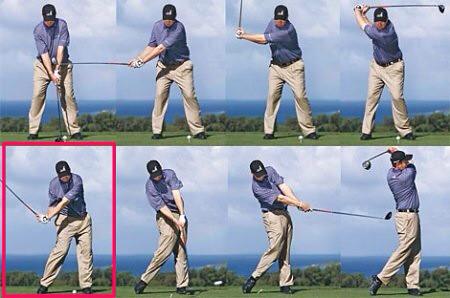
A good takeaway sets the pace for a good swing. Unfortunately, many amateurs get off to a shaky start: They lift the club and roll their hands away from their body, which draws the clubhead inside and opens the face. As a result, they make erratic contact.

Perfect your takeaway - Golf.com - GOLF.com

Tuesday, February 19, 2013

Address Procedure, Shaft Angles, and Taller Posture

I recently discovered a simple error I was making at address that affected the consistency of my contact in the full swing, especially with the driver. This unlikely culprit was also causing me to bend over too much from the hips with too deep a knee bend at address. What was this error? The angle of the club shaft to my arms was not large enough. In other words, I had preset too much radial deviation and not enough ulner deviation at address; my wrists were preset with too much wrist cock (too close to 90 degrees), which meant I had to bend over more from the hips, bend the knees more, and widen my stance in order to address the ball!

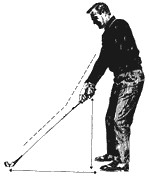
Taller posture
Taller posture, larger wrist angle

The result was inconsistent contact on the club face, and the club was also bottoming out behind the ball (fat) or hitting the top of the ball (thin and skulls). I would get a lot of pop-ups and skulled shots with my driver. The wrist angle naturally increases in the downswing as the wrists uncock, which means the difference between my address shaft angle and impact shaft angle was too great; the impact shaft angle is usually always more upright than at address, but too much can cause the errors I was experiencing.

I should note that the two work in tandem: a taller posture should cause one to address the ball with a more upright shaft and, thus, a straighter wrist angle (shaft-arm angle). And the opposite is true. Therefore, as the angle of posture (legs to trunk) decreases (moves away from 180 degrees towards 90 degrees), the shaft-arm angle also decreases (i.e., the hands get closer to the ground). And vice versa.

Other variables play a role. One's body type and equipment (length of shafts and lie angles) have an impact in this equation. You should experiment to find what's best for you to make solid contact in the center of your clubs. I wrote before about having the grip point at the belt buckle at address, but the truth is that this may be too flat for some players: it should point somewhere between the belt buckle and the belly button.

Every golfer needs a good procedure for helping to ensure a proper setup or address posture with respect to stance width and distance from the ball. It's easy to overlook the importance of a good address procedure as a fundamental, but when done consistently the same way with all clubs, it helps eliminate inconsistency introduced into the swing BEFORE the first move off the ball in the takeaway.

I've written before on how a wider stance helps promote a hook and higher ball flight, while a more narrow stance helps promote a slice (a wider stance presets the upper body further behind the ball and theoretically produces a flatter swing). What set me off on my quest was learning that I tended to bend over too far from the hips (also using too much knee bend) when addressing the ball, especially with the driver; this meant that my posture was not upright or tall enough. Increasing or straightening the wrist-club angle at address automatically induces a taller posture and reduces the amount of the downward wrist uncocking (ulner deviation) that occurs during the downswing! It's important not to go too far and completely straighten the angle, but getting closer to straight will help reduce the vertical variance in club movement through the ball when the wrists uncock. In reality, it also reduces the amount of horizontal variance, helping to return the ball to the center of the club face at impact, because you're presetting both downward and outward movement of the club head.

Using chalk on the club face, I noticed that my contact with the driver face was consistenly too high. Most of my misses were no longer left and right (horizontal) but up and down (vertical) with respect to impact on the club face. I could compensate slightly by hovering the club completely above the ball at address, but this was ridiculous as no golf professional does this, and the contact was still too high on the face. So, on a whim, I addressed the ball as usual and then raised my posture a few inches. Doing so caused the angle between the club shaft and arms to increase as my wrists had to increase in ulner deviation to keep the club aligned with the ball. Standing taller can also cause the stance width to decrease slightly, but what's more important is to recognize the relationship between the angle of the address wrist cock and the amount of upper body bend (or posture) over the ball at address. Subsequent drills using chalk as an indicator produced many more impacts located in or nearer to the center of the club face, which is essential for distance with any club but especially for the driver.

So I asked myself if there might be a more failsafe method of addressing the ball to achieve a taller posture, better stance width, larger arm-shaft angle, and correct distance from the ball, and I remembered something that I had poo-pooed away before but that most professionals do some form of when addressing the ball.

After ascertaining the proper aim behind the ball, one should first place the club behind the ball on the intended starting or target line (aligned to a close target a foot or so in front of the ball on the intended starting line). This should be done, initially, with both feet together with the ball located on a line running between both feet and perpendicular to the target or starting line. Most important is that the wrist angle at address is extended or closer to a fuller down-cocked position. The knees, hips, and shoulders should be on lines parallel to the target or starting line. The head should be located slightly behind the ball. At this point, one should assume the correct upper body posture by bending over from the hips with the arms hanging to get the correct distance from the ball; if you've suffered from too much wrist cock at address, your posture should feel much taller.

Address procedure
Address procedure

Now, all that's left to do is to move both feet to a stance comfortably wide enough, with a very slight knee bend, to maintain that upper body posture relative to the ball established when both feet were together! Your head and upper body should not move vertically when you take your stance. In other words, the posture stays taller. With the driver, only the right leg need move, as the ball position should be more forward. The shoulder, hip, and knee lines shouldn't move from their original positions; if they do, then the stance assumed has been too wide. If one wants to hover the club (to improve impact or smooth out the takeaway) then one should hover it when going through this procedure; otherwise, the upper body's posture will change when raising or grounding the club.

Notice that tour players look “big” compared to their clubs. Even with a longer iron, say a 4-iron, they seem to be standing “on top” of the ball, meaning the ball is not too far from their feet. Their spines are generally bent forward a fair amount, and the shaft of the club points at the belt-line, and often higher.

Are Your Golf Clubs Too Long? | Golf Things Considered

The clubshaft should be pointing to the belt buckle or slightly above it…

10 Checkpoints For Proper Setup Position ~ Create Golfers

In establishing the correct shaft angle, we also resolve the question of the correct position of the hands at address. Far too many players hold their hands too low at address - few hold them too high. Holding the hands low at address is a major cause of excessive wrist action in the swing. A vice to be avoided at all costs!

Here once again, is the routine:

1 Evaluate the shot.

2. Take up your grip and square the club face to it.

3. Ground the club correctly behind the ball.

4. Now place the feet into position.

Note that the positioning of the feet came LAST.

The average golfer often reverses the procedure, placing his feet first, then vaguely grounding the club he juggles with his grip in an attempt to get the club-face square. There is no logical sequence in his method and his last minute grip adjustments account for the fact that his grip is never the same one shot from the next.

Golf Lessons - Lesson 4 from Golf Today

In an athletic address position the arms hang comfortably from the shoulders with a slight cocking of the wrists as you grip the club. The toe of the club should be off the ground slightly, with the club resting more on the heel of the club. From this set up position it is easier for the wrists to cock correctly, starting the club on plane and setting the club at the top of the back swing.

Club lie angle at address and impact are not the same | Derek Hooper Golf


Monday, February 4, 2013

Driver Downswing: See the Ball at Eye Level

One feel I use to shallow out the driver is to feel that my eyes are behind and level with the back of the ball up to the point of impact. Impossible, I know, but we're talking about a feeling here, not reality.

Ernie Els - Head Back!
The head and chest are behind the club shaft, the head is actually behind its original position.

Another way to put this is that--of all the clubs--it's most important with the driver to exaggerate staying behind the ball! It's true that the longer the club the more behind the ball you should be at impact, but it's an absolute necessity to hit good, penetrating drives with the driver.

Look at slow motion video of most professional golfers and you'll notice that, up to the point of impact, their heads are located over their right leg when swinging the driver. In many cases, their heads move FURTHER right from the initial address position, which was already behind the ball! (You'll still notice that their heads are behind the ball with other clubs too--just not that far back.) Thus my feel of trying to get my eyes behind and level with the back of the ball. The continuing motion of the arms and club will pull you fully over into the left leg and into your balanced finish.

A wider stance and increased rightward tilt at address will help with staying behind the ball at impact, but it also encourages a hook. Remember that a wide stance is a hook condition, meaning that it inhibits lower body movement and encourages more arm movement through impact. If you find yourself hooking the ball wildly, you may need to go with a more narrow driver stance to help straighten out your drive; a narrow stance is a fade or slice condition, because the body can get ahead of the arms; as the stance widens, the swing plane becomes flatter, and the plane becomes more vertical with a more narrow stance. There are many such characteristics associated with different ball flights that you can use to encourage a shot shape you desire, but remember that you still must be able to get behind the ball and stay there up to impact.

Swinging this way also allows you to tee the ball up higher to encourage a high draw without the fear of sliding the club UNDER the ball and hitting pop-ups, which is common with golfers who swing the driver too steeply.

Staying back like this with the driver helps to shallow out the downswing and produces a flatter swing plane, causing the golfer to catch the ball on the upswing and impart an upward angle of attack, which reduces backspin, helps ensure an inside-out motion (often resulting in a nice draw), and thus, increases distance. Some instructors teach setting up with an exaggerated spine tilt to the right, but this doesn't help if the golfer immediately begins moving back over the ball (as if hitting an iron). As a matter of fact, it might be best to set up with a rightward tilt with the understanding that this right tilt will, initially, increase when the downswing begins.

Some golfers try to keep their head still or over the top of the golf ball. To make a full turn on a swing with your driver your head might move a little towards your back foot. That’s fine if not desired. You need to be well behind the golf ball at impact. One should have a straight line from the front shoulder to the ball at impact.

Golf Tips with Bobby Lopez: Why Is It More Difficult To Hit Your Driver Than Any Other Club?

David Leadbetter in 100% Golf, 2004, states: "the head and upper body stay behind the ball as you unswing and accelerate into impact." Try to maintain your spine angle from the set up all the way to the moment of impact and don't worry if your head has a little lateral movement. Your head and spine are behind the ball at impact.

Keep Your Head Back and Behind the Ball Through Impact! Six Top Golf Pros Agree

The key to solid driving is that you first get fully behind the ball as you wind up your backswing. Only then can your truly stay behind the ball as you unwind on the way back down. With the driver, one of the problems that I see a lot of amateurs struggle with is they get too far ahead of themselves on the way down, which results in the swing being too steep coming in to the ball.

Remember, you have to get back to the left side to strike the irons properly, which involves making sure that your body weight is centred more on top of the left foot as you hit the ball. With a driver, if you can first get behind it and then stay behind it, you will enjoy flighting your tee-shots with a good powerful trajectory.

The BIG Feeling - Denis Pugh

Anchor the head at the beginning of the downswing. There is no need to shift the weight forward the same as on an iron shot where you have to hit down onto the ball. Keep the head back to hit the ball on the upswing.

Driving the Golf Ball - Golf Swing Driver Tips

In the swing you will need to feel that you are staying behind the ball with your upper body as you aggressively drive the hips and weight over onto the front foot. This is where the “uphill” sense comes from – as the hips drive the head stays back you create the body motion that allows for the clubhead to move up into the hit. I like to refer to this as body curve.

Driver Set Up | Andrew Rice Golf


Friday, January 25, 2013

Load Wrists for Lag

Search here and you'll find several posts that refer to the wrists in the full golf swing; there's even a previous post on wrist action at the top of the swing, and I wanted to expand on that fundamental quite a bit in this post.

First, it's important to make a few concepts clear. Many wanna-be golf instructors (and some legitimate ones) tend to use "hinge" and "cock" interchangeably when referring to the wrist action in the golf swing. The wrists actually cock up and down in the golf swing (more correctly called radial and ulner deviation), and the right wrist also hinges backwards or dorsiflexes on the backswing. The wrists should up-cock on the backswing (radial deviation) and down-cock on the downswing (ulner deviation); the right wrist should delay straightening from its hinged position; and the left wrist should NEVER dorsiflex or hinge backwards during the downswing (also known as a flip).

It's important to allow the weight of the golf club to cock the wrists vertically at the top of the backswing; this explains why so many golf professionals say that you should learn to feel the club head and use light grip pressure with soft wrists. Doing this effectively sets or cocks the wrists (especially the left wrist) at the top naturally. The feeling of the left wrist setting or loading at the top (due to the weight of the club head) should be felt at the base of the left thumb and the side of the wrist (as the left thumb somewhat supports the shaft) and felt in certain forearm muscles. TGM circles call this using Power Accumulator #2. This feeling of loading the wrists (sometimes called float loading) can be used as a trigger to begin the downswing weight shift; doing it this way will serve to keep the lag well into the downswing and helps provide that whip-like feel at the bottom. When one gets to the top, there's a sense of everything collecting, as the club should be the last thing moving before and during the transition. No conscious effort to hold lag is needed, because you'll be delivering the lag you loaded at the top. Finally, it's not necessary to rush down when you feel that load in the wrists; you should transition smoothly using the lower body to start down.

I feel you can still float load the wrists at the top while setting the wrists earlier in the backswing. You should experiment to find what feels and works best for you.

If your grip pressure is about a 3 on a scale from 1-10, the club head will eventually pass “Top Dead Center”, fall on its own and automatically hinge your wrists correctly. What it looks like, is a flat to bowed out front wrist (a la Paul Azinger, Dustin Johnson, Trevino, or Hogan’s supination just before impact). Now we’re talking. This wrist hinge has the club face square to the plane. You will know it is right if the toe of the club looks about 45 degrees to the plane not in line with it. This correct passive wrist hinge ALLOWS THE BODY TO TURN AS HARD, FAST OR SLOW THROUGH TO THE FINISH without any need for manipulation. There is no need to stop and throw the club head at the ball. In fact that messes everything up.

DUPLESSISGOLF » Active Hinging vs. Passive Hinging of the Wrists

In a word, if there's no "give" at the top of your backswing, you start losing your wrist cock almost immediately. If you have some "give," the club doesn't react immediately. Instead, it absorbs the energy at the change of direction and holds it for a few microseconds while you start down, then gives you a bounce that adds power to your downswing. That "give" comes from several areas, like your overall flexibility, but there are primarily two sources that concern us.

Ruthless Golf: Why Holding Your Wrist Cock Doesn't Work

Thursday, January 24, 2013

Shaping Shots Consistently

I must have a ga-ja-billion posts on shaping shots (i.e., coaxing fades and draws), and that's because I'm always in search of the best way to do it. The best way is the way that is consistent and reliable for you to perform on the course (i.e., 90% of the time the ball bends as you intended). Click on the tags or keywords at the end of this post and you'll discover the numerous ways it's possible to influence the ball's starting line and follow-on ball flight.

I think this method--along with Jack's method--may be the easiest.

To fade the ball, tee up the ball LOW (even with the top of the driver) and on the right side of the tee box. Aim the club face towards the left side of the fairway (pick a tree or other target on the left); this represents the starting line. Place the club down aligned with this starting line. Make the address stance slightly open to the starting line; this means the hips, knees, feet, and shoulders should be aligned to the left. The upper body should still be tilted away from the target, and one must still shift the weight correctly and stay behind the ball for this power fade (sort of a push-fade, as you're still hitting inside-out ala Lee Trevino). Position the ball off the inside of the left instep (or roughly with the left shoulder). The further forward the ball position, the further left the ball should start on line before curving. Experiment with tee heights and ball position to get the right mix for the shot shape you want. Hit through the ball as if hitting four balls in a row on the starting line. Finally, use your normal grip, as most amateurs and high-handicappers hit with a slightly open club face even when trying to close it. Done correctly you should impart a nice, narrow fade on the ball.

To draw the ball, tee up the ball HIGH (one quarter to half the ball above the driver) and on the left side of the tee box. Pick a target on the left side of the fairway and place the club on that starting line. Make the address stance slightly closed to the starting line (pull the right foot back and align the shoulders and knees to the feet). Position the ball back in the stance (a few inches to the right of where it would be for the fade); the ball should be inside the left heel or roughly even with your shirt logo. Finally, rotate the club face slightly closed compared to the stance and then take your normal grip (most amateur golfers have trouble closing the club face enough for a push-draw, so manipulating the club at setup is easiest). Instead of hitting through all four balls, pretend you're hitting only the first ball of the four. Experiment to find the right mix; you will draw the ball (if you hook it then either move the ball slightly forward, tee it lower, lessen your closed stance, or try combinations of all).

A few notes. The lower the loft of the club (6-iron and up to driver), the easier it is to slice and the harder it is draw (another reason for manipulating the club face slightly closed for a draw). The higher the loft of the club (i.e., 7-iron and higher), the easier it is to hook and more difficult to fade. Draws tend to fly lower, further, and run more on landing. Fades tend to fly higher, shorter, and land with less roll. Take this into account when selecting a club. Don't be afraid to exaggerate adjustments to get the ball spinning like you want (i.e., if you lose your draw, get the ball hooking by standing with your back to the target and hitting balls).Full extension adds power and helps close the face (obviously useful for a draw but maybe for the fade too if the fade is too close to a slice). Hit both shots with the same swing shape--inside-out. And inside-out fade is called a power fade, and this was used by the greats like Hogan, Trevino, and Nicklaus.

Trevino’s swing is unorthodox, and so is his method for hitting the fade. The conventional way is to align the body left of target, aim the clubface at the target, and swing along the line of the body. Trevino follows the first two steps, but swings down the target line rather than with his body. The deviation actually produces a swing path that’s inside-to-out relative to the body, and directly down the target line. Trevino produces the left-to-right spin necessary for a fade by delaying the release (rolling over) of his hands through impact. According to Trevino, his routine produces more power than the traditional technique. He acknowledges that the ball will finish right of the target, but suggests simply lining up the body and clubface farther left to compensate.

Try Trevino's Unorthodox Power Fade Swing

Most players think of the swing as a circle. Trevino saw it as something different. Instead of folding his arms up after impact to remain on the circle, he chased his right shoulder toward the target to 
 the point where the club pointed straight down the line. He made this move with such force that it 
 looked like his right arm was going to rip straight out of its shoulder socket. It’s actually a move that most great ballstrikers have used over the decades.

Eventually, your left elbow must fold and get the club moving up the circle again, but try chasing down the line first, like Trevino did. I bet you’ll find yourself hitting the ball a little straighter and, if you can hold off your release just that much longer, creating a power fade. While the word “fade” has negative connotations for a chronic slicer, a controlled cut in the hands of a good player like Trevino leads to a Hall-of-Fame career, five Vardon Trophies and half a dozen major victories.

Johnny Miller - Lee Trevino signature chase move can help you hit it straighter | GOLF.com

"Inside out?" you might ask. "Doesn't that cause a draw?" Yes, it does, but only when your swing is inside out in relation to your target line. This swing is inside out in relation to the body alignment, but straight back to straight through in relation to the target line (see illustration). You won't draw the ball with this swing. If anything, you will contact the ball after the club has swung down and back to, the inside on the forward swing, thus putting a slight left to right spin on the ball .

So you have two big pluses here: First, you have an inside to outside attack in relation to your body. This is much more powerful than the outside-to inside swings that many amateurs use to fade the ball. Second, you have the club moving down the target line, producing either a straight ball or slight fade. You can't beat that combination.

Here's a trick that might help you understand this a little better. After you set up, imagine that there are three golf balls in front of the one you're about to hit. For the fade, you want to hit through all four balls. This will force your right shoulder down rather than around on the downswing, with your arms extending toward the target on the follow through. Keep in mind that the right shoulder doesn't dip. That would cause fat shots. Instead, the shoulder simply swivels underneath the chin. As a result, you will hold your release, keep the club moving down the target line, and push the ball to the hole, with very little sidespin.

I have, however, encountered one "problem" among people who have tried this method. They say to me, "Lee, when I swing your way, I hit the ball way to the right. I just tell them, "Aim farther left.” Don't open your stance more; just shift your entire orientation to the left. In other words, rather than aim the clubface down the fairway or at the pin, aim it at an intermediate target more to the left and shift your body alignment farther to the left as well. There's no rule that says you have to aim down the middle. Line up for the trees on the left and push it down the fairway. It's easy, when you know for sure that you can hit the push/fade.

The beauty of the balls in a line image is that you can use it to draw the ball, too. For the right to left shot, line up your body parallel to the target line and aim your clubface at an intermediate target to the right, to allow for the draw. Then, simply think of picking off the first ball in line, the real ball, without touching the three imaginary ones. This brings the right shoulder and club up quickly in the follow through, and whenever the club and shoulder move up, they go counterclockwise as well, which closes the clubface. Result: a draw.

You Can Learn to Hit My Fade - Lee Trevino - Golf Magazine - Dec 1979

Monday, January 14, 2013

Take an Inside Path

We've all heard time and again that we need to swing inside-out, and there is no shortage of drills and instruction out there designed to help us do just that. But like most things in golf, there's usually a huge difference between what we THINK we're doing and what we're ACTUALLY doing during our facsimiles of a swing. Often when we try hard to follow the target or aim line with the club, we end up unintentionally swinging over the top (OTT). That might be okay if you're trying to hit a fade or slice, but this isn't preferable or as powerful as swinging from the inside and hitting a draw.

I've written about swinging inside-out numerous times (including Ernie Els' clever "keep the box" thought)--a move that produces an inside path to the ball, which is one half of the equation to hitting a hook or draw. The other half of the equation is that the club face at impact must be closed to the path to some degree. Too much club face closure relative to the club face path and the ball will hook wildly or pull-hook. We've been told to swing to right field, swing towards one o'clock, hit the inside-left of the ball, etc. I've tried all of these and they've all worked and then later failed me in one way or another, and I believe that's because I was still making an unintentional OTT move by being fixated on the target or aim line and fixated on getting the club head back to the ball with respect to the target line.

I think it might be best to occasionally drill what a REAL inside path to the ball feels like. One should start with imagination: imagine a half semi-circle behind the ball. The smaller the club, the tighter that circle should be if attempting to hit the inside. Now, how can one swing inside WITHOUT trying to steer the arms through impact, which relies on timing and small muscles too much? In other words, how can you make an inside swing using--mostly--the big muscles in the lower body to drive the swing?

I don't think I've seen a better description lately than Martin Hall's drill/feel for hitting inside-out (video below). At address, imagine there's a large tent stake that's about waist high, inline with your rear foot, and about three feet away from you. Your first thought coming down should be to use your club as a hammer to hit that stake before rotating down. This will shallow the swing path to inside-out instead of the steeper outside-in move.

Another thought is to feel like the butt end of the club handle (and thus the entire club) is pointing out to right field shortly after starting down (back is still turned at this point and hands and wrists remain passive). But avoid the impulse to throw the club head at the ball from the top. When the club reaches near parallel to the ground and the hands are located close to belt level, the shoulders and the end of the club handle (and thus the whole club) will be pointing out to the right and appear to be pointing at the inside left of the ball or inside the target line. The right elbow will have dropped in close to the right hip and the right wrist can dorsiflex (bend back) even further (right palm facing the ground) to keep the end of the club pointing off to the right and on plane. Keep the club and shoulders pointing this way for as long as gravity and centrifugal force will allow. You may notice that the weight shift driving all this is naturally moving the way many teaching professionals (such Hank Haney and David Leadbetter) describe: The weight shifts first into the left big toe and then around to the outside of the left foot. The reason is that the weight of the club and arms are moving in this direction initially!

The club head will "fall" (creating the appearance of a loop) and be located well behind you at this point--NOT pointing at the target line, which would be an OTT move. This swing thought solves several problems. For one, it helps ensure an inside approach to the ball, which is essential for hitting a draw and avoiding a slice. It also ensures that lag is retained because of how late the butt end of the club is still pointing out to the right; as a matter of fact, lagging the club and swinging inside-out are closely related, just as casting and swinging OTT are closely related. The club head shouldn't just lag behind the hands relative to the target line; it should ALSO lag behind the hands relative to right field (lags behind the hands and also behind the body for a time). Finally, it flattens a steep swing and should therefore lessen fat shots.

In order for the club to return to that lined-up position at address, it must approach the ball on the downswing on an inside-out path. In fact, the proper swing path will cause the club to strike the inside quarter of the ball.

“On line” and “target line” are not the same. If you could take a string and attach it to the inside quarter of the ball on one end and to the butt of the club at the top of the backswing, then keep the butt of the club sliding straight down that string on the downswing, the swing would be “on line.”

Swinging Inside-Out - Golf Instruction

So, the question is, “How do you get the club to the inside and in the ‘slot’ on the downswing?”

There are many ways to feel this. One of the most popular thoughts is the clock image. Feel like you are swinging the club from 7 o’clock to 1 o’clock. Some golfers need a body thought to get the club to the inside on the downswing. If this is you, you might want to think of getting your right elbow close to your right hip on the downswing. Too simple, you say.

Other golfers need to focus on the ball. If this is you, try to hit the inside edge of the ball at impact.

A good thought for you might be to keep your back to your target and swing your arms down to the inside. Just try to avoid starting your down with your shoulders and upper body as this will throw the club down on a steep and outside path.

For those of you who are very athletic and have strong legs, a good thought would be to move your weight to your front leg during the transition. This will allow the arms and club to fall down to the inside on the forward swing. Other people can relate to the butt end of the club. These people seem to gain distance (maybe 10 to 15 yards) simply by feeling the butt end of the club being pulled down at the ball. In any case, this seems to get the club on a good inside path.

Speed is another issue. If you have a fast change of direction it is called “hitting from the top.” If you are too fast during your transition, your club will never come down in the proper inside-outside approach angle. A good thought for you might be “slow at the top.’’

Jim Suttie: Better golf through an inside path

You may be hitting the outside of the ball at impact, imparting left to right spin. To correct this, you need to hit the inside of the ball at impact instead. To help you achieve this position, have the butt end of the club pointing inside the ball-target line as you swing your arms down. This will help you hit the inside of the ball.

Looking to get more power on your golf swing? Here's how - WorldGolf.com

Downswing Drops in the Slot with Right Palm Down

As the downswing starts, the right arm and shoulder simply drop straight down as the feet press firmly into the ground and the knees make a slight lateral shift. There is no body turn at this stage the right arm cant drop straight down if the chest starts turning.

This straight down drop is what stores the lag angle at right elbow and right wrist as the club drops on plane into the slot half way down. The secret at this stage of the swing is to feel the pressure against the right hand trigger finger as the right palm faces down at waist-high. From the top of the backswing it feels like hitting your right thigh with the heel of your right hand while your right wrist stays bent all the way back.

At this waist-high downswing position of the hands, the butt of the club should point at the golf ball, toe of club points upward (but not quite straight up) and right palm is facing the ground, or more technically faces the ball on the ground.

Right Wrist Action for the Perfect Golf Swing | Herman Williams Golf Instruction


Thursday, January 3, 2013

Get Off Your Right Side!

One of a golfer's biggest potential errors is to get lazy and fail to shift or transfer the weight FULLY to the left foot before starting down. We all know we're supposed to do it--bump to the left and then rotate. Sometimes we think we're doing it when we really aren't. Some can get part way over at impact but not far enough; the weight ends up, maybe, in the center of the stance to the inside of the left foot at impact. Maybe it stays more on the right foot than imagined. Usually, it's because we're working on some other part of the swing and become distracted from this absolute essential fundamental. All sorts of wayward shots result, including slices and fat shots.

The reverse pivot is the other golf weight shift evil that's far worse than failing to get fully to the left; these folks (fortunately not my problem) do it all backwards; they shift their weight left on the backswing and then right on the downswing, all the while thinking they're doing it correctly. You'll know them by the way the lose their balance and fall backward at impact, with more weight on the right foot at the finish than at address. Sometimes you'll even see them take a step backwards with the left leg!

To get an idea of what "correct" feels like, use Shawn Clement's One Leg Drill to exaggerate the feeling of pivoting in a centered fashion and being firmly onto the left side to begin the downswing. At impact, most of the weight should be on the left foot. This is what is often called "hitting into a firm left side or left leg." Shawn calls it "bracing one's tilt against a firm left side." The inside of the right leg and foot should be the pivot point for a centralized backswing (with most weight movement to the right provided by the arms and club only--not a conscious shifting of body weight to the right), and the left foot and leg should be the pivot point for the downswing! The right leg's main function at impact is to ensure the tilted upper body doesn't fall over while mostly supported by the left leg. So, a key part of a great forward weight transfer is ensuring that you don't move too far off the ball to begin with! Make a centralized turn (you shouldn't move more than an inch of so off the ball during the backswing weight "shift." (really more of a turn than a shift) All sorts of GREAT shots result when getting off the right side by impact, such as power, slight draws, easier fades (with the right stance and grip adjustments), low shots played further back in the stance, hitting down, crisp contact, lower ball flights, great wedges, etc. The finish will be fully over the left side, with the weight concentrated toward the outside of the left foot, like it's supposed to be.

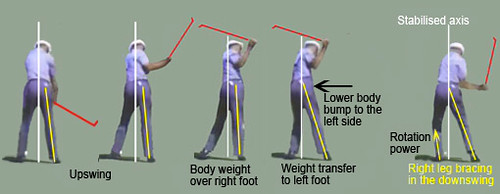
Shift before coming down!
Notice frame 5 - shift before arms come down!


Other drills to instill this feeling include Gary Player's "hit and take a step after impact" drill and completely lifting the right foot off the ground at the finish while remaining balanced on the left foot. Either of these makes the point that the right leg should have minimal involvement in supporting the body weight at impact and beyond.

Here's another feel to get the point of shifting into a solid left leg and stable left foot: When bumping the left hip targetward, act as if the left foot becomes firmly planted onto the flat surface of a foot stool and that the next act has one stepping up by straightening the left leg while rotating to put something on a shelf behind and above oneself. All of this should be happening while the arms are still at the top or nearly there! Don't start down with the arms before planting into that left leg, because that left leg is the power engine for the arms to accelerate from the ground up! Get the feeing that your hands and arms are lazy and kind of pause at the top (with the back turned), while you shift firmly into the left leg. In reality, the club head will keep going for a second and set at the top while you shift. The head should stay tilted back behind the ball.

Bump and fire!
Shift into left leg then fire!


Characteristics of a proper weight transfer during the downswing: The weight shifts linearly (targetward) into the MIDDLE of the left foot, BEFORE opening the shoulders and starting down with the arms and club. As the left hip bumps towards the target, there's a distinct, solid feeling in left hip and bent left knee, as the weight settles into the left leg (again, before starting down with the club), though the upper body is tilted away from the target. The bent left knee will shift from pointing behind the ball to pointing ahead of it, automatically. The right knee will fold in (again, linearly) behind the left knee, automatically. When the weight first transfers quickly to the left foot, the left knee is bent but gradually straightens as the left hip gradually rotates backwards and upwards during the remaining downswing motions (the left hip rotates upwards because the left knee straightens). This move is NOT abrupt or "stomping" in nature; it's a very smooth but rapid transition into the left foot (almost a pressing down feeling) that gets the weight left. At impact, there's practically no weight on the right foot. The weight will be firmly in the middle of the left foot at impact and will gradually roll to the outside of the foot at the finish.

The weight transfers in the swing purely due to the motion in the arms hands and club as they travel away from the target. Think of it this way – if I swing my arms, which each weigh 15 lbs, and a club in my backswing you can be sure that I am transferring weight onto my back foot. There is however no conscious shifting or body move that gets the weight over there.

There is no lateral body move, yet many players often wrote or spoke about a sense of weight transfer. The body stays centered while the weight is transferred by the motion in the arms and the club. Video HERE

All the best ball strikers studied displayed a tendency to transfer the weight to the front foot in a smooth and continuous flow with no backing up or slowing of the transfer...This meant that they arrived at impact with an 80/20 split favoring the front foot and the weight continued to move smoothly over to the front side beyond impact.

The tendency with higher handicap golfers (above 18) was for the weight to get too far back and then remain there all the way through impact. It was not unusual to see one of these golfers have a split of 70/30 favoring the back foot at impact.


The hips play a very important role in the golf swing. The problem is that most people do not understand the correct motion that they must make. The correct move is NOT a simple turn of the hips from the top of the swing, as many would believe.

In fact, the correct move is a slight lateral shift, or "bump", and then a turn. If you look at players like Tiger Woods and Nick Faldo, you will see a perfect example of this. These guys don't just turn their hips away from the top. Instead, their weight shifts laterally to the left side, which drops everything (arms and shoulders) into the slot. From there, they can just turn and fire through the ball as hard as they want.

Golf Tips - Hip Movement During the Swing

Secondly, good ball-strikers make a full weight transfer to the left as they complete their swing. You can't finish low if you hang back on your right side. Proof of the weight shift is your right heel.

If you've turned your hips aggressively and moved to your left side through impact, your right heel should be off the ground and closer to the target than your right toe.

Stay Low After Impact - Butch Harmon

Start the downswing by stepping down on your left heel and letting your left hip move slightly toward the target. As your lower body starts to move, pull your hands down, keeping your right elbow close to your right hip as long as possible.

Take our advice: Put your golf slice in the past

This “bump then fire” action, which is present in the techniques of many elite players, requires considerable discipline in ensuring that the weight transfer is properly executed before commencing the downswing rotation.

Understanding golf swing weight shift