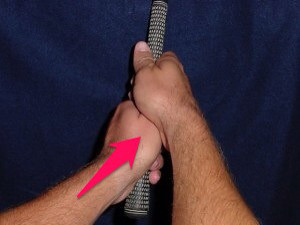
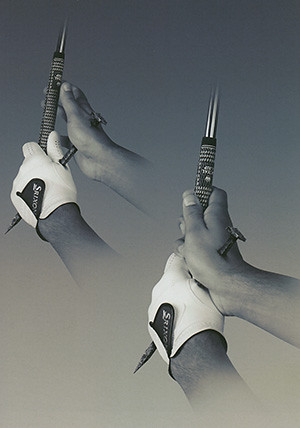
The left wrist should be flat at impact (assuming a right-handed golfer). That seems to be a universal point of agreement among most teaching professionals, regardless of what else upon which they disagree (and disagree they do). The converse of the flat left wrist (FLW) at impact is a corresponding dorsiflexed or hinged right wrist at impact; the two are inseparably linked, thus you can't have one without the other. Given these near universally accepted tenets of golf, if you study long enough you will find teachers that relate the position and loft of the clubface to the back of the left hand (Hank Haney), or you will similarly find teachers that take the opposite approach and match the clubface to the palm of the right hand (David Leadbetter). Either is correct as they have an inverse relationship. And either can help the golfer be aware of the loft of club (i.e., how delofted) and the direction of the club (i.e., whether pointed left, straight ahead, or right) at impact. If you're a right-handed player, you may find it easier to relate the club face position and loft to your right palm, but you've got to do it the right way.
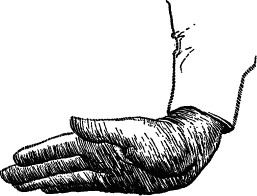 |
| Dorsiflexed RW, palm down. |
There are numerous posts on the use of the wrists on this blog. But it's a good idea to revisit accepted fundamentals from time-to-time with a fresh look. In this post, I'm going to examine using the dorsiflexed right wrist and right palm to add power and direction in the downswing, without flipping at impact.
First, all the grip and downswing fundamentals (using the appropriate grip pressure points and arm-chest pressure points) apply. I've posted about this right palm-right wrist concept before. The right palm should begin rotating down towards the ground in the downswing when the club is about parallel to the ground; the right elbow maintains the bend established at the top of the backswing as this is happening. I think the way it's sometimes presented can be confusing, especially for golfers who utilize PP #4 (upper left arm pressed against the left chest). It can be an active or passive process, but I'm going to focus on using it somewhat passively. The grip pressure points in particular allow one to maintain awareness of club face position and lag pressure throughout the swing.
What is this? We all know that the right wrist dorsiflexes on the backswing into a position that looks similar to holding a tray of pizza or dishes at the top of the backswing. At least that's how it has been described. This is where many reputable teachers disagree; some want you to have a FLW at the top (or even on the way there), while others want you to have a slight cup in the left wrist at the top. I think that it's during the transition to the downswing when a good player will often max out this slightly dorsiflexed postion of the right wrist, producing the tray position and a FLW. Most weekend golfers would be better off forgoing the vertical wrist cock on the backswing (taught by many great instructors) and instead focus on just hinging the right wrist backwards (thereby insuring a FLW at the top). Another way to think of this is that the heel of the right hand comes into the ball first, not the right palm! The right palm is trailing the heel of the right hand and the right palm is facing the ground.
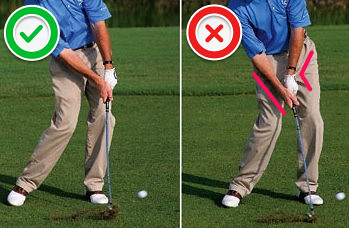 |
| Correct and Flip Wrist Actions. |
Regardless of whether you achieve a FLW at the top or during the transition (or later), I think a loose right wrist is essential in allowing the weight of the club to maximize the dorsiflexed right wrist angle in the transition and downswing. You can try to hold the wrist angle (as I once tried to do when first learning of this fundamental), but you'll likely find your shots heading right (unless you compensate somehow).
However, holding the angle is a good way to learn the position and the feeling of the hands-first-clubhead-second necessity, and you can start by just hitting chip shots this way, ensuring you have a FLW and dorsiflexed right wrist (DRW) at impact; you will find that your chip shots will be very crisp, and if you're remotely curious, you'll ask yourself how you can have that same crisp feeling in your full swing shots. You can! When chipping this way, I allow the weight of the club to set my right wrist, and then I hold it coming through. I can feel PP #1 and PP #3 working, sensing lag. I even feel PP #2 in the pinky and ring fingers of my left hand as they resist the breaking down of the left wrist. PP #1, 2, and 3 really work to maintain and feel this lagged position. Boom! A solid, compressed chip shot. Going back and hitting chips like this is a great tool for regaining the correct impact feel in the full swing, if you find yourself suddenly losing it.
But I don't want to consciously hold that angle (DRW) in a full swing, because it will slow down the momentum and deter the continued closing of the club face. The kicker is that you can feel the weight of the club set the right wrist at the top, when the club is still going back, and that's a signal for your brain to start the transition. You can then deliver the DRW at impact without having to forcefully hold it as in the chip example above. One must fight the urge to flip at impact, and again, the simple chip can help you learn to fight this; the correct way is to release the DRW well past impact (it's actually more of a right palm over rotation, where the club shaft and right arm form a straight line point at the ground). But the ball is long gone by this point, and the term "flip" is irrelevant by then (you can't flip at something that isn't there); if your left wrist cups late in the followthrough, don't obsess about it--you want it flat at impact and just beyond. Another swing thought or feel to use is that you're collecting the ball with a DRW (heel and palm of the right hand) by first contacting the inside portion of the ball and then slinging it out towards the target during the release!
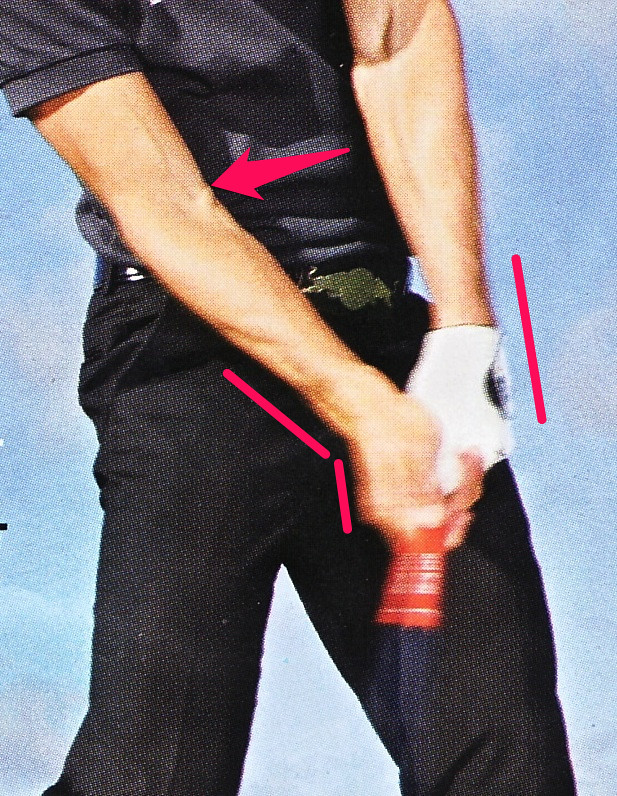 |
| Antecubital and right palm face right field. |
This fundamental has been described in many ways. But let's go back to the tray at the top analogy. You want to take that tray and dump its contents on the floor in front of the ball! So on the downswing, you come into the inside portion of the ball with the right palm rotated downward and bent back on itself. The more bent back, the more your selected club is delofted. Likewise, assuming an inside-out path, if the palm is aiming is initially aiming right and closing at separation, you will get a push-draw. So you can see that there are numerous combinations of side-to-side and up-down motion of the palm that can produce a variety of shot trajectories and starting directions.
Now another important facet of this concerns the right elbow--specifically the opposite side of the right elbow or the inside-bending part known as the antecubital fossa. The interior bending part of the right elbow should actually face, along with the right palm, towards right field at impact (while still slightly bent), whereas an illusion is that it faces the target line. In other words, the right elbow itself should be rougly pointed directly AWAY from the target at impact, not directly at the right hip. And it's important to note that the still bent right elbow rides near or against the right hip rotating into the impact area and then quickly shoots past the right hip in the release.
So, let's put this altogether. At address, focus on the correct grip pressure points. Keep a loose right wrist (almost floppy feeling) and swing to the top. Let the weight of the club set the wrist into a dorsiflexed position at the top, with a corresponding flat left wrist. Coming down, begin rotating your right palm down to the ground WHILE SIMULTANEOUSLY increasing the dorsiflex in the right wrist (PP #1 feels as if it's increasing--pushing into the left thumb joint), as the still bent right elbow gets close to the right side. This must all be timed with the rotation of the body and while feeling connected, with the left arm pinched against the chest (PP #4). At impact, the DRW collects the inside portion of the ball and begins to release forwards (straightening) and turn over (rotating palm slightly down). Your right antecubital fossa should face out to the right at impact, while still remaining slightly bent (it straightens fully in the release slightly out to the right).
Get used to the feeling of that right wrist passing in front of you still bent backwards a bit. Then start putting with that motion through the ball. Then chipping, then pitching, and finally your full swing with that same bend in your right wrist. It might take a while to get this down, but the effort you put into it will pay off handsomely.
The Recreational Golfer™: Your Wrists at Impact
Your hands at this point will be slightly ahead of the ball, slightly--not leaning way over [but] just a slight bit [ahead], and the right wrist is bent back or "cocked." [actually hinged or dorsiflexed] One way to think about this is to push the pad of your right thumb down onto the knuckle of your left thumb. This will bend the right wrist. Or push the wrist bent.
Here's an Easy Golf Swing Lesson That Will Give You Huge Results
The Answer: What I did next changed my swing immediately. I let all the tension go in my right wrist, so when I took the club back, it set back on itself naturally. I felt a lot of pressure in my trigger finger of my right hand, so I know I was on to something. Before I could never feel that.
What I Did (Drill): I kept the fingers in my right hand very relaxed, and focused on a slight pulling motion. But the key was to pull down with the big fleshy pad under my right thumb, which helped retain the wrist cock in my right wrist. Following me?
What’s important here, is to feel your right hand bent back on itself, and staying there as you pull down. This is called “retaining lag”, and is a must if you want to hit the ball a long way.
Believe it or not, in the pictures below, you might not be able to see it, but my right hand feels and looks right on top of the shaft, with the palm literally facing the ground.
The second picture at impact, I feel like I’m smothering the ball with my right hand. That’s the feeling you need to get to compress the ball squarely, and achieve the nirvana of smashing that golf ball!
Golf Swing Release Drills - Watch This Video
Train the forearms to cross to show the ball who’s the boss immediately after impact. This is known as the release interval and the right palm (for right-handed golfers) should be facing the ground to multiply the power to the punch.
The function of the hands in the golf swing
Then, during your downswing, rotate your right palm toward the ground through the impact zone, to square the face. It's a counterclockwise rotation of your right hand. If you practice turning your palm through impact, not only will you lose your slice -- you'll be able to hit a draw, cut, or straight ball, at will. You'll be dangerous!
Johnny Miller: My No. 1s - GOLF.com
When your right hand reaches waist height, try to face your right palm toward the ground. At impact, you should feel like your right palm is facing the ground as well. David Leadbetter said the right palm mirrors the clubface. So by squaring up your right palm, you will be able to square your clubface. Some players have stronger grip, so your right palm doesn't exactly mirrors [sic] the clubface. But it's close. It's a good idea to use your right palm to control your clubface.
The Tips to Fix a Slice: Use Your Right Palm | Golf Tips & Lessons
The position of the right hand not only dictates the direction of the ball, but also the trajectory of the shot. Using the right hand as the controller again, make the palm face up at impact. Not only does this aim the club right but also adds loft to the club (see photo 4). This will allow you to hit a higher trajectory shot if the situation calls for it. Now, take the controller (palm) and face it downward, this de-lofts the club and causes the ball to come off the face much lower than its intended trajectory. The placement of the right palm at impact also affects the spin of the ball once it hits the green. A palm that is looking downward at impact is prone to have less backspin on the ball which means that it will roll out further onto the green. With the palm in an upward position at impact the ball will have more backspin which means less roll and more stop.
Princeton - Control The Ball With Your Palm - Chad Darby, PGA - The Turn Golf Magazine
Through impact, the hands lead a trailing clubhead. That delofts the clubface and makes it possible to hit down on the ball and squash it against the face. If you've ever wondered how good iron players make their shots bore through the air, this is it. Every effective iron player maintains the semi-cocked position in the right wrist through impact, the right palm facing down. Every bad ball-striker has the palm up. As I said only half-jokingly on a telecast last summer, if you want to be a terrible iron player and avoid getting to single digits, just flip that right wrist so the clubhead scoops and passes your hands.
Johnny Miller: 10 rules for sticking your irons: Golf Digest
A lot of people will talk about the #1 Power Accumulator (the folding and then straightening of the right arm) as like a boxer throwing a punch. The arm certainly moves in that type of motion. However, the HAND and the WRIST does not because in the boxing punch the wrist flattens. In the golf swing, the right wrist should be bent at impact.
3Jack Golf Blog: Hitting Revelations, Part II
Next, get your right hip and club driving TOGETHER to and through the ball towards the target. ALL GREAT PLAYERS unwind this way. Most will get a FEEL of the hip and the club head working and driving together IMMEDIATELY from back swing into the down swing.
The best way to describe the right arm on the downswing is that it should be “pushing down and out.”
“Pushing down” allows the right arm to actively straighten while maintaining its bend in the right wrist.
“Out” is the second half of the equation as it directs the right arm to deliver the club head from the inside. Most players need to feel as if they are driving the right arm not only “down,” but “out.” I often times describe this feeling as if the right arm is being directed more towards right field.

